Using TrueCrypt Encryption for large scale data transport
What is TrueCrypt? When would it be used?
TrueCrypt is an open source third party encryption application designed for creating encrypted file storage containers, encrypting removable disks as well as providing full disk encryption of entire disks, including boot drives. The software has been freely available since the early 2000’s, with development halting in 2014 due to the wide scale availability of BitLocker. While no longer actively developed, other open source developers have continued enhancing the base TrueCrypt program into different versions, known as forks, such as VeraCrypt.
Supporting AES-256 bit encryption, the gold standard of data encryption at the time of the creation of this article, the data secured by TrueCrypt is virtually impossible to crack and any data secured by it without the appropriate keys to decrypt it is as good as lost. Due to the combined ease of use, open source nature and extremely powerful encryption, Tangent had adopted TrueCrypt for data encryption of bulk data back in the late 2000’s and continues to use the last fully functional original build of it for extra security when transporting large quantities of data today, including already encrypted data.
Attempting to move very large scale amounts of data, especially in excess of hundreds of gigabytes and above, can be very inefficient for many organizations, particularly those with limited upload bandwidth. In situations where large scale data movement must be performed and protected, Tangent can provide large hard drives that are encrypted via TrueCrypt along with USB disk enclosures to attach to computers that can access the desired data.
Common examples include:
Providing an exported copy of an on-premises virtual DataCove for migration to a Tangent Cloud Hosted DataCove, rather than migrating the data over the open internet.
Providing a copy of an on-premises physical DataCove’s remote backup, for restoration onto a Tangent Cloud Hosted DataCove, rather than shipping the physical DataCove to Tangent for migration.
Large scale historical data uploads, such as PST, EML or Exchange Crawler output, to a Cloud Hosted DataCove while working with a limited uplink at the client site.
Tangent creating an exported copy of a Cloud Hosted virtual machine for point-in-time backup storage at a client site.
In such situations, Tangent can provide a pre-encrypted disk that only Tangent knows the decryption key of, which would be shared with the client site once they have successfully received the disk via regular logistic carriers like United Parcel Service (UPS) or Federal Express (FedEx). By dividing the decryption key and the physical medium, the loss, interception or compromise of either does not allow anyone to successfully access or read the data contained on the disk, thereby compensating for the occasional losses such carriers incur and negating the need for expensive “hand carries” of sensitive data.
The below guide will provide a walkthrough of how to obtain the TrueCrypt client from Tangent, installation of the software and using the client to perform protected data transfers.
Downloading the TrueCrypt Client
Acquisition of the TrueCrypt client is best handled via Tangent’s FTP Server and not from various online mirrors, due to the potential risks of malevolent code injections in the now-discontinued software. In order to access the Tangent FTP, an FTP client such as FileZilla or BitVise must be used. Most web browsers will not longer operate with the FTP protocol and it is not recommended to use legacy browsers to do so.
For the purposes of this article, FileZilla will be used.
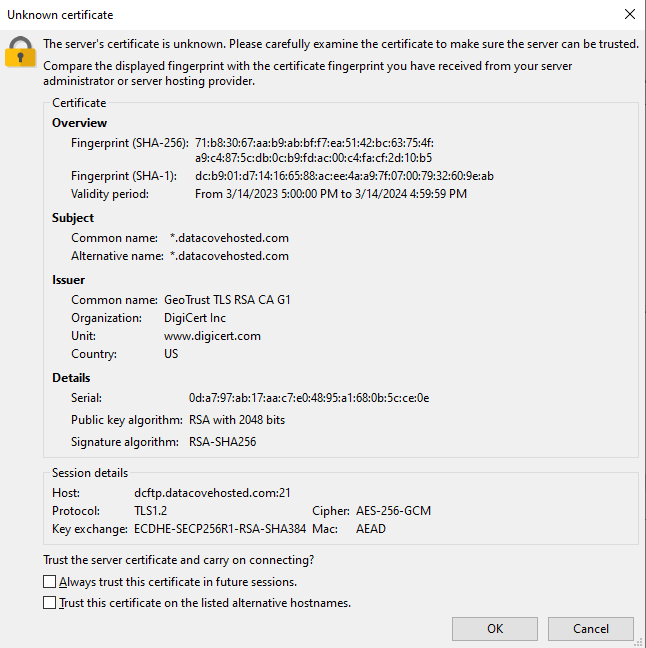
Begin by launching the FTP client and connecting to “DCFTP.DatacoveHosted.Com” over the FTP protocol, using TCP Port 21.
An SSL Certificate challenge may be received when connecting; this is normal and should present a valid Certificate for use. In the event of an invalid Certificate or one not reflecting Datacovehosted.com as the domain, verify that the correct address was typed in and if the issue persists, contact Tangent Support.
Once past the Certificate challenge, locate the TrueCrypt Setup 7.1a.exe file on the FTP Server and right click the file.
Select Download to begin receiving a copy to the local computer in a directory chosen on the left hand side pane of the FTP client.

With the TrueCrypt installer now downloaded, the setup procedure must be run to prepare it for use. This is covered in the next section.
Installing the TrueCrypt Client
Installing the TrueCrypt software is a very rapid process and largely a “next-next-finish” affair without any need to select non-default options.
Begin by locating the downloaded installer program and double click the installer to initiate the setup routine.

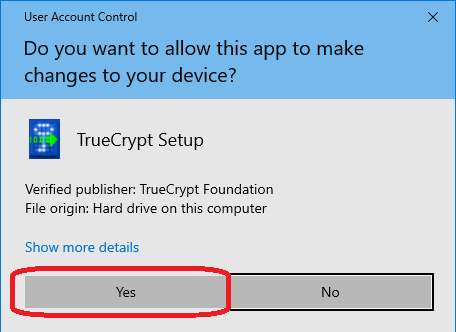
Depending on the workstation’s security settings, a User Access Control (UAC) prompt may appear.
If it does, select Yes.
Review the TrueCrypt End User License Agreement (EULA) page and, if satisfactory, check the “I accept the license terms” box.
Select Next to continue.

Select Install for the installation method, then click Next.

The default installation directory and shortcut definitions are fine for most organizations, but these can be adjusted if needed.
Select Install to continue.

The installation for TrueCrypt will usually finish in under ten seconds, after which a prompt will appear indicating success.
Select OK on that prompt.

With TrueCrypt being open source software, the developer used to have a “Donate Now” function integrated with the installer, as is common amongst such freeware releases.
With that developer being largely defunct and the TrueCrypt software retired, this can be safely ignored.
Select Finish to complete the installation.

A prompt will appear post-installation inquiring if this is the first time TrueCrypt is being used. The tutorial can be viewed if desired, but is not necessary for the planned usage.
Select No to close out that prompt.

TrueCrypt is now installed and ready for use.
Attaching, Mounting and Decrypting a disk
With TrueCrypt now installed, the system is now ready for mounting a disk.
Gather the Tangent-provided hard drive and USB enclosure and mate the disk to the enclosure’s SATA interface securely.
Connect the enclosure’s AC adapter to an electrical outlet.
Connect the enclosure’s USB cable to both the enclosure and the computer running TrueCrypt.
Note: The USB port chosen for the connect should be a USB 3.0 or higher port. Using USB 2.0 or USB 1.1 ports will limit data transfer speeds significantly below what the disk is capable of.
With the disk and enclosure now connected, press the power button on the enclosure to energize the disk.
Within twenty seconds, Windows will detect the enclosure and begin the autoplay sequence, often seeing the disk as entirely blank and possibly prompting to format it.
Under no circumstances should this disk be formatted; this will wipe out the encryption and hidden partition configured on the disk and render the protections insolvent. If such a formatting prompt appears, select No on any attempt to format the disk via Windows.
Note: If by accident the disk is formatted in Windows, contact DataCove Support for assistance with re-encrypting the disk in the field.
Once the disk has initialized and is spinning, launch the TrueCrypt application from the Start Menu or desktop shortcut.
Select a drive letter that is currently unused on the workstation from the TrueCrypt Drive list, then click Select Device.

A new dialog box will spawn, inquiring which disk that the system has access to should be mounted.
Select the Tangent-provided disk, best identified by its enormous size in comparison to other disks in the system. The disk’s labeling will also provide an indication to its expected capacity.
Click OK.

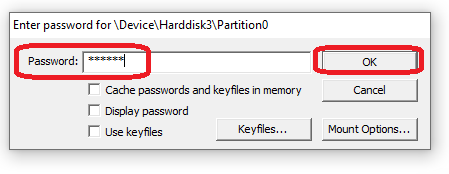
A password prompt will now appear.
Enter the Decryption Key provided by DataCove Support in this field, then select OK.
Within a moment, the decryption will finish and the disk will now be mounted at the specified drive letter.

Launch “This PC/My Computer” from the Start Menu’s search bar to find a list of disk volumes accessible on the workstation.
The newly mounted encryption disk should now appear and be usable.
All functionality of this disk will behave exactly as any other USB-connected storage device would, with one exception: dismounting of the disk. This is covered in the next section.

By navigating into the new disk, create a folder for the data to be transferred and begin copying over the data.
Once the data transfer is complete, do not power down or disconnect the disk. Follow the dismounting instructions in the next section.
Dismounting the Disk
After all necessary data has been copied over to the encrypted disk, a special dismount procedure is necessary to avoid damaging the encryption framing or any data contained within. Similar to the “ejection” function of USB connected storage devices like flash drives in Windows, TrueCrypt does not like a disk it may be reading or writing from to be randomly removed from it and doing so can risk corruption of the data.
To safely dismount a disk from TrueCrypt:
Wait until all reads and writes to that disk have completed.
Close any open Windows Explorer screens showing the contents of the encrypted disk.
Select the mounted disk from the Drive list within the TrueCrypt window.
Select the Dismount button at the bottom of the TrueCrypt window.
This procedure will safely dismount the disk from the system.

With the disk now dismounted in TrueCrypt, press the power button on the enclosure to power down the disk in the enclosure.
Note: It is not necessary to run Windows’ Safe Hardware Removal Wizard to dismount the USB enclosure, as no reads/writes will be taking place on that disk at this point.
Remove the disk from the enclosure and unplug the USB cable and AC adapter from their respective ports in preparation of shipment of the disk back to Tangent. This disk, its associated enclosure and accessories should now be carefully and individually repackaged as it was originally sent, with especial care given to padding around the hard drive. Please contact DataCove Support for final shipment instructions and return label.
This concludes the TrueCrypt Decryption article.