Using the DataCove Exchange Crawler to import historical emails
What is the Exchange Crawler and when would it be used?
Downloading and Installing the Exchange Crawler
Office 365 Crawling: Configuring the Azure Active Directory Enterprise Application
Local Exchange 2016+ Server Crawling: Configuring a Privileged Account
Configuring the Exchange Crawler
Running the Exchange Crawler
Troubleshooting Errors with Crawled Messages
Clearing Checkpoints for another Crawl
What is the Exchange Crawler and when would it be used?
DataCove’s Exchange Crawler is a standalone application that allows for individual mailboxes to have their contents imported into the DataCove via a scanning process known as “crawling.” This crawling process is akin to a user logging into the mailbox and reading every single email contained within, followed by making copies of those messages and sending them up to DataCove via SMTP, or copied to local storage as .EML files for mass upload to DataCove later.
Traditionally, the Exchange Crawler is used when a new DataCove is being deployed to create copies of all emails that exist in the environment prior to the Journaling function being activated. Journaling will capture all new emails being sent or received, but emails that had already been sent or received prior to Journaling’s activation will exist only in user mailboxes or mail server backups. Many organizations will have significant amounts of corporate memory locked away inside of those extant emails and will want to make them searchable as soon as possible.
It should be noted that using the Exchange Crawler for such historical email archival only captures the messages still contained within the users’ mailboxes, meaning that any messages they deleted would not be archived. From that perspective, the data garnered is very incomplete from a compliance point of view. Only after Journaling is activated should the formal period of compliance begin; the Exchange Crawler cannot “shortcut” that for organizations who haven’t started archiving yet due to the partial nature of such a crawl.
Messages being crawled can be limited by specific factors, such as only crawling emails sent or received within a range of dates, or all emails before or after a certain date. All users or individual users can be crawled, along with options for specifying different mailbox folders like Junk Email, Sent Items, Deleted Items, Recoverable Items and even the Archive Mailbox can be crawled or not crawled, as desired.
For example, by using date range based crawling, the Crawler can find and archive data that may have been missing due to an overfilled journaling mailbox, some sort of network lapse that prevented fetching of messages, an accidentally deactivated journaling rule or a myriad of other accidents that may occur. In such a situation, emails may not have been journaled or received properly, but the Exchange Crawler can retrieve some of those emails, perhaps most of them depending on how soon it is run, and get them routed to the DataCove for archiving, thus minimizing the gap and improving the likelihood of having the needed data in the future.
The Exchange Crawler also has a particularly valuable use case for being able to effectively work through very large mailboxes that have over 300,000 messages inside of them, as the POP and IMAP protocols tend to operate very slowly with mailboxes with lots of items in them. If exporting that mailbox to a .PST and uploading it to DataCove isn’t possible, the Crawler can get that data extremely effectively using its EWS protocol support.
The Exchange Crawler supports Microsoft Exchange 2003 to 2019 (and is expected to continue to support all newer releases afterwards), as well as Office 365. Different versions of Exchange require different configuration steps, with substantial differences being present in Exchange 2003, 2007-2010, 2013+ and Office 365. This article will cover the most likely versions of Exchange to be seen in the wild as of 2023.
For any versions of Exchange not covered that need the attention of the Crawler, please contact DataCove Support.
Downloading and Installing the Exchange Crawler
The first step in using the Exchange Crawler is planning where to deploy it, and much of that decision is predicated on where the mail server is located.
For Crawls that will be occurring on an On-Premises Exchange Server, the Crawler is best installed on the Exchange Server itself; this provides the fastest access to the data it’s trying to obtain. Having that data effectively local makes crawling significantly faster than having to make a remote connection to the system, as well as an Exchange Server normally being a pretty beefy machine in and of itself, offering resources that are not always available to mere workstations.
In terms of “load” to the Exchange Server, a Crawl is simply a user session that looks at a lot of email very quickly and then opens a session to another mailbox where it then speedreads all of the email contained inside. It is reasonable to consider the overhead this process adds to be equivalent to approximately 30 regular users checking their email.
Installing the Crawler on a regular workstation or another server that can communicate with the Exchange Server is also fine; this can throttle the process down to an equivalent overhead of about 15 users.
For Crawls that will be occurring on an Off-Premises Exchange Server, including Office 365’s Exchange Online, the Crawler can be installed on any workstation that can reach the Exchange Server or Exchange Online.
This workstation should be possess resources that allow for multithreaded workloads, including at least 4 cores on the processor and 16GB of RAM. Disk performance needs are negligible since the data is transient, but significant storage space may be required if caching the data for later upload to DataCove instead of immediate transmission. More on that below.
The workstation is best positioned as closely to the DataCove as possible in terms of network proximity, to best facilitate rapid transmission to it, and where possible, limiting transmission of the data over the WAN.
Lastly, the location where the Crawler is installed should either be able to communicate with DataCove over TCP Port 25 for SMTP (or TCP 465 for encrypted communication via ESMTP) or have a significant amount of storage space to locally store the crawled emails until they can be later uploaded to DataCove via network share. The Crawler’s standard methodology is to send emails directly to the DataCove as they are acquired, but in some air-gapped environments or other high security configurations, this may not be possible. In these situations, the Crawler will instead save a copy of the crawled email as a .EML file which can later be uploaded to DataCove.
The amount of space that may be needed for caching crawled emails in this manner varies greatly depending on number of users being crawled, the date range of the crawl, the amount of data they have in their mailbox and a few other factors, but as a safe measurement, quantify the storage needs as 1GB per user per month of data being crawled. If the workstation has access to a network share where it can write this data instead of holding it locally, that is also a good option rather than providing local storage to the workstation.
Once a desired location has been plotted for the Crawler, proceed with the below steps to download and install the Crawler.
To download the Exchange crawler, begin by opening a web browser and navigating to the DataCove system. Log in, then select Maintenance in the top header bar, then select Download Tools on the left hand side menu.
In the line of text, a link that leads towards the DataCove’s tool page is embedded in the “Visit this page” text.
Click that embedded link.

A new page will open that lists the latest builds of the various DataCove tools, such as the Outlook Connector and the Exchange Crawler.
Locate the Exchange Crawler and click the hyperlink to download a compressed .ZIP file containing the Crawler.

With the .ZIP file now downloaded, navigate to the folder it was downloaded into and right click the file to bring up the context menu, then select Extract All.

In the Extract Compressed (Zipped) Folders dialog box, ensure the “Show extracted files when complete” box is checked, then click Extract.

A new window will spawn showing the decompressed file contents.
Locate the TangentMSExchangeemailCrawlerSetup.MSI file and double click it to launch the installer.

The Installer will provide a wizard interface to guide installation sequence.
Select Next on the initial splash screen.

The End User License Agreement (EULA) page will appear. Please review this information carefully, as it governs the use of this tool separately from that of the DataCove system itself.
If the EULA terms are acceptable, select the I agree radio box, then click Next.

Select the installation folder for the Crawler. For most organizations, the default location is fine.
Select Next once configured.

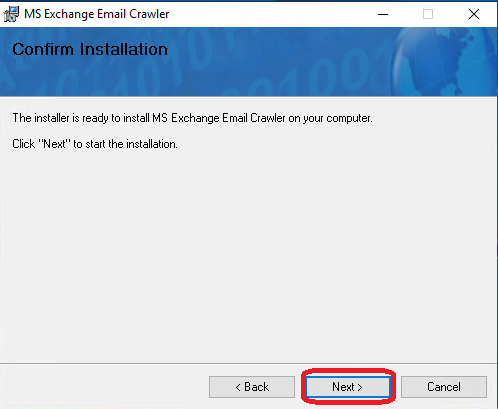
Once ready for install, the Crawler wizard will prompt for confirmation.
Select Next to continue.
If a User Access Control (UAC) prompt appears, select Yes.
If one does not appear, skip this step.

The Crawler will now install and will show a confirmation page once completed.
Click Close.

With the Crawler now installed and ready, proceed with the configuration steps for the Office 365 or Exchange server below.
Office 365 Crawling: Configuring the Azure Active Directory Enterprise Application
Office 365 crawling with DataCove requires the configuration of an advanced and privileged account that allows access to all Office 365 Exchange mailboxes. With the advent of OAuth and other more secure means of providing long term access to mailboxes, rather than the Application Impersonation role and username/password combination used in yesteryear, DataCove uses an Azure Active Directory Application Registration to create a “trusted application” that grants the access necessary.
This trusted application uses three mechanisms to authenticate the service using it:
A Client ID (individual identification of the Application and any special configurations it possesses).
A Tenant ID (individual identification of the organization on Microsoft’s Office 365 platform, ensuring the application points to your tenant).
A Secret (similar to an application password, this is the unique key for that application to be triggered).
This combination allows the Exchange Crawler application to talk to Office 365 and crawl user mailboxes for their email data. Guidance on creating and configuring the application can be found below.
Begin by opening a web browser and logging onto HTTPS://Admin.Microsoft.Com.
Log in with an administrative account and select Show All on the left hand side menu to expand the Admin Center viewable options.

Select the Azure Active Directory Admin Center.

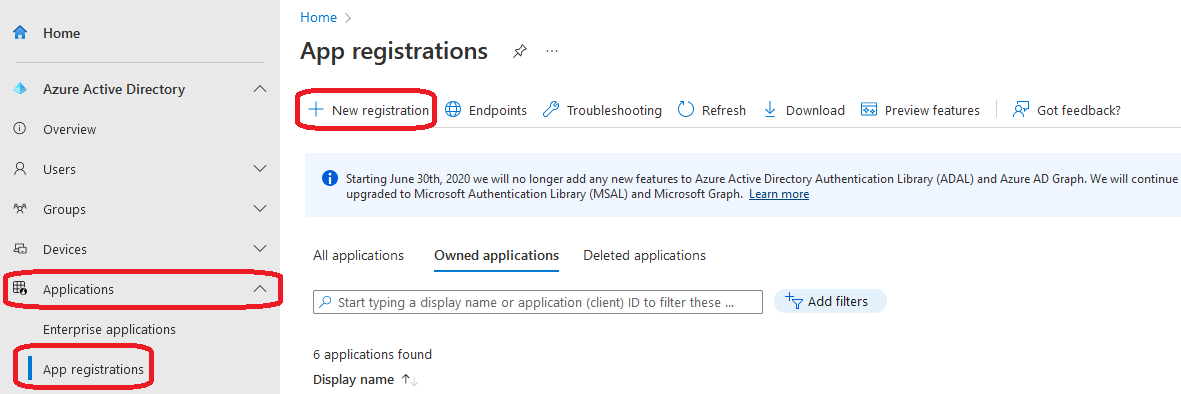
On the newly spawned tab for Azure Active Directory, select Applications on the left hand side menu, then App Registrations from the dropdown menu and finally select New Registration towards the top middle of the screen.
A new slide-in page will now spawn, inquiring for the name of the application and a few other parameters.
The name of the application can be whatever name would be easy to remember and recognizable in the future. A general recommendation is “DataCove Office 365 Mailbox Crawler” as that is very descriptive as to the application and its specific task and implied permissions.
Supported Account types should be bound to accounts within the Single Tenant Organizational Directory.
Redirect URI should be set for Public Client/Native with the this URI: https://login.microsoftonline.com/common/oauth2/nativeclient
Click Register once all fields have been populated.

In the upper right hand corner of the screen, a successful Create Application popup will appear referencing the name of the newly created application.
On the new Application page that AAD will redirect to post-creation, select Manifest on the left hand side menu.

In the XML content pane, locate the ‘requiredResourceAccess’ property in the manifest (note that scrolling down may be required) and add the following language inside the square brackets ([]), then click Save.
,{
"resourceAppId": "00000002-0000-0ff1-ce00-000000000000",
"resourceAccess": [
{
"id": "dc890d15-9560-4a4c-9b7f-a736ec74ec40",
"type": "Role"
}
]
}
Note: Some browsers may interpret the double quotes in the above code to be a different type of “curly” double quote that isn’t allowed in JSON files. If the Manifest file does not allow you to save, delete the double quotation marks on all of the entries and retype them. An example of what an incorrect “curly” double quote looks like is below.

Note: Careful placement of these code additions is necessary; please carefully review the Before and After images below for placement verification.
Before:

After:

A small popup confirmation in the upper right hand corner will appear if the Save is successful on the newly edited application.

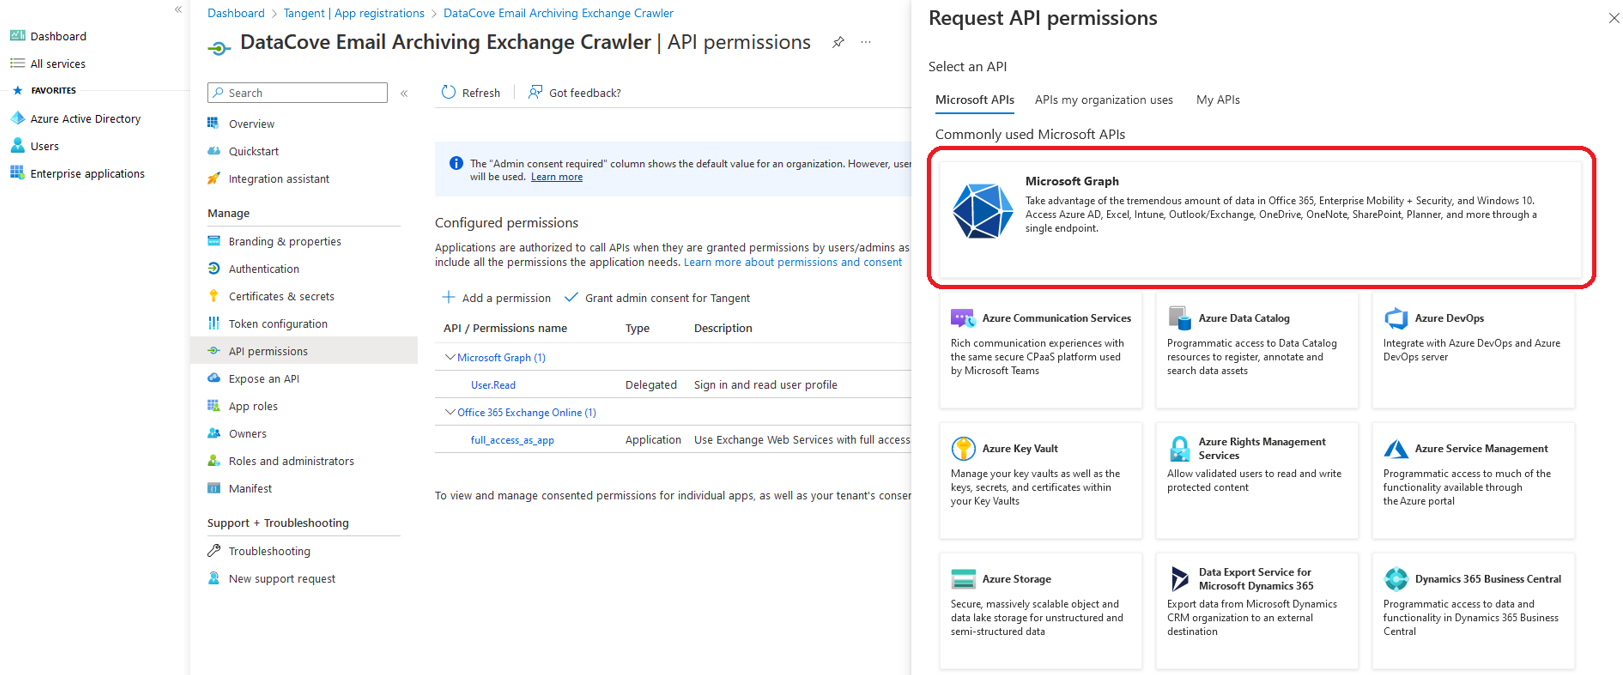
Next, select API Permissions on the left hand side menu and click Add A Permission.

On the slide-in tab page, select Microsoft Graph from the Microsoft API list.
Microsoft Graph will inquire which type of permission your application requires, and offers the choice between Delegated Permissions and Application Permissions. Choose Application Permissions.
Using the Select Permissions Search Bar, type the word “directory” and select ‘Directory.Read.All’, then click Add Permission.

The Application page will now reflect back with the new permission added.

Next, select “Grant Admin Consent” and select Yes on the verification popup.
This empowers the application for the wide ranging access it needs to read all mailboxes.
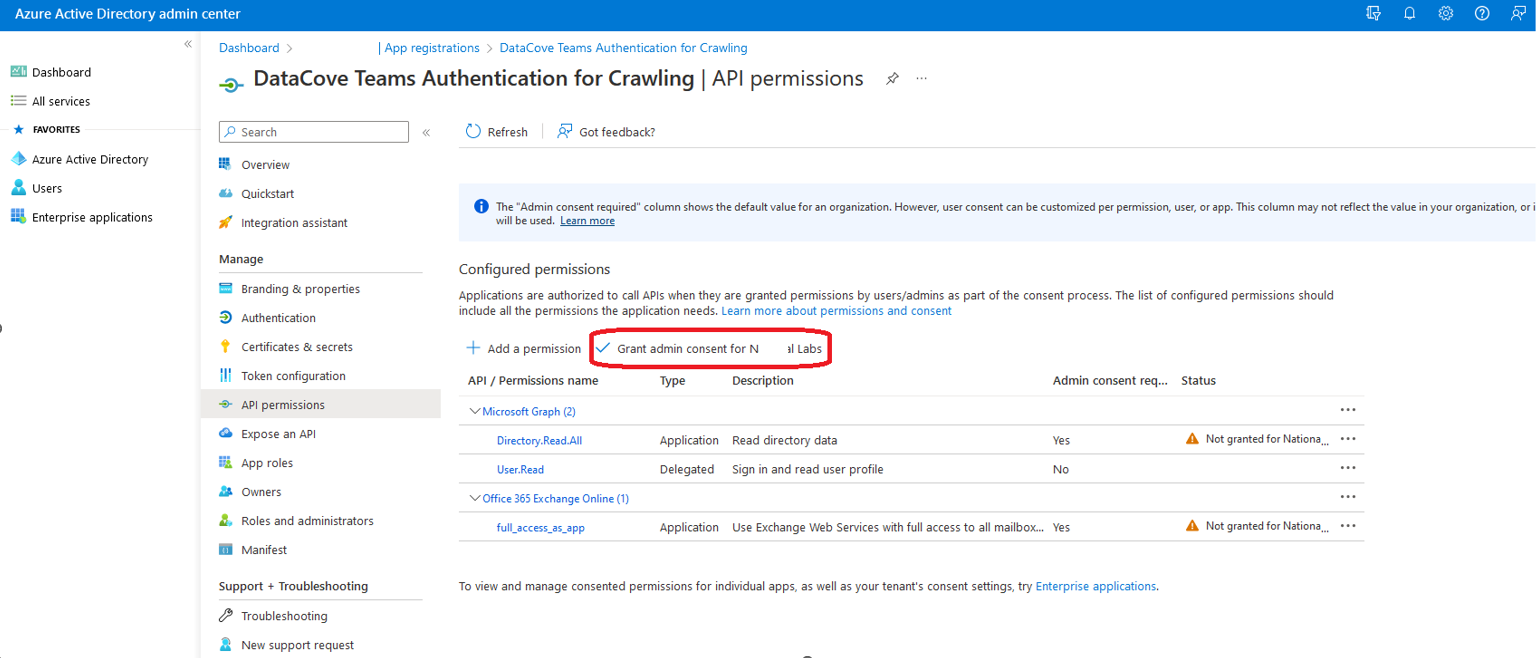

A small Consent successful box will popup in the top right hand part of the screen.

The application page should now reflect back with full read and administrative permissions.

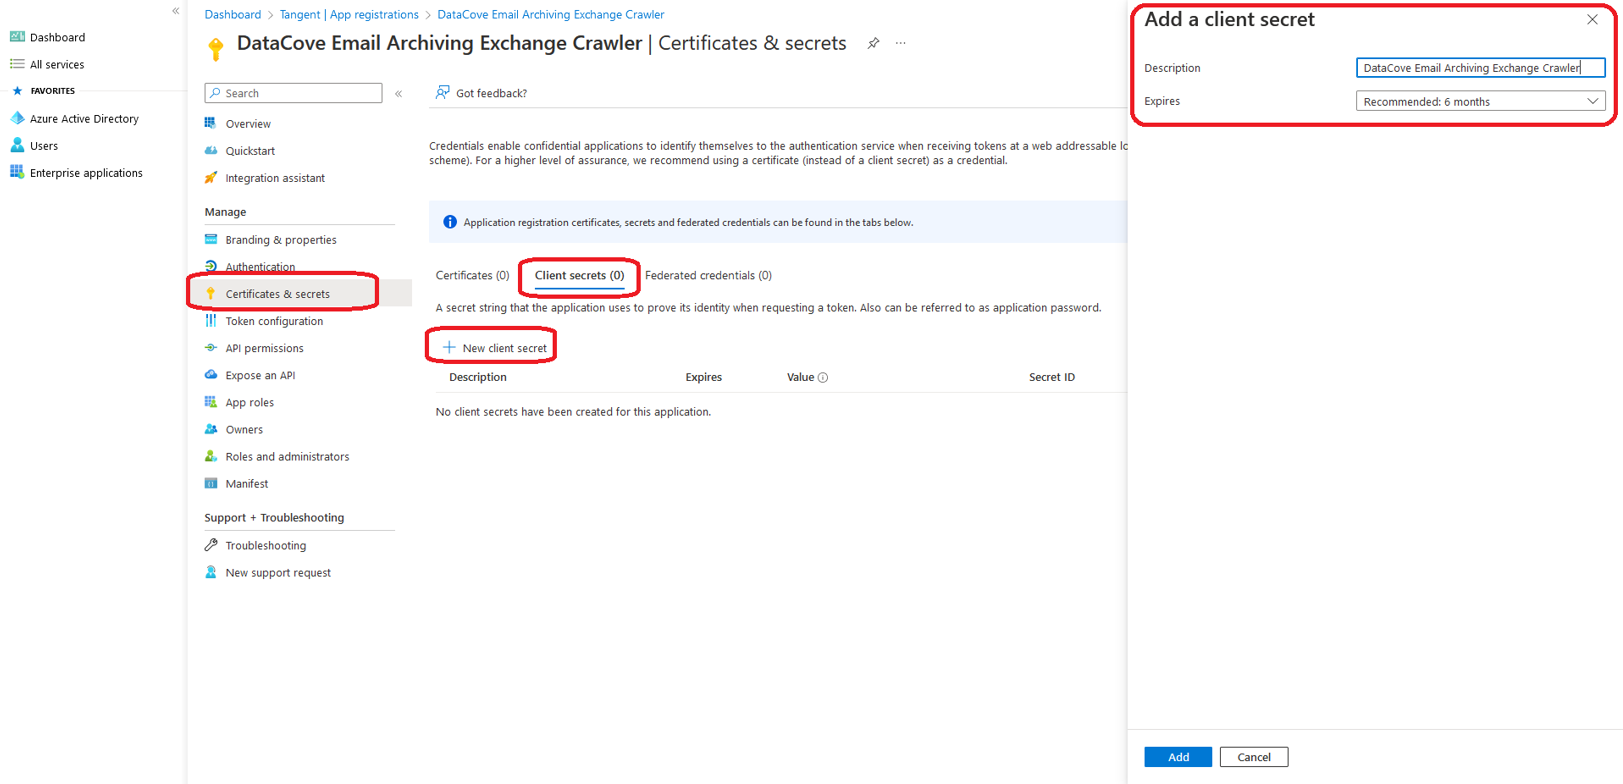
Next, on the left hand side menu, select Certificates and Secrets and click New Client Secret.
Populate the description field with a descriptive name to help identify this application for future reference, then bind a duration for the Secret to function (as short as possible is recommended for this, as the Crawler application will be used for a short time only).
A notification will appear in the upper right hand corner of the screen for a successful Secret creation.
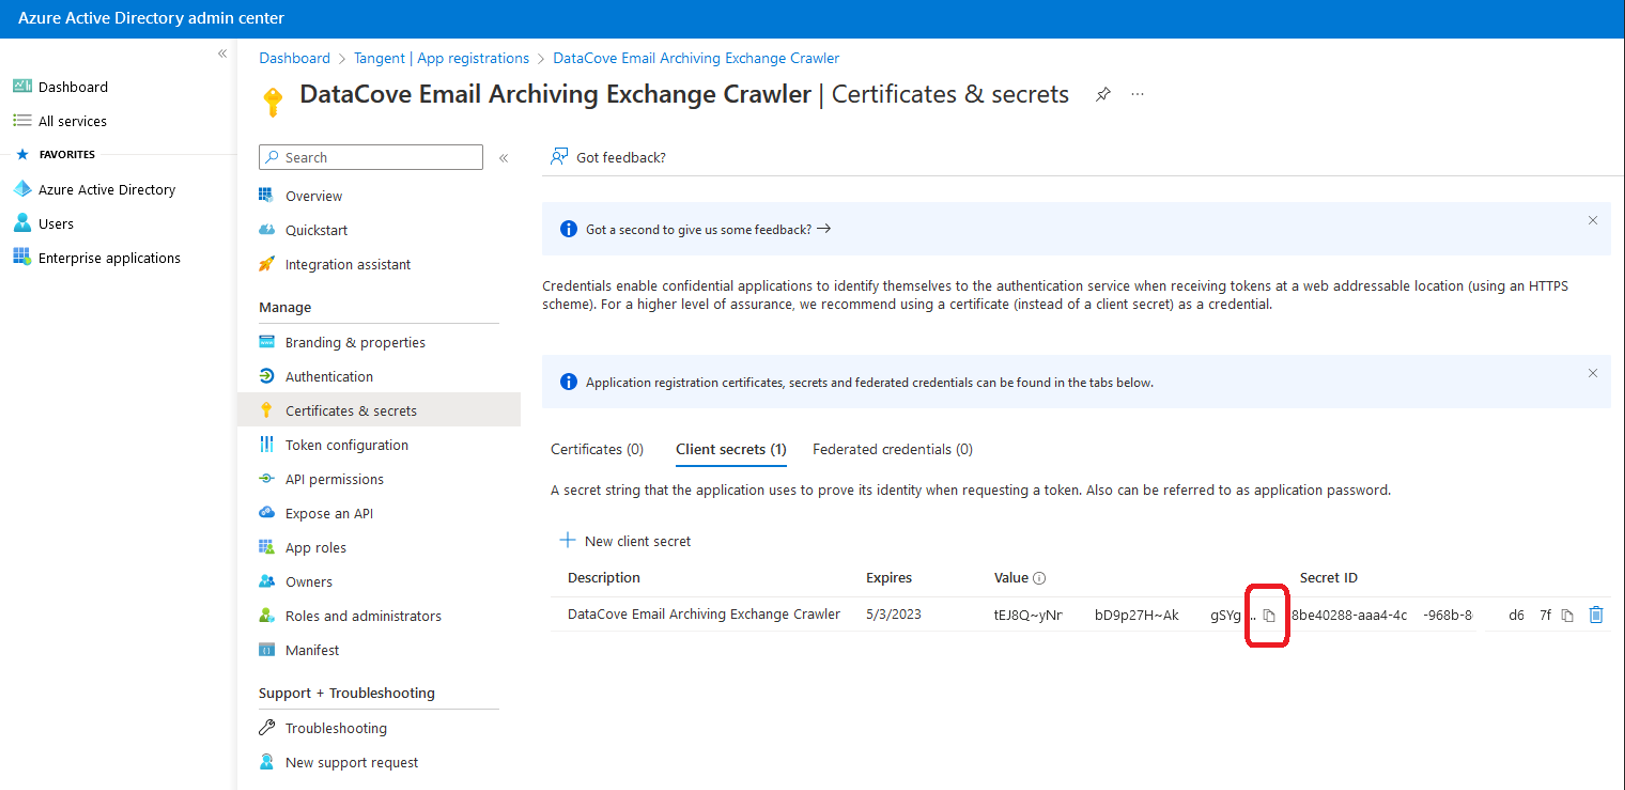
A Secret (similar to an Application Password) has now been generated for the Application.
Select the Copy button for the Secret and paste it to a Notepad file or other temporary storage location for use with the Exchange Crawler. The data contained therein will be used to populate the “Secret” field of the Exchange Crawler interface.
Note: This Secret can only be obtained at this time of creation; it is not possible to go back to obtain this later as the information will be permanently hidden after this page is navigated away from.
If the Secret is not obtained at the time of creation, the Secret will need to be deleted and a new one made following these same steps.
The Secret ID is not the same as the Secret Value, and cannot be used in place of it.
Most of the configuration is now complete. The Client ID and Tenant ID will be collected on the following page and will allow us to begin the Exchange Crawler configuration.
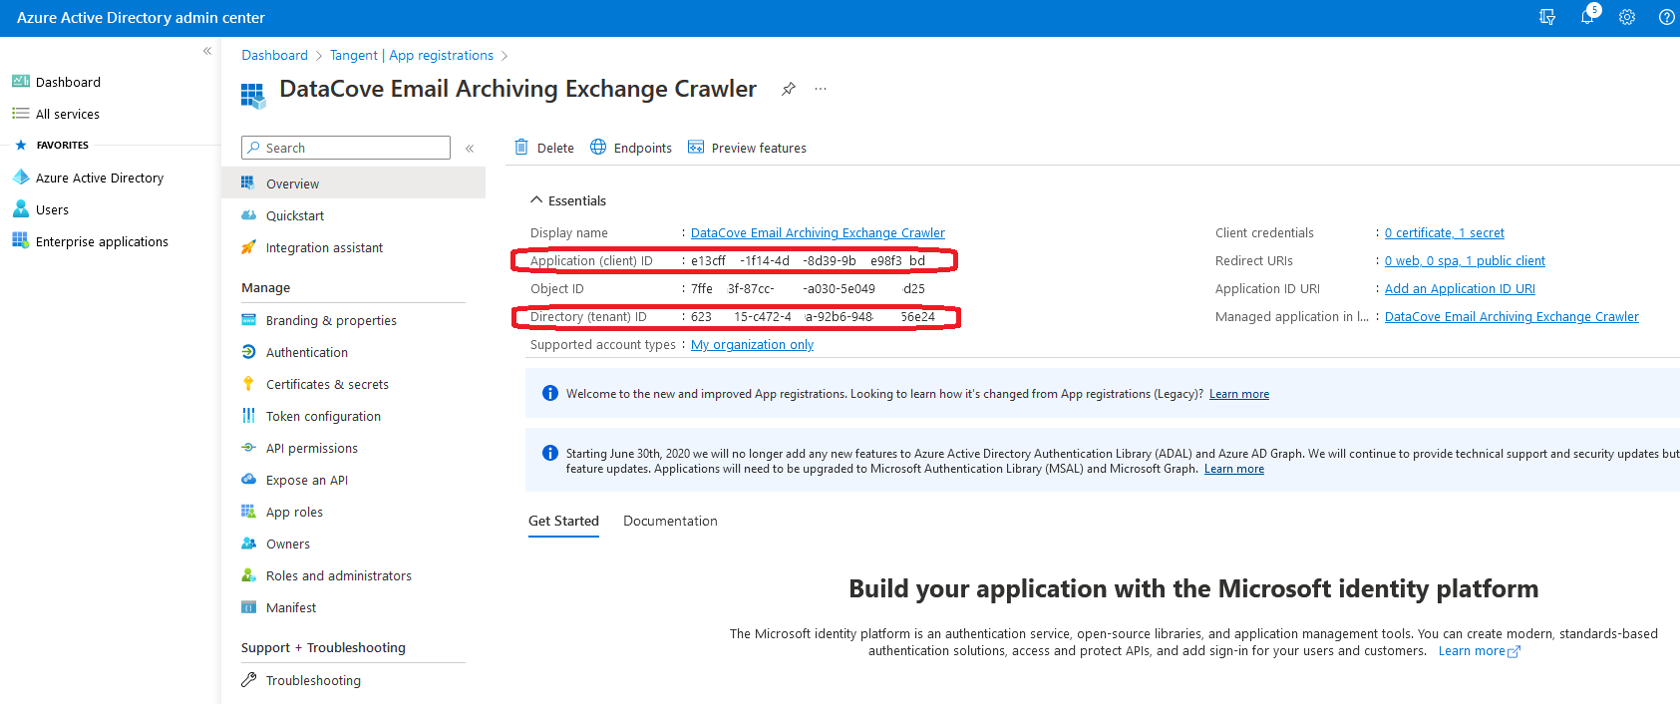
Click on the Application link at the top of the page.

Copy the Application (Client) ID and Directory (Tenant) ID fields to that same Notepad or other temporary storage location for use with the Exchange Crawler.
Note: A copy button is hidden away on the right hand side of the ID text to allow for ease of capture.
With these three keys now in hand, the Exchange Crawler can now be configured.
Local Exchange 2016+ Server Crawling: Configuring a Privileged Account
Configuration of a local Exchange Server with version 2016 or above uses enhanced privileges on an account that allows it the appropriate “read-as” access to other mailboxes, effectively allowing the account to read any messages within any other mailbox as if they were that user, but without having to log in as that user nor need their password or Multifactor Authentication tokens, if applicable. These privileges are rendered via Role Based Access Controls, introduced back in Exchange 2010, to provide specialized permission sets based on the role of the user within the organization.
To begin, an account will need to be empowered with these enhanced privileges: some organizations may already have a service account used for “read-as” access for other applications, such as a Blackberry Enterprise Message Relay; other times the existing DataCove journaling account will be used since it technically already is a service account. For some high security organizations, the preference will be to make a dedicated service account just for the Exchange Crawler. Any of these options is fine and the the default recommendation for most organizations is simply to elevate the DataCove’s extant journaling account since it largely already has “access” to everyone’s mail and is logically a secured account for that reason. This account will be used with the Exchange Crawler in the next step.
Once an account has been decided on (and created, if necessary), open a web browser and navigate to the Exchange Server’s Control Panel page, usually found at “HTTPS://MailServerFullyQualifiedDomainName/ecp” and log in with administrative credentials.
Note: Be sure to log in at /ECP and not the more common /OWA, which only provides Outlook Web Access instead of the administrative control panel.
Note: It is recommended to remove these permissions from the empowered account after the Crawler’s usage is complete, as such wide ranging access in the wrong hands can be very dangerous from a data leak prevention perspective.

Once logged in, select Permissions on the left hand side menu, then Admin Roles at the top of the page.
Click the grey plus sign (+) to create a new administrative role.
Note: In the context of the Exchange Crawler, a pre-existing role known as Discovery Management, generally used by eDiscovery Managers at an organization whose task it is to conduct eDiscovery lookups within Exchange, already has most of the roles that the Exchange Crawler needs and just needs the addition of the ApplicationImpersonation permission added to it to become usable. If there are no members of the Discovery Management group in Exchange, adding the ApplicationImpersonation permission to it can make this a usable predefined role and negates the need to create an entirely new administrative role.

A dialog box to create a New Role Group will spawn.
Populate a name that makes it clear at a glance what the purpose of this Role Group is for, along with a description that clearly defines what this Role Group is supposed to be capable of doing.
Once those are set, locate the Roles section and click the grey plus sign (+).

Another dialog box will spawn offering a list of all of the potential permissions that can be set for this role group.
Locate ApplicationImpersonation and Mailbox Search, then click the Add button at the bottom of the screen to add them to the list.
Once both permission sets have been added, click OK.

Once the Roles have been added, these need to be applied to the user account that will be employed for the Crawl. This is achieved by assigning the desired account as a member of the role group.
Select the grey plus sign (+) under Members.

A new dialog box will spawn allowing the selection of any live user account in Exchange.
Use the search bar at the top to narrow down on the desired account by name, then click on the account.
Click “Add” to select that account and add it to the list of members to add, then click OK.

With the Group Permissions and Membership now set, click Save at the bottom of the original New Role Group dialog box.

The new administrative role will now appear in the list of choices under Exchange’s Permissions page.

With the account now empowered for “read-as” access to all mailboxes, proceed on to the Running the Exchange Crawler section.
Note: It is recommended to remove these permissions from the empowered account after the Crawler’s usage is complete, as such wide ranging access in the wrong hands can be very dangerous from a data leak prevention perspective.
Configuring the Exchange Crawler
To prepare the Exchange Crawler for operation, it must be configured to communicate with both the Exchange Server or Office 365, as well as the DataCove.
For the DataCove communication half, two options exist:
The Crawler can send emails to the DataCove via SMTP as soon as it finishes pulling them from Exchange or Office 365. Traffic over SMTP can be encrypted for remote transmission.
The Crawler can save the emails locally to the machine upon which it runs (or an accessible network share) for later upload to the DataCove using its bulk import tools.
Both methods have merit for different situations, with the Local Storage method traditionally only used in situations where the DataCove is remote from the system running the Crawler or when the organization has high security configurations that make SMTP communication difficult or less desirable. If the Local Storage method is preferred, please contact DataCove Support for a walkthrough on how to upload that data to the DataCove post-crawl.
The SMTP communication method is the the more common mechanism for the Crawler and will be discussed below.
Preparing the DataCove’s SMTP Server for incoming traffic is a very fast affair, needing only a few changes made on the system. Begin by logging into the DataCove’s web interface, then select Configuration in the top header bar, followed by selecting SMTP Server on the left hand side menu.
The first step is to start the DataCove’s SMTP Endpoint server, which allows the DataCove to receive traffic over the SMTP protocol TCP port 25.
If the SMTP Server is currently reporting its status as “stopped,” click the Start Now button.
If the SMTP Server is currently reporting its status as “running,” the SMTP endpoint service is already live.
Adjust the SMTP Timeout value to 300, up from the default of 30.
30 seconds worth of SMTP timeout is fine for most organizations and most traffic rates, but the sheer bulk traffic and potential for large attachments that come from wide scale email Crawling can necessitate the need for a longer timeout value on transmissions.
Require Encryption is an optional function to activate; this only affects emails sent over TCP 25 for regular SMTP and enforces a requirement of TLS.
For DataCove’s that are not on the same network as the system running the Crawler, it is highly recommended to Enable SMTPS to allow for receipt of encrypted emails over TCP 465.
Click Save after making changes to any Timeout, Encryption or SMTPS protocol setting.
Authorization of the IP address that the Crawler will be running from is critical to add, as by default, activating the SMTP Server without locking down the DataCove to only allowing traffic in from certain IP addresses means that any system can send email to the DataCove, which will dutifully archive that data and potentially fill the system with spam or other unwanted data.
For organizations running the Crawler on the same network as the DataCove, add the workstation that is running the Crawler’s IP address into the IP or Domain Name whitelist field at the bottom of the page, followed by clicking Add Server.
For organizations running the Crawler on a remote network from the DataCove, add the Internet Service Provider’s (ISP) gateway IP address to the IP or Domain Name whitelist field at the bottom of the page, followed by clicking Add Server. If the gateway address is unknown, open a web browser from the Crawler workstation and navigate to www.WhatIsMyIP.com in order to find out what the gateway IP address is. The “Public IPv4” address displayed prominently there is the one to add to DataCove’s SMTP whitelist.
With the SMTP Server activated, optional services configured and the IP address of the workstation (or gateway) where the Crawler is being run authorized, the configuration of the Crawler can now begin.

In the following steps, the privileged account created above will be bound to the Crawler and specifications for which user accounts to be crawled will be set.
To begin, on the workstation whereupon the Crawler is installed, click the Start button and locate the Tangent program folder. Inside will be the Exchange Crawler application shortcut.
Click on the MS Exchange Email Crawler shortcut to launch the Crawler.

The Crawler will now load the application frame.
Select Tools at the top, then select Configuration from the submenu.


The Configuration menu is where the choices are made for server type, folders to crawl, privileged access credentials and designating where to send the data to.
Each of these steps will be addressed individually below.

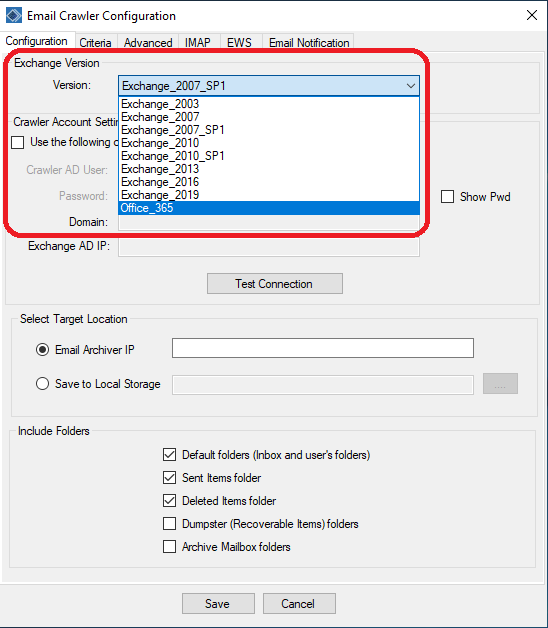
Begin by selecting the dropdown menu box for Exchange Version and select the generation of the Exchange server that is being crawled or Office 365 for crawling mailboxes that are hosted by Microsoft.
Note: Some text and certain sections of greyed out fields will be enabled or disabled depending on Exchange Version chosen. The below examples will be situated in the standard Office 365 configuration.
With the Exchange version selected, check the box for “Use Office 365 OAuth Credential” and then fill in the appropriate fields from the previously elevated account or application registration.
Once done, click the Test Connection button to have the Crawler attempt to log into Exchange/O365 with the provided credentials.
Note: In some local Exchange Server scenarios, if the elevated account is not authenticating properly with the specified credentials, logging into the computer running the Crawler using the elevated account (assuming the computer is domain joined) and unchecking the box for “Use the following credentials instead of the default Windows credentials” will allow automatic use of the elevated account and bypass certain implicit denial errors some high security environments may encounter.

A confirmation message will appear if the connection was successful.
Select Yes to save the configuration.

Next, deciding where to dispatch the Crawled messages to is defined by the Select Target Location section.
In most scenarios, the Crawled emails will be sent directly to the DataCove over SMTP (TCP 25) and the workstation running the crawler must be able to reach the DataCove over that protocol. To configure this, enter the DataCove’s IP address in the Email Archiver IP field.
Note: If Crawling emails and sending them to the DataCove over a WAN uplink, or for high security organizations with a zero trust network practice in place, encryption options such as SMTPS are available on the Advanced tab, which will be discussed further down. This will use an alternative protocol and port over TCP 465 and supports end to end encryption.
For scenarios where bandwidth, network latency, stability or routing rules may not allow direct upload to the DataCove, selecting Save to Local Storage allows the Crawler to retain the Crawled emails as .EML files on the local storage of the workstation or an accessible network volume. Browsing to a location with sufficient storage capacity can be performed from the triple dot menu. Emails saved to Local Storage can be later uploaded en masse to DataCove via the Raw Email upload option via network share.
Note: Depending on the scope of the Crawl, tens to hundreds of gigabytes of storage capacity may be needed, especially as Crawled emails do not possess the benefits of deduplication and compression until the DataCove processes them. As a quick rule of thumb that will fit most organizations, be sure to have at least 4GB of storage capacity per day of emails to be Crawled on the intended storage volume.

Lastly, selecting which common folders for the Crawler to run through can be defined.
In most scenarios, the standard loadout of Default Folders (comprising the Inbox and any user-created folders) Sent Items and Deleted Items are sufficient, but more thorough crawls, especially for first time crawls at an organization, are highly recommended to use the Dumpster and Archive Mailbox folders to gain a much larger window of archived data. Dumpster and Archive folders can be tens of gigabytes of additional data gained from each mailbox and can be quite valuable.
Once the desired folders have been selected, select Save at the bottom of the menu to preserve this data.

Next, select the Criteria tab at the top of the menu.
Criteria allows for the selection of which users will be crawled, along with selecting the date ranges the Crawler will be operating within.
There are two different ways of preparing a list of users for the Crawler to run against: uploading them via .CSV file that contains a list of fully qualified email addresses, or making an Active Directory (including Azure Active Directory for O365-only organizations) query that will find all of the users available.
For most organizations, using the Active Directory lookup will automatically find all users and is the recommended approach that will be discussed below.
If uploading a list of users from a .CSV file, select the Add From CSV button and browse to the file. Once uploaded, a list of users will appear on the right hand side pane of users to crawl.
Note: The “Show Disabled Users” checkbox is only available for on-premises Exchange Server deployments. Disabled Users can be useful to crawl for some organizations that disable, but do not delete expired user accounts and want to make their data available for eDiscovery via Crawling.

To begin an Active Directory lookup, select the Update Available Users button.
This will prompt the Crawler to make an AD Query, using the privileged account, for a listing of all users at the organization. This query finds up to 1000 users at its default setting. If the organization being Crawled has more than 1000 users, see the next section for how to adjust the AD Query Depth in the Advanced tab before attempting to populate this list of users. Once clicked, users will spawn in the left pane as users who are available for Crawling.
If intending to Crawl all users, use the keyboard combination of CTRL+A to select all entries, then click the Add button to move them to the Selected Users to Crawl pane, on the right side of the Criteria page.
If only Crawling a subset of users, locate the desired users individually and click the Add button to move them over to the right hand pane. If there are a large number of individual users to be Crawled this way, using the .CSV upload method is recommended.

Two options are available to determine the scope of time the Crawler is meant to run on:
Crawl all emails between a specific Start Date and End Date. By choosing the Start Date in the top dropdown box and the End Date in the bottom dropdown box, a range of time can be selected that the Crawler will only run within. This is great for gathering data from known gaps in journaled emails or other missing data situations.
Crawl all emails on a specific Start Date and all emails prior going back to beginning of time. This type of Crawl is best for organizations who are deploying DataCove for the first time and want to bring in as much existing data as they can for initial data seeding.
Once the desired date range option has been set, click Save at the bottom of the menu.

With the Criteria page now set, select the Advanced tab at the top of the menu. The Advanced tab is broken out into several sections with varying options, described individually below.
SMTP Connect determines the amount of time the Crawler is allowed to spend trying to connect to the DataCove and negotiating the connection parameters. Nominally, 30 seconds is plentiful unless the DataCove is under extreme loads from other fetching, data retention purges, large scale backups or exports or similar processes.
SMTP Send provides a window of time that the Crawler is allowed to send data to the DataCove within wherein the DataCove must respond to each packet being sent with a confirmation of receipt. If the DataCove does not respond within 5 seconds, the default setting, the Crawler will time the connection out and end a Crawl run due to lack of connectivity. If the DataCove system is under some load, it is recommended to increase this to 60 seconds to reduce the chance of a stalled Crawler session due to a busy DataCove or other gap in network communication.
Maximum Mailbox Query Results is the amount of mailboxes that are returned when conducting an Active Directory Lookup to identify mailboxes within an organization’s AD tree. This setting should be adjusted as high as necessary to find all users within the organization, with a fairly safe bet being available at 100,000 mailboxes if in doubt. If the Update Selected Users button was already pressed on the previous Criteria page to find users, it should be run again to ensure it finds all users that went beyond the 1000 user lookup limit.
The Logging Options section contain various details that can be written to the Exchange Crawler’s Event Viewer based logs, which are by default stored in the Program Files directory where the Crawler was installed. In most scenarios, these logs are not necessary as they only provide deeper view information for analysis in the event of Crawler problems, but if a Crawler run is running into frequent stops or errors based on message content, enabling all of these logging options and reviewing them for errors is the first step to troubleshooting the issue. If the logs are not immediately pointing to any specific issue, refer them to DataCove Support for assistance.
Advanced Configuration Log Location allows for the adjustment to the location where the aforementioned Event Viewer logs would be stored.
Save Crawler Output Automatically saves the output of the Crawler’s main progress window even if the Crawler is closed, allowing an easy re-entry point to understanding where the Crawler was when reopened in the future. Without this checked, the Crawler’s progress window page will be empty upon any subsequent launch.
SMTP (Archiver) Encryption is an important field when transmitting directly from the workstation running the Crawler to the DataCove over SMTP, primarily in situations where the DataCove is not on the same local network as the Crawler or high security environments where end to end encryption is required.
Checking the Enable Encryption box instructs the Crawler to encrypt emails via TLS as a “best effort,” meaning that if the recipient DataCove does not negotiate back with a TLS enabled connection, the emails will be sent via plaintext.
If Require Encryption is selected, emails will only be transmitted over TLS and any attempts to drop down connection security will be refused.
Selecting Enable SMTPS and selecting Port 465 is the recommended approach for using end to end encryption between both the Crawler and the DataCove. Note that the DataCove must have the SMTPS option also enabled for this to work.
Once the settings here are bound, select Save at the bottom of the menu.

The IMAP tab is specific for use with Exchange 2003’s specialized IMAP based crawling and is only available when Exchange 2003 is selected as the mail server type.
Configuring the Crawler for Exchange 2003 requires pointing the Crawler at the Exchange server running the IMAP4 Frontend service for Exchange (for Exchange clusters featuring Frontend and BackEnd servers), similarly to how the Crawler would be pointed at the Client Access Server (CAS) role equipped Exchange 2007 or Exchange 2010 server, and not necessarily the backend Mailbox Hub server.
The Advanced Settings available on this tab are similar to the SMTP Settings from the Advanced tab in allowing for manual adjustments to specific connectivity parameters.
IMAP Connect defines how long the Crawler grants the Exchange Server to respond with an IMAP-Ready command upon connection before timing out and cancelling the Crawl. It is recommended to adjust this to 30 seconds for busy Exchange Servers.
IMAP Search is a complex command initiated after the Crawler makes a successful connection to the Exchange Server. This command is a protocol-formatted list of the folders to be crawled and date ranges desired as set under the Configuration and Criteria tabs. The default setting is usually fine for this given the limited scope of this command.
IMAP Fetcher provides a limit to how long the Crawler can run without receiving a full message and moving on to the next message. The default setting is usually long enough unless extremely large messages are present in the mailbox (in excess of 100MB) or the network connection to the Exchange Server is slow.
IMAP Examine sets how long the Crawler lets Exchange process a “search” or “list” command inside of a mailbox to garner a list of emails to then Crawl. On very large mailboxes with tens of thousands of messages in any given folder, it is recommended to boost this to 600 seconds.
Once the settings here are set as desired, select Save at the bottom of the menu.

The EWS tab, or Exchange Web Services tab, specifies the EWS URL to reach the Exchange Server or Office 365 (which runs on Exchange behind the scenes). This URL is the access point for certain types of programs and APIs to talk to Exchange for various advanced functions, including the kind of Account Impersonation that the Crawler uses for Read As access to all of the mailboxes.
When selecting Office 365 from the Exchange Server Version dropdown menu under the Configuration tab, this URL will be automatically populated for you.
For local Exchange Servers, this URL is unique to your domain’s Exchange Server and is usually accessible at HTTPS://mail.domain.com/EWS/Exchange.asmx, replacing the mail.domain.com with your mail server’s hostname, domain name and top level domain. For some organizations, that standard URL won’t be accurate and manually finding the EWS URL will be necessary via the below steps.

To find the organization’s EWS URL for an Exchange Server, launch the Outlook email client with a user account that normally connects to the Exchange server for mail.
Once it has loaded, locate the Outlook Icon in the System Tray of the Taskbar and right click on it to spawn the Context Menu.
Select Test Email AutoConfiguration from the presented options.

A new dialog box for testing the AutoConfiguration will spawn.
Enter the fully qualified email address and password for any account that would be present on the Exchange Server, then click Test.
After a moment, the test will finish and provide a long list of data of the various locations it is connecting to, including Exchange Web Services.
This EWS URL may be used for several services, but should always match the similar convention of ending in /EWS/Exchange.ASMX. The preceding URL information before it will be the mail server that should be connected to and copying the entire URL string into the Crawler’s Exchange Web Services URL field is recommended.
Process Completed Folders on Resume instructs the Crawler to rerun folders it has already crawled in case new items have arrived in them that may fit the Crawl criteria. It is recommended to leave this on.
Click Save once the EWS URL is set.

Lastly, the Email Notification tab provides a service wherein the Crawler can notify the administrator running the Crawler of when it completes a run via email. The notification is relayed via the Exchange Web Services configured on the previous page.
Check the Notify via Email box to begin configuring this service.
Bind a From Address that belongs to a live address at the organization, preferably using the address of a service account to avoid any anti-spoofing protections. If the mailbox does not exist, Exchange Web Services won’t authorize the relay.
To Address should be populated with the email address or a distribution list address of the administrator running the Crawler.
Subject is best to reference, at a high level, what the message is about. Mentions of DataCove or Exchange Crawler will likely be good reminders as to what it is about.
Email Body comes prepopulated with a simple success text, but this can be customized to fit the preferred needs of the administrator.
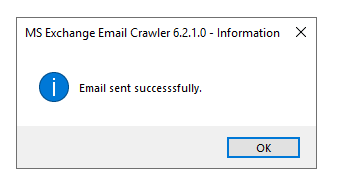
Once the fields have been configured as desired, press the Send Test Email button to dispatch an initial message to the administrator. If the message is successfully received, this means the Crawler will be able to successfully notify the administrator upon Crawl completion.
Click Save at the bottom of the tab.

With the Crawler parameters now set, it is time to actually run the Crawler.
Running the Exchange Crawler
With the Crawler now configured to run, an overview of what to expect from the Crawler’s Status Pane should be discussed.
Much of the Status pane will be teeming with information once the Crawler is initiated. With the Crawler in this preparatory phase, a brief discussion of the various content columns observed can be conducted without too much noise. These columns will automatically be populated with data as the Crawler runs, creating row after row of information.
The Mailbox column identifies which user mailbox is currently being crawled. Mailboxes will be limited to only the users specified for the crawl to take place upon.
The Folder column specifies which individual folder inside of the user’s mailbox is currently being crawled. Limits on some of the default folders can be defined, avoiding locations like Junk Email or Deleted Items, for example.
The Total column lists the total number of messages inside the folder.
The Selected column narrows down messages from within that Total by the search criteria and limits defined in the upcoming Filtering step, such as a date range of content to crawl or specific folders to pull in.
The Sent column notates which messages have been dispatched by the Crawler to the DataCove, and this is the number that will increment live while a crawl is in action.
The Already Sent column shows messages have which been seen before and already sent to the DataCove previously. This column is generally only populated when running the Crawler a subsequent time or restarting a crawl, such as in the event of an error that prevented the Crawler from proceeding further. The Exchange Crawler places “checkpoints” on its progress through user mailboxes and messages so that it knows not to send them a second time in the event of an application restart or resumption.
The Failed column indicates messages that could not be sent for one reason or another, such as calendar invitations or other unsupported content. More information on those can be found under the Errors tab.
The ResumedFrom column posits information about where the Crawler is resuming its run from, in the event of a stoppage and resumption or other interruption, based on checkpoints applied to each email as it is crawled and successfully dispatched to the DataCove or local storage.

Once ready to begin crawling, click Start in the upper left hand corner of the Crawler application.

Upon starting the Crawl, a listing of the quantity of mailboxes to run will appear in the bottom left corner.

Subsequently, actual user mailboxes and their respective folders, quantities of messages within and more will begin counting up rapidly as the Crawler reads and sends them over to the DataCove (or local storage).
Receipt of these messages on DataCove can be observed by looking at the Dashboard’s daily traffic graphs, which should show a great spike in SMTP traffic as the Crawler makes progress.
When saving to local storage, visiting the directory where the files were instructed to be saved will show the emails broken out by username, folder and then individually numbered emails.

Troubleshooting Errors with Crawled Messages
Occasionally, errors with the Crawler will occur in terms of communication, permissions or content that is unreadable in a mailbox.
Listings of the errors will appear in the bottom right hand corner of the Crawler’s main Status pane.

Details of the errors will appear under the Errors pane, next to the Status pane.
In this case, a user’s mailbox was already had filenames that matched what the Crawler was trying to write to a local storage location.
This particular error is remedied by merely deleting the extraneously named files, renaming them or directing the Crawler’s output to a different location.

Most errors detected will be transient or of data that is incompatible with the RFC822 format, such as Outlook calendar invitations, and the Crawler will continue onwards without interruption. Sometimes, longer errors that exceed the Crawler’s timeout values will occur and halt the Crawler entirely until they are resolved or, in the event of a communication failure, until the Crawler is restarted.
Common reasons why stoppages may occur include:
Networking drops or high latency between the workstation running the Crawler and the Exchange Server or Office 365.
Network drops or high latency between the workstation and DataCove.
Firewall or Managed Switch ACL rules preventing outbound SMTP (TCP 25) or SSMTP (TCP 465) communication with the DataCove.
Local antivirus or XDR software on the workstation running the Crawler locking down the rapid SMTP communication with DataCove.
In the event of frequent stoppages, it is recommended to run the Crawler from a Windows virtual machine that is not domain joined (and thusly not subject to group policies that may include security standards that interfere) and not running any sort of antivirus, antimalware or XDR software. In many situations, antivirus software sees the Crawler and its tremendous volume of SMTP traffic as that of a mass mailing worm and attempts to throttle the traffic, if not stop it outright.
In other situations where communication is not being established with the DataCove outright, firewall or Managed/Smart Switch rules limiting which systems are allowed to communicate over Port 25 or Port 465 may be responsible and an allowance made for the system that the Crawler runs from to DataCove may be required. Many organizations have implemented such whitelist rules for only their mail servers or mail relay services or devices to be allowed to communicate over those ports, often limiting the Crawler from reaching the DataCove.
Running the Crawler from a system with a wireless connection to the network is not recommended. Wired connections should always be used for both reliability and performance.
In other more extreme situations, often found at high security sites, it may be more challenging to run the Crawler itself and depending on the stoppage point, alternative methodologies may exist to crawl the data successfully.
For sites experiencing trouble connecting to the DataCove, but the connection to Exchange or Office 365 are fine, saving the crawled emails to local storage and then uploading them to DataCove via network share is a very efficient method. Depending on the amount of data being crawled, a significant amount of local storage space may be required, often in the range of several hundred gigabytes.
For sites experiencing trouble with connecting to Exchange or Office 365, with the provision of appropriate elevated credentials and NAT access to the DataCove, the DataCove Support team can run the Crawler at our secure datacenter with special Microsoft peering connectivity and direct uploads to the DataCove on behalf of the client.

Clearing Checkpoints for another Crawl
As the Crawler moves along, it marks emails it has already seen with a special checkpoint so it does not pull another copy of them again when resuming the Crawler after a stoppage or on a subsequent run for additional data.
This is normally fine for almost every organization, but in some situations when a Crawl of the data is needed again, such as to another DataCove or to another local storage location, clearing the resumption checkpoints allows for a crawl of messages previously captured.
To do so, select the Clear Resume Checkpoints button on the Crawler’s main menu.
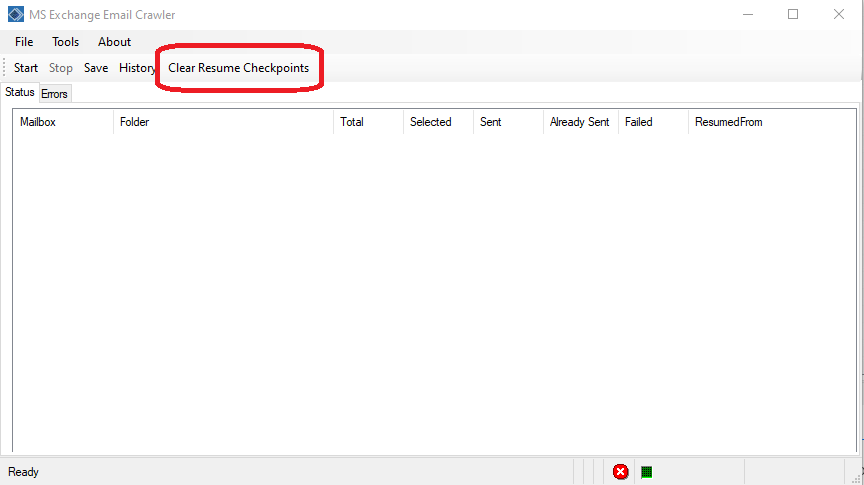
A confirmation dialog box will appear to ensure you want to remove the checkpoint files.
Click Yes.
A new confirmation dialog box will spawn successfully declaring the removal of the checkpoint files.
The Crawler is now ready to run again against mailboxes previously crawled and will recapture any and all data meeting the Crawl criteria.


Once the Crawler successfully completes its run, it is highly recommended to remove the enhanced permissions and privileges assigned to the account used for the Crawler, or terminate the Enterprise Application made for the Crawler in Office 365 configurations, to limit the potential impact of a compromise of that account or application. The Crawler can also be uninstalled after all operations with it are complete.
This concludes the DataCove Exchange Crawler article.