Opening a SSH Reverse Tunnel for Support
What is a SSH Reverse Tunnel and how is it used?
Support for the DataCove email archiving appliance comes in several different tiers of access, depending on what kind of assistance is needed.
This can range from emails and phone calls for basic questions to screen sharing and collaboration for mid-level concerns and troubleshooting and then escalating to a Network Address Translations (NAT) or SSH Reverse Tunnels for high level troubleshooting or ongoing monitoring. This article focuses on the nature of the Reverse Tunnel, how they function and the steps necessary to set one up.
SSH Reverse Tunnels are used to grant direct remote access to Tangent’s Level 3 support team to a DataCove for in-depth analysis and troubleshooting without having to go through the effort of setting up a full NAT and are extremely rapid to deploy. These Tunnels are a set of instructions that are individual for each DataCove and are time-delineated in that they tell the system to make contact with a specific set of servers, coupled with the use of a specific port and password that are assigned to them for every individual support ticket. As the name implies, the DataCove uses the Secure Shell (SSH) protocol over TCP 22 for this connection, ensuring an end-to-end encrypted connection no matter the connection medium, such as the Internet.
Once the DataCove reaches a “Tunnel server” via the Reverse Tunnel, access to the DataCove’s console and web interface are made available to the Level 3 support team. They’ll then begin troubleshooting and repairs to get the system back to the desired state.
Note: As a key item for high security organizations or other “whitelist-only” organizations, SSH over TCP 22 outbound has a fairly good likelihood of being blocked by network policy. If initiation of the Reverse Tunnel fails, check the local Managed Switches that DataCove connects to (and any switches upstream of it) and Firewall rules if TCP 22 is blocked for outbound communications. If it is, authorize DataCove’s IP to allow TCP 22 outbound to all, or allow it to only “Tunnel2.updateasap.com” to ensure it can reach the tunnel servers.
In general, the process of obtaining and using a Reverse Tunnel is as follows:
Contact DataCove Support via phone or email.
Support will diagnose the issue and determine if escalation to Level 3 is needed.
If Level 3 Support is needed, DataCove Support will arrange an internal ticket for our Level 3 team to begin preparation of a Reverse Tunnel for the individual DataCove.
Once that Tunnel is prepared (usually within 3-6 business hours), DataCove Support will relay over the Port and Password information necessary to initiate the Reverse Tunnel.
The Tunnel should then be set up on the DataCove via the below instructions, and DataCove Support notified once it’s live.
DataCove Support will then work with the Level 3 team to get the situation resolved.
Once resolution is complete, DataCove Support will advise that the Tunnel can now be closed or left to expire out on its own.
Initiating the Reverse Tunnel
Note: Setting up the Reverse Tunnel has a prerequisite of a Port and Password supplied by DataCove Support. If this has not been received yet, inquire with your DataCove Support representative.
To begin setting up the Reverse Tunnel, use an SSH-capable remote administration tool like Putty or SecureCRT to initiate an SSH connection to the DataCove over TCP 22.
Type in the DataCove’s Fully Qualified Domain Name (FQDN) or IP address and assign it to the SSH service.

Once the communication handshake has completed, the DataCove will respond with a login screen similar to the below image.

The default login for the console system configuration menu is as follows, but if this password has been changed, be sure to use the new password:
Username: cliadmin
Password: ChangeMe
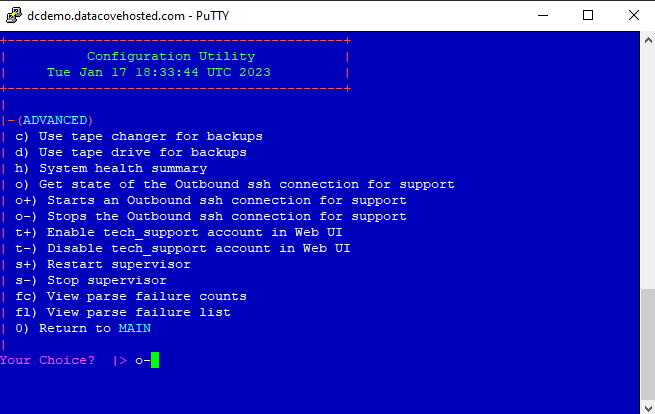
Once authenticated, the system will present its configuration and diagnostic menu, as displayed below.

Type “advanced” at this main menu screen, then hit Enter. This will now provide access to the Advanced Menu.

The Advanced Menu provides some additional diagnostic options as well as features that can be toggled on or off. This is also where the Reverse Tunnel options live.
Type o+ at the menu and then hit Enter to begin initiation of a reverse tunnel.

A series of text blocks will appear briefly detailing how the the Reverse Tunnel works and stating the requirements for the SSH service to be active on the DataCove for the Reverse Tunnel to be used.
The SSH service can be validated as active by reviewing the following items:
The SSH service is activated by default on all DataCove appliance servers when they leave the factory, so unless purposefully deactivated once onsite, this service will already be live.
The SSH service is activated by default on all DataCove virtual machines upon deployment, so unless purposefully deactivated, this service will already be live.
If a remote access tool like Putty or SecureCRT was used to connect to the DataCove to begin this process, SSH is already live on the DataCove, as the SSH client would fail to connect otherwise.
If the DataCove’s SSH service is not active for any reason, it can be enabled from the DataCove web interface by navigating to Configuration in the top header bar, then selecting Network Server Control on the left hand side menu.
This will bring up the list of configurable services that DataCove responds on for basic communications, including SSH.
If SSH is disabled, click on the green upward facing arrow to the right hand side of the process to enable the service.

Once the Reverse Tunnel instructions have been reviewed, type “I agree” at the prompt and hit Enter.
The Reverse Tunnel wizard will now request the Port number provided by DataCove Support.
Enter that Port number and then hit Enter.

The system will take a moment to initiate the SSH connection to the specified Port, ensuring it is open and routable.
If the connection is solvent, the system will now ask for the Password that was supplied along with the Port.
If the system cannot connect, verify that the Port number was typed in properly and that there are no Managed Switch policies or Firewall rules that are blocking TCP 22 outbound, then try again.
Enter the Password and hit Enter.

If the Password is accepted, the connection will succeed and deploy a large green banner message indicating such.
At this time, inform your DataCove Support representative that the Reverse Tunnel is live, and they’ll engage the Level 3 team to begin work.

An example of a failed Reverse Tunnel connection is represented in the below image, indicating either:
A DNS resolution failure to the Tunnel2.update.updateasap.com address.
An inability to route over TCP 22 for SSH out of the firewall, usually driven by a protocol whitelisting policy.
A Smart switch or Managed switch policy preventing TCP 22 for SSH traffic.
DNS resolution can be tested from the DataCove by using the Ping option under the main CLI menu’s Network Diagnostics and verifying if Tunnel2.update.updateasap.com resolves to an IP address. If it does, the issue is most likely not a DNS fault.
The remaining firewall and switch policy possibilities are much more common in high security environments and will need analysis performed on where the network traffic is dying out to verify which one may be responsible. Adding a whitelist for DataCove’s IP address to get to the Tunnel server over TCP 22 for SSH is the recommended solution.

Closing the Reverse Tunnel
Closure of a SSH Reverse Tunnel occurs automatically after several days of inactivity on the Tunnel, and it usually is not necessary to manually close the Tunnel as a result.
In the event the Tunnel needs to be forcefully closed for security policy reasons, connect to the DataCove over SSH as in the previous step and navigate to the Advanced Menu once more.
Use the o- command and hit Enter to terminate the Reverse Tunnel.
This immediately closes the Reverse Tunnel and ends any Level 3 Support access.