Enabling Microsoft Teams archiving on DataCove
What is Microsoft Teams archiving and how does DataCove tie into it?
Microsoft Teams is a business version of the instant messenger systems that have existed for decades, starting out way back when as ICQ, AOL Instant Messenger (AIM), Yahoo Instant Messenger and MSN Messenger. These applications were used for personal purposes in non-business environments, but slowly started creeping into business environments over time due to their utility. As a growing portion of the electronic communications market share, slowly nibbling away at emails’ decades long pre-eminence, instant messages enable rapid responsiveness for short form questions and answers or brief updates and memorandums. Both critical and non-critical communications can be dispatched this way and by nature of them being an electronic communication, they wind up being discoverable under law as a digital document.
These days, business-grade instant messenger services like Slack, Salesforce Chat, Microsoft Teams, Yammer and more have taken their place in the corporate world, factoring in important improvements like tenant data segregation, user account controls and encryption of data. So many organizations are turning to Microsoft Teams every day due to its combination of solid features, screen sharing and presentation modes and free price point, causing a subsequent spike in instant messages between individual employees and group chats amongst several employees simultaneously. Some organizations even communicate with outside vendors and clients using it, greatly increasing the need for oversight instantly.
Most organizations who are already performing email archiving are doing so for legal compliance purposes, and the advent and growth of Microsoft Teams has been effectively going unarchived or archived in a separate data silo, making eDiscovery challenging. It makes sense to consolidate the archival of those messages with the extant email archives that DataCove already maintains, making all of these communications searchable in one place.
Teams communications are broken up into a few different categories, with DataCove handling the bulk of personnel communications:
Individual-to-Individual messages: These are messages sent from one employee to another, or from an employee to an external contact. DataCove archives these.
Individual-to-Many messages: These are messages sent from one employee to several others, including potential external contacts. DataCove archives these.
Teams Channel messages: These are longstanding dedicated “groups” that people can be added to or removed from over time where information can be posted for regular reuse. DataCove does not archive these.
The below guide covers how to set up Teams Archiving on DataCove within an Office 365 environment, and how to view those messages once they are pulled in.
Configuring an Azure Active Directory Application Registration
Teams Archival with DataCove requires the configuration of an advanced and privileged account that allows access to all Office 365 Exchange mailboxes, as the Teams application surreptitiously stores its data within hidden folders within the Exchange mailbox. With the advent of OAuth and other more secure means of providing long term access to mailboxes, rather than the Application Impersonation role and username/password combination used in yesteryear, DataCove uses an Azure Active Directory Application Registration to create a “trusted application” that grants the access necessary.
This trusted application uses three mechanisms to authenticate the service using it:
A Client ID (individual identification of the Application and any special configurations it possesses).
A Tenant ID (individual identification of the organization on Microsoft’s Office 365 platform, ensuring the application points to your tenant).
A Secret (similar to an application password, this is the unique key for that application to be triggered).
This combination allows the DataCove to talk to Office 365 and regularly crawl user mailboxes for their Teams data. Guidance on creating and configuring the application can be found below.
Begin by opening a web browser and logging onto HTTPS://Admin.Microsoft.Com.
Log in with an administrative account and select Show All on the left hand side menu to expand the Admin Center viewable options.

Select the Azure Active Directory Admin Center.

On the newly spawned tab for Azure Active Directory, select Applications on the left hand side menu, then App Registrations from the dropdown menu and finally select New Registration towards the top middle of the screen.
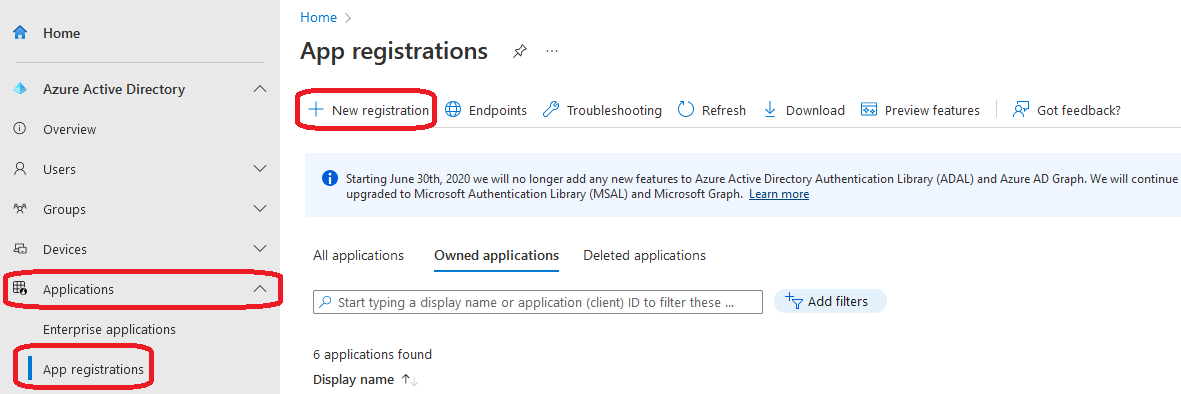
A new slide-in page will now spawn, inquiring for the name of the application and a few other parameters.
The name of the application can be whatever name would be easy to remember and recognizable in the future. A general recommendation is “DataCove Teams Archiving” as that is very descriptive as to the application and its specific task and implied permissions.
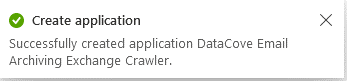
Note: For the purposes of this article, the images below will refer to the application being named “DataCove Email Archiving Exchange Crawler.” The same procedure is used to prepare a trusted application for that tool as well.
Supported Account types should be bound to accounts within the Single Tenant Organizational Directory.
Redirect URI should be set for Public Client/Native with the this URI: https://login.microsoftonline.com/common/oauth2/nativeclient
Click Register once all fields have been populated.

In the upper right hand corner of the screen, a successful Create Application popup will appear referencing the name of the newly created application.
On the new Application page that AAD will redirect to post-creation, select Manifest on the left hand side menu.

In the XML content pane, locate the ‘requiredResourceAccess’ property in the manifest (note that scrolling down may be required) and add the following language inside the square brackets ([]), then click Save.
,{
"resourceAppId": "00000002-0000-0ff1-ce00-000000000000",
"resourceAccess": [
{
"id": "dc890d15-9560-4a4c-9b7f-a736ec74ec40",
"type": "Role"
}
]
}
Note: Some browsers may interpret the double quotes in the above code to be a different type of “curly” double quote that isn’t allowed in JSON files. If the Manifest file does not allow you to save, delete the double quotation marks on all of the entries and retype them. An example of what an incorrect “curly” double quote looks like is below.

Note: Careful placement of these code additions is necessary; please carefully review the Before and After images below for placement verification.
Before:

After:

A small popup confirmation in the upper right hand corner will appear if the Save is successful on the newly edited application.

Next, select API Permissions on the left hand side menu and click Add A Permission.

On the slide-in tab page, select Microsoft Graph from the Microsoft API list.
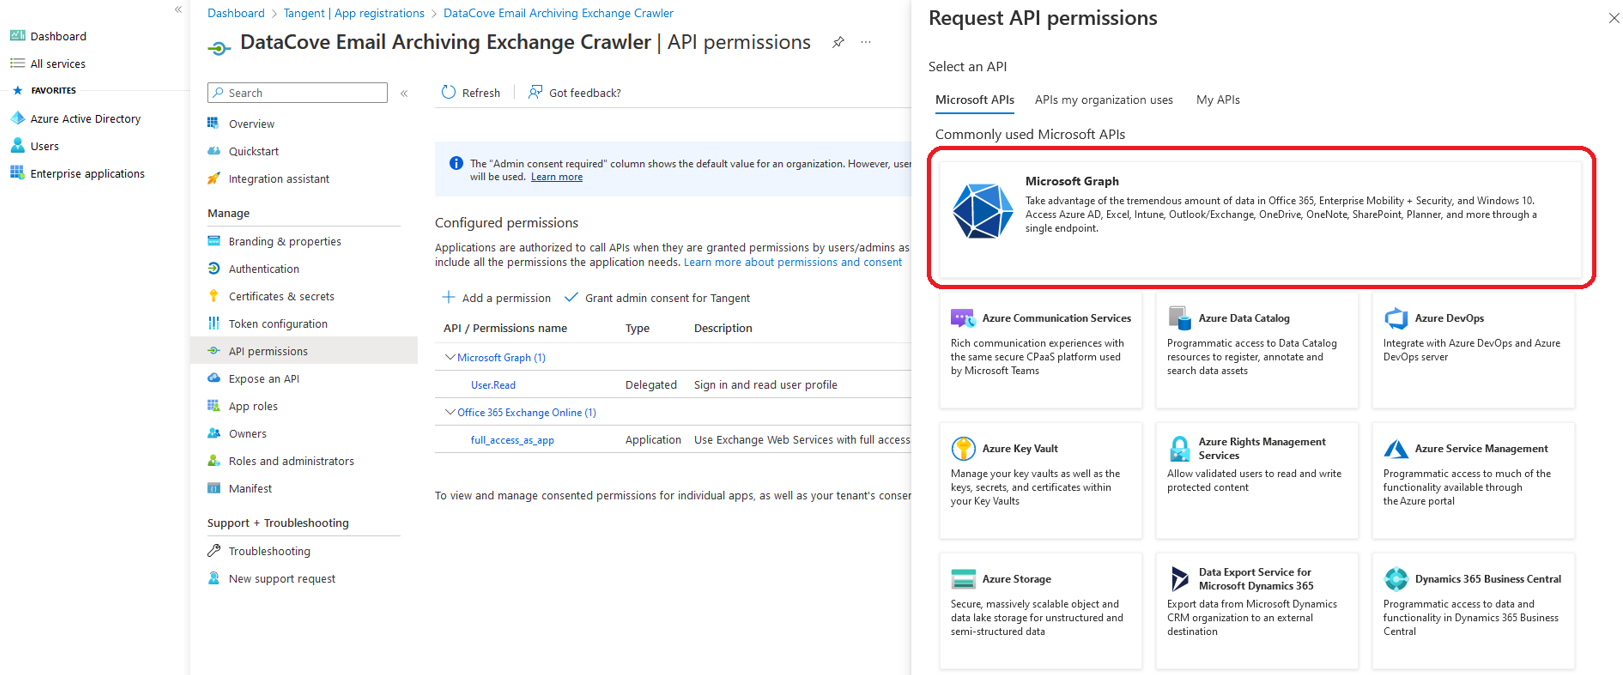
Microsoft Graph will inquire which type of permission your application requires, and offers the choice between Delegated Permissions and Application Permissions. Choose Application Permissions.
Using the Select Permissions Search Bar, type the word “directory” and select ‘Directory.Read.All’, then click Add Permission.

The Application page will now reflect back with the new permission added.

Next, select “Grant Admin Consent” and select Yes on the verification popup.
This empowers the application for the wide ranging access it needs to read all mailboxes.
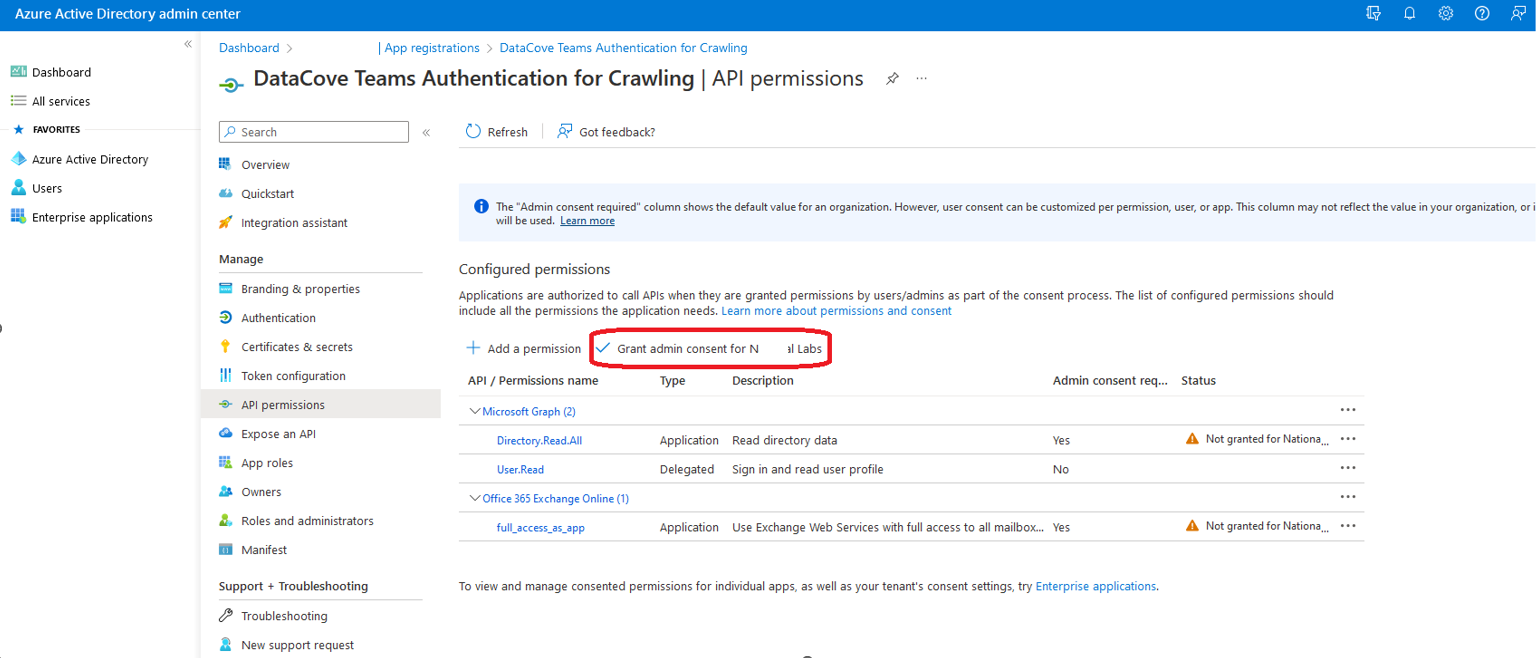

A small Consent successful box will popup in the top right hand part of the screen.

The application page should now reflect back with full read and administrative permissions.

Next, on the left hand side menu, select Certificates and Secrets and click New Client Secret.
Populate the description field with a descriptive name to help identify this application for future reference, then bind a duration for the Secret to function (as long as possible is recommended for this, as the Teams archiving application will be used permanently).
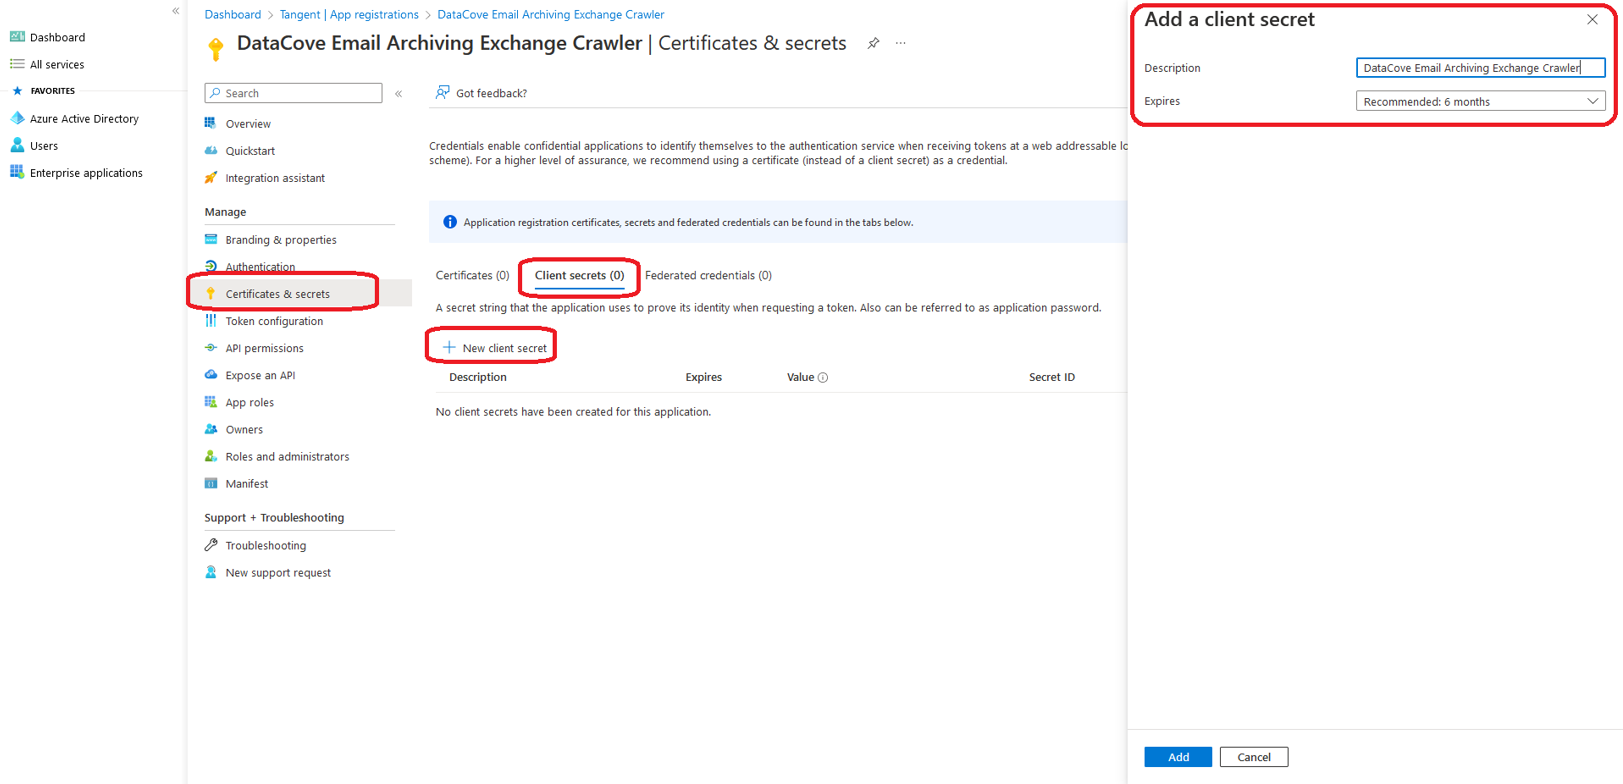
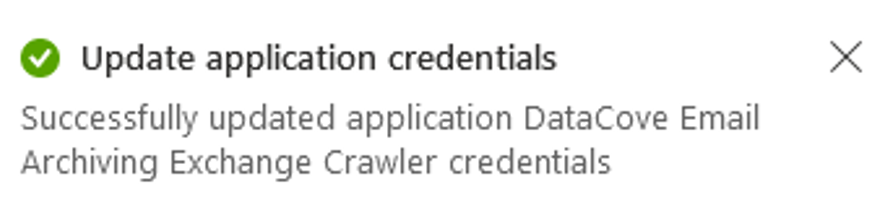
A notification will appear in the upper right hand corner of the screen for a successful Secret creation.
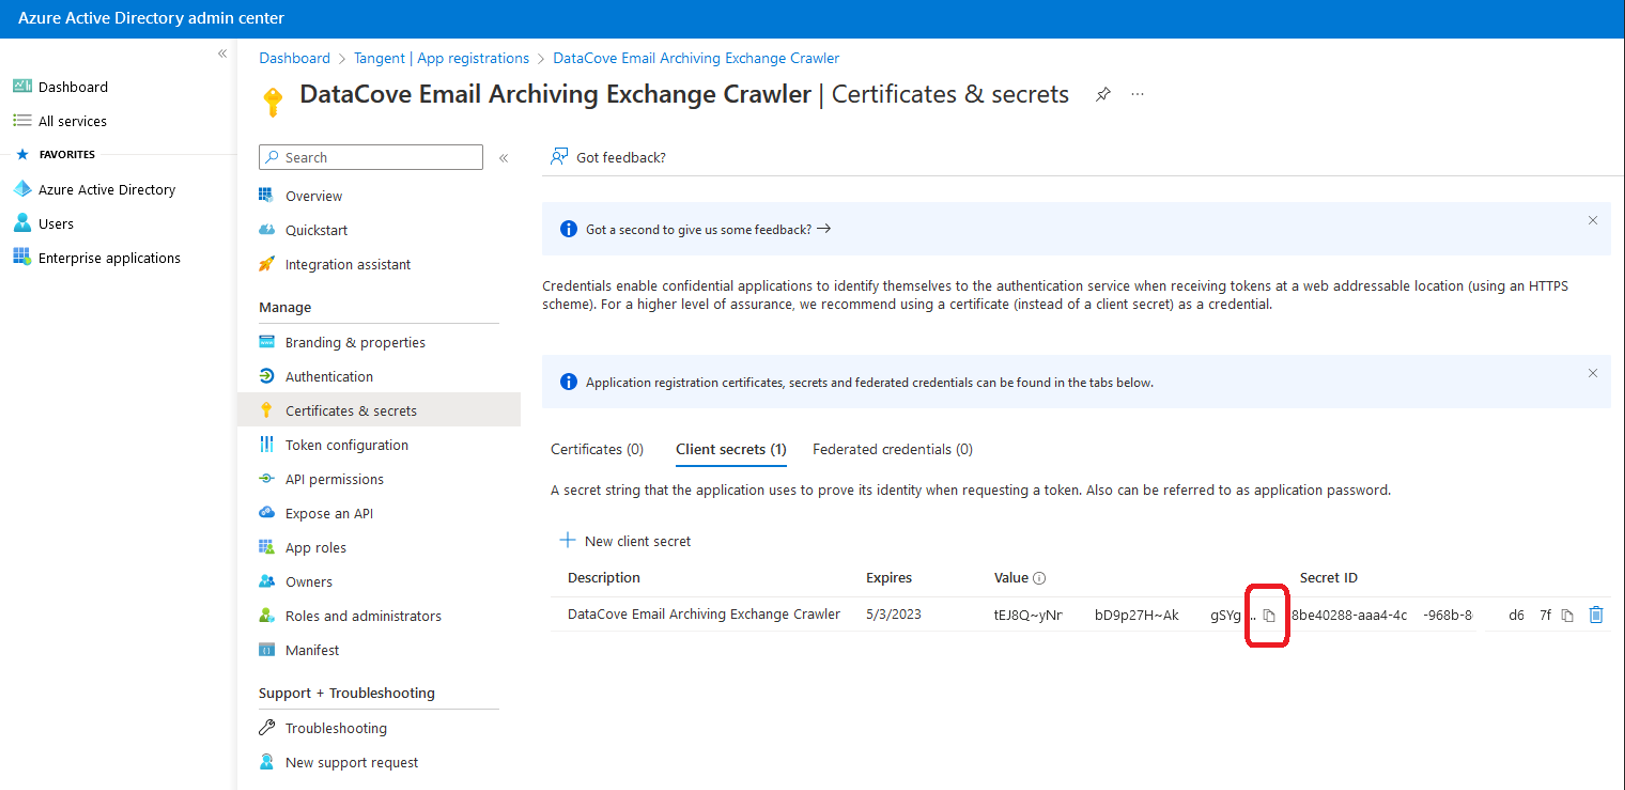
A Secret (similar to an Application Password) has now been generated for the Application.
Select the Copy button for the Secret and paste it to a Notepad file or other temporary storage location for use with the Teams Archival configuration. The data contained therein will be used to populate the “Secret” field of the Teams Fetcher OAuth interface.
Note: This Secret can only be obtained at this time of creation; it is not possible to go back to obtain this later as the information will be permanently hidden after this page is navigated away from.
If the Secret is not obtained at the time of creation, the Secret will need to be deleted and a new one made following these same steps.
The Secret ID is not the same as the Secret Value, and cannot be used in place of it.
Most of the configuration is now complete. The Client ID and Tenant ID will be collected on the following page and will allow us to begin the Teams Fetcher configuration.
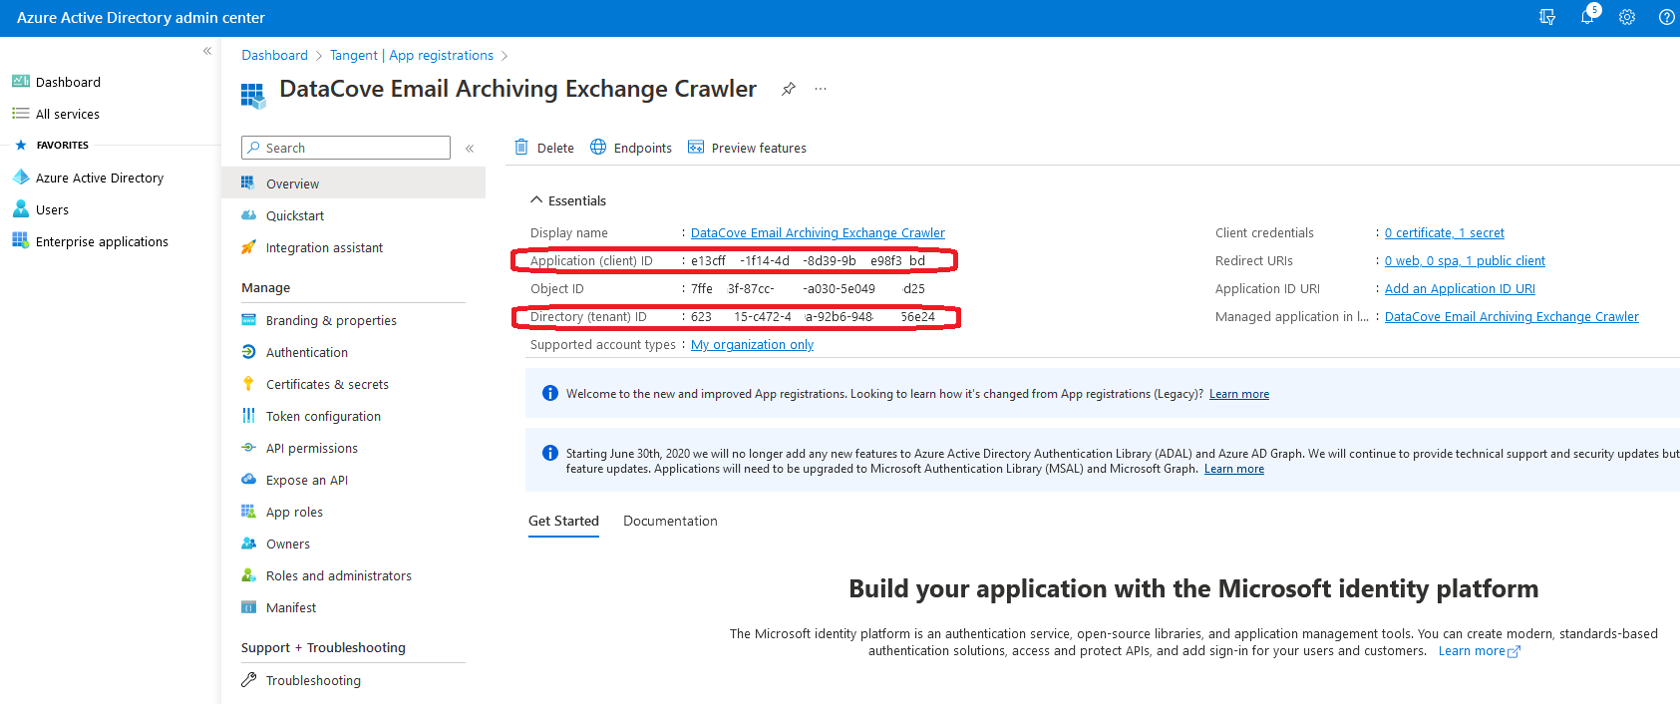
Click on the Application link at the top of the page.

Copy the Application (Client) ID and Directory (Tenant) ID fields to that same Notepad or other temporary storage location for use with the Teams fetcher.
Note: A copy button is hidden away on the right hand side of the ID text to allow for ease of capture.
With these three keys now in hand, the Teams fetcher can be configured on DataCove.
Configuring Microsoft Teams Archiving on DataCove
DataCove uses a suite of services known as Microsoft Exchange Web Services to communicate with Office 365 to pull copies of Teams messages down for archival. In this context, this particular subservice will be known as the Teams Fetcher, a service that “fetches” data that Microsoft Teams creates and stores in specialty folders within a user’s Exchange mailbox.
Once configured, this service automatically launches at a scheduled time every day and will run a “full” capture on its initial run, gathering up all of the Teams messages that exist in user mailboxes going back to the beginning of time. Subsequent runs are incremental and capture all new data accrued since the previous session.
Critically, the Teams Fetcher is reliant on which user accounts are configured on the DataCove, as that instructs it upon whose Teams messages it should search for. These users can be local users on the DataCove system, either created manually or imported in bulk, but it is strongly recommended to use LDAP Authenticators to determine which users to Fetch against. This automatically keeps the user database up to date with live and expired users, matches for email address changes and more. The users upon whom this service should run should be configured in advance of setting up the Teams Fetcher, whether they will be local users or LDAP Authenticated users.
Note: LDAP Authentication, in this context, does not actually have to allow the users to log into the DataCove; it simply needs to allow the DataCove to talk to a Domain Controller or Azure Active Directory Domain Services Controller to poll for user accounts.
To begin configuring a Teams Fetcher, log onto the DataCove web interface and navigate to Configuration in the top header bar, then select MS EWS Services on the left hand side menu.
Click on Add New Server to setup a binding to Office 365 with the trusted application’s information.

On the Add Exchange Server page, several fields will need to be populated to instruct DataCove where to point for this Fetcher:
A Fully Qualified Domain Name for the EWS service from Office 365 will need to be entered. This should be set to “Outlook.Office365.com”.
Different versions of Exchange use various protocols and contact methods for EWS, but for Office 365, this falls under the Exchange on Office 365 option from the dropdown list.
Select the OAuth Authentication method; Basic Authentication won’t be accepted too far into 2023 without serious security compromises being made at the organization and No Authentication is almost never used due to the major risks associated with that.
Once OAuth is selected, populate the Client ID, Tenant ID and Client Secret fields with the information obtained from the previous Application Registration step.
Click Submit after all fields are set.

After clicking Submit, the page will reset to the MS EWS Services section, but with a new entry listed under Exchange Servers.
Select the green encircled check mark to initiate a test battery against the server to ensure that DataCove can reach and authenticate the service.

On the Test page, click the Run Tests button to begin the test battery.

The tests will take about ten seconds to run and will verify that the DataCove can resolve the Fully Qualified Domain Name assigned for the Exchange Server via DNS, can reach that service on Office 365, can authenticate with it given the Client ID, Tenant ID and Client Secret provided earlier and verify that the necessary permissions are present.
Once this completes, click on the MS EWS Services link on the left hand side menu to begin the next step of configuring the Teams Fetcher.

Back on the MS EWS Services page, select Add New Activity.

Under the Add New Activity page, multiple fields will appear that determine the type of EWS service that will be used, where it will route to, the scheduling for its automation and which users it will affect.
Activity Name should be given a descriptive name that covers what this particular service does. “Teams Archiving” is the recommended name.
Activity Type should be set for “Skype For Business.” While this is a now-deprecated name from Microsoft for the Teams platform referencing its origins, the original Chat Archiving was built for Skype For Business and this is a relic pending a name change as of version 6.12 of the DataCove software.
Exchange Server should be automatically set for the new Outlook.Office365.com server that was just added, but in organizations where multiple Exchange Servers may be providing services, be sure to select Outlook.Office365.com.
Week Days determine which days of the week the Fetcher should run. Most organizations should have this run every day; CTRL+Left Clicking each day will allow for the selection of multiple days.
Run Time sets the hour at which the Fetcher service will launch. This should generally be set for sometime after the end of the business day to collect all of the messages sent during that day so that they’re ready for searching and review the next day. This time setting operates on a 24 hour clock, meaning that 17:00 is 5pm local time.
Deciding which Users this Fetcher should run against is the last determination necessary. Most organizations will want the Teams messages of all users to be archived, with the configuration of an “LDAP Server” that seeks all users being the recommended approach. Checking the box next to either the local account username, LDAP Server (LDAP Authenticator) or Department will instruct the Fetcher to review all email addresses associated with those users and fetch copies of their Teams messages for archival.
Once filled in, click Submit at the bottom of the page.

The first scheduled run of the Teams Fetcher will take a significant amount of time, based on how far back in time the organization has been using Teams, followed by the quantity of users being fetched for. Initial runs can take several days to weeks to fully gather large amounts of data (limited by Microsoft throttles), but subsequent runs are generally very fast since they are only adding incremental amounts of data.
Note: Depending on when the process was scheduled to run, this initial run may not take place until late into the night and the results may not be available until the next day at the earliest.
When this process launches, its progress can be tracked by selecting Status in the top header bar, followed by System Status on the left hand side menu.

Locating the process called Skype Sync: Teams Archiving (or whichever name was chosen for the process in the previous step) and selecting its Magnifying Glass will provide details on how many messages were captured and how long the process run took.
After the Sync process finishes, a Skype Insert process will run to push those messages into the DataCove’s processing and indexing queues, after which they’ll be available for regular searching.

The traffic will also be visible from the daily email traffic graphs, found by clicking Status in the top header bar, followed by selecting Email Activity on the left hand side menu.
This will spawn a view of how many messages were fetched overall by the system over the course of the present day, including any Teams-fetched messages. Color coding of different traffic sources helps delineate which traffic came from where and their respective quantities.
Sorting filters are available at the bottom of the page to allow for searching over larger spans of time, as well as the right and left arrows on the graph page itself to move to the next date-demarcated range of data.

Viewing archived Teams Conversations
Now that some chat messages have been archived into the system, let’s look at how to view them.
Navigate to Email Viewing in the top header bar, then select Search on the left hand side menu.
Select a date range prior to present day to run a search for and populate a search term or other keywords that might be found in a Teams chat message.
Note: The present day’s messages are not likely to be on the system as yet, depending on when the Teams Fetcher is scheduled to run, so it’s best not to run it for the present day only.
3. Click on Search once the desired set of keywords has been defined.
The search results will now appear with messages matching the search criteria, including both emails and Teams messages. Teams messages can be clearly distinguished from regular emails by the subject line of “Microsoft Skype:” being present every time, whereas emails can have a variety of subject lines, or no subject line at all.
Each Teams message is considered an independent communication, much like how a single email being sent to someone is also an independent communication. In the context of chat-based messaging systems, a simple word or greeting like “hi” would receive its own message, but wouldn’t be particularly useful in and of itself. Attempting to read through dozens of such short messages would be a maddening affair, so a Conversation View that threads together communications between people is available for easy legibility.

Clicking on the Conversation View option for this same Teams message shows that the search term of “borgar” was a new entry in a line of food related one word conversations, with the occasional response from the receiving party threaded in.
This would be an example of a One-to-One conversation between two people only.

In a rich content multiple recipient setting, such as a One-to-Many group conversation, further communications from multiple participants can be seen and threaded together, including rich content like pictures, animated content and more.

The scroll bar to the right hand side of the context view shows the ability to view messages further back in time (limited by the date range searched).
It’s also possible to view the total number of participants in the conversation, including exactly which personnel they are, by clicking on the silhouette of people icon.
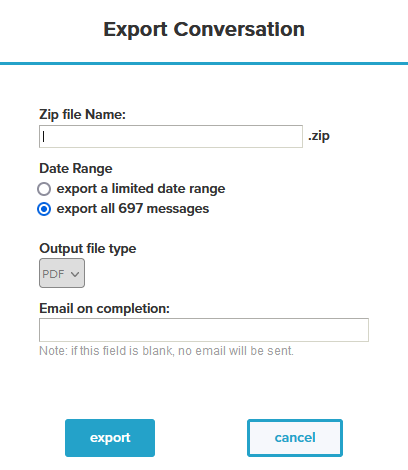
As with regular emails exports, DataCove also offers the option to export the content of the threaded conversation as a PDF file for further distribution or eDiscovery purposes.

As mentioned above, searching for only Teams messages can be executed by using the Subject Line search field and searching only for “Microsoft Skype.” This will solely bring up Teams messages and avoids emails.

As a corollary, Teams messages can be removed from search results by using the Subject Line’s None Of dropdown option and using “Microsoft Skype” in the search term field. This prevents any Teams messages from appearing in the search results.

This concludes the Teams Archiving setup guide for DataCove.
As always, if any trouble is being encountered with setting up or using this function, or if questions arise on how to best use it, please contact DataCove Support via this link.