Configuring Federated Search between multiple DataCoves
What is Federated Search and how does it help?
All DataCoves support a feature known as Federated Search, which clusters together the search engines and email databases of multiple DataCove systems into behaving as if they were one very large machine. ‘Single origin search’ is the resulting capability, wherein a search initiated on one DataCove propagates to the other systems in the Federation, with all of the search results from each system rendering on the machine from which the search was run from.
Given that DataCove uses storage-size based licensing with each machine bringing its own resources to the table commensurate to how much data it is expected to hold, the obvious benefit of Federation is scalable growth between multiple DataCoves and their respective databases without compromising performance. Performance at the scale of tens or hundreds of terabytes has frequently been elusive for many data storage and archival systems until the ubiquity of cheap SSDs, but DataCove has managed it through software and hardware ingenuity for more than a decade already.
Mechanically, when Federated Search is configured, a new layer of execution is added to the search process that points at each Federated DataCove, instead of just the DataCove that the search is being run on. When a search is executed, the search request is blasted out over HTTPS to the partner machines, with the results from all systems blending back into the display on the Search Originator machine also via HTTPS. Local DataCove results from that Search Originator machine, if any, will render first and fastest, with the remaining Federated DataCove’s results streaming into the display pane as their searches run.
There are two kinds of Federation: Unidirectional and Omnidirectional.
Unidirectional Federation describes a scenario of when one DataCove (the “Primary” DataCove henceforth) can reach the other DataCoves (Secondary systems) in a Federation to search upon itself and the other systems, but the Secondary systems cannot search upon the Primary DataCove. These Secondary DataCoves may or may not be configured to search upon other Secondary DataCoves depending on the layout of the organization, or they may be only beholden to the Primary DataCove.
This Unidirectional Federation is most often used when a “parent” organization or agency needs to have their own data archived while also viewing the archives of various autonomous departments, agencies or subsidiaries, but without those same child organizations being able to view the parent organization’s archives.
This is also commonly used in merger/acquisition scenarios, extremely large organizations with multiple field offices that have compartmented data security requirements or complex organizations with multiple uniquely named subsidiaries.
Omnidirectional Federation describes a Federation wherein each DataCove in the Federation can search on each other entirely. Federating all of the systems together provides complete data consolidation so that any one DataCove can search all of the DataCoves simultaneously and without being restricted to using a “multitenant” interface for all of the data and an “individual” interface for local data.
Omnidirectional Federation is most commonly used when large organizations have multiple DataCove systems to achieve scalability into very large archived datasets. By Federating all systems together, huge amounts of data upwards of tens or hundreds of terabytes can be consolidated and made searchable from any of the DataCove’s in the Federation.
This configuration is also incredibly valuable for use when migrating from one DataCove to another DataCove, as it allows for one machine (usually the newer system) to search on not only new data it ingests, but also the old data that the old machine possesses, until the migration completes and all data is searchable from the new DataCove.
Deciding which Federation type to use is the first step to decide on when planning to Federate DataCoves, as that informs the subsequent configuration steps.
An example network diagram is provided below to show how the layout operates.
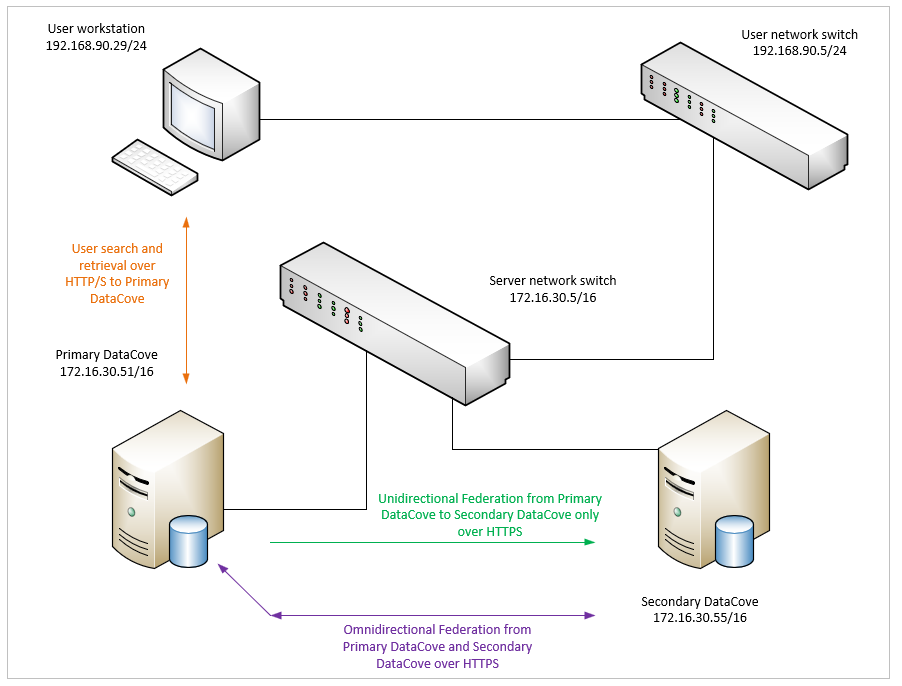
Much like a RAID volume, the slowest system (either from hardware performance, existing loads or network latency) sets the speed for the entire Federation. For example, federating a small DataCove with a large DataCove, both of which have vastly different capabilities, means that the search on the large DataCove would execute and be finished many seconds before the same search finishes on the small DataCove, leading to a longer “total” wait time for complete results to render.
There are several recommendations and advisories to Federated Search that should be taken into consideration when planning a deployment for optimal performance:
The systems should be as close to each other as possible, in terms of network proximity, preferably attached the same switch. Federating systems over the Internet or over high latency connections is not recommended and will degrade search performance across the cluster.
Emails placed under Legal Holds/Tags on one system will tag the relevant emails on each individual system as appropriate after Tag synchronization, but tagged emails are not “moved” between systems for centralized storage.
The systems should be as similar in hardware profile, generation and capability as possible. Older, smaller or otherwise less powerful systems being Federated with newer or mightier platforms will wind up slowing down the overall search performance.
All systems must have a valid Service subscription and should be updated to the latest version.
As a reminder, search results are not fully viewable until a search has completed and no results should have any export/tagging action taken against them while the search is in progress. The appearance of a search in progress, as shown in the Retrieving Results popup and the red text in the number of search results can be seen below:

That same search completed, as designated by black text in the number of search results:

Configuring Federated Search on the Primary DataCove
Before beginning the Federation process, ensure that the workstation being used for this configuration can reach all of the web interfaces of each DataCove that is to be Federated, and that all of the DataCoves to be Federated can communicate with each other over the network. Any firewall clearances, managed switch port authorizations or VLAN tags should be performed ahead of time to ensure clear communications between the systems both at time of configuration and for the future, as Federation is reliant upon clear and rapid communication between the systems to function.
The following steps should be performed on whichever DataCove will be designated as the Primary DataCove, as defined by it being the most commonly used system for searching or the “master” system in the Federation which can search on other DataCoves, but cannot be searched on by the other DataCoves.
Log into the DataCove web interface and select Configuration in the top header bar, followed by Federated Configuration on the left hand side menu.

The Federated Configuration page will display two different sections of unique text held in copy pastable form: the Federation Key and the Product Key.
The Federation Key is a Pre-Shared Key (PSK) that functions like a password for access into other DataCoves, similarly to how a Pre-Shared Key (commonly referred to as a ‘wifi password’) is used to log onto a secure wireless network. This key should be copied to a Notepad and kept aside for use on the Secondary DataCove if planning to use Omnidirectional Federation.
The Product Key is another unique identification key for each individual DataCove, which when combined with a few other unique characteristics of each machine, are used for matching system updates, subscription status and more. This key should be copied to a Notepad and kept aside for use on the Secondary DataCove if planning to use Omnidirectional Federation.
These long strings of alphanumeric text can be quickly copied to the local workstation’s clipboard by using the double folded page “copy” icon placed on the right hand side of each text box. This feature obviates the need to manually select the text and copy, potentially missing characters.

Below the Federation and Product Keys are the version-linked federated environment security mode. Depending on the version of the DataCove being configured, different mechanisms were used for authentication and communication between the systems.
Version 6.3.1 and prior used SMTP to handle these processes, whereas version 6.4 and later use HTTPS.

Identifying which version the DataCove is on can be found in the bottom footer of any page of the web interface, or by selecting Status in the top header bar, then clicking System Summary on the left hand side menu.
If running on a 6.4 or above DataCove, leave this option set for Version 6.4+ Security.
If running on 6.3.1 or prior, do not select Pre-6.4 Security and instead visit the following knowledge base article on how to update the DataCove to a newer version: https://datacove.net/knowledge-base/installing-software-updates-to-datacove
Note: While Federation can be configured in a 6.3.1 or prior environment, there are security implications that come into play and a different method of configuring the DataCoves that is now obsolete and not covered in this article. As Federated Search only functions with a valid DataCove subscription, this intrinsically means that a DataCove without a valid subscription cannot use Federation, and one with a valid subscription can and should update to a newer version that supports the 6.4+ Security mode.

Once the Environment Security Mode has been selected, locate the Active Machines section and click on Configure This Machine.

Federating a DataCove requires an initial step instructing each DataCove of its upcoming role as part of a cluster of systems. This is inserting logic into the execution layer of the search subsystem that the DataCove needs to narrowcast any searches run on it to similarly Federated partners and should wait for additional results or an internal timeout value to be reached before it concludes any searches run from it and makes available the results.
The Active Machines and Inactive Machines sections at the bottom of the previous page will indicate which machines are anticipated to be recipients of that narrowcast and which ones are not, along with their respective communication status. Active Machines will receive the narrowcast and are expected to report back, whereas Inactive Machines will not receive receive the narrowcast and are not expected to respond.
The initial configuration step for the Primary DataCove will be to enter the system’s IP address or Fully Qualified Domain Name (FQDN) into the identifier field. This field comes prepopulated with the default term of ‘master,’ which should be replaced with the correct IP address or FQDN of the system.
Note: If using a FQDN, be sure that internal A records exist in the DNS that point to the accurate IP address of the DataCove, and that DataCove is configured to use those nameservers. Identifying which nameservers DataCove is configured to use can be performed by visiting Status in the top header bar, then scrolling down the default Dashboard page until locating the network information. In general, it is recommended to use the IP address rather than FQDN to avoid any misconfiguration issues with DNS.

Once the IP address or FQDN of the system has been added, select Save.
The page will now go back to the Federated Configuration page with a green “success” notification at the top of the page.

Scroll down to now see the Primary DataCove listed under the Active Machines section, with the Responding and 6.4+ indicators present.
With the Primary DataCove configured, a Secondary DataCove can now be added to the Federation.
Click the Add Federated Machine button.

Adding a Secondary DataCove is a little more involved than the configuration of the Primary DataCove. The Primary DataCove knows its own Federation Key and Product Key, only needing its IP address or FQDN entered. However, the Primary DataCove needs to be informed of those items from the Secondary DataCove.
The Add Federated Machine page will inquire for the IP address (or FQDN) of the Secondary DataCove, its Product Key and its Federation Key.
Enter in the IP address of the Secondary DataCove at this time.
In another tab or web browser, log onto the Secondary DataCove’s web interface, select Configuration from the top header bar, then select Federated Configuration on the left hand side menu.
Using the dedicated copy button discussed above, copy the Product Key and Federation Key from this page, then switch back to the Primary DataCove’s tab/browser and paste them into the Primary DataCove’s respective Product Key and Federation Key fields under the Add Federated Machine page.
Click Save.

The browser will now go back to the Federated Configuration page, with a small green text alert declaring success.

The final step in the Primary DataCove’s Federation is to activate the newly added Secondary DataCove, integrating it fully into the new search execution order.
Scroll down on the Federated Configuration page until finding the Inactive Machines section, wherein the newly added Secondary machine will reside.
Check the box next to the Secondary Machine’s IP address or FQDN, then click the upward facing green arrow for Activate Selected.

The page will refresh and a small green text blurb will appear at the top of the page declaring success.

Confirmation of the status of the newly built Search Federation can be found by scrolling down the page once more until finding the Active Machines section. Both machines should now appear in this section with their respective Responding and 6.4+ indicators active.
The Primary DataCove is now configured to search upon itself and the Secondary DataCove, creating a Unidirectional Federation.
At this point, additional DataCoves can be added to the Federation with the same Add Federated Machine step.
The next section will cover the configuration of the Secondary DataCove to search upon the Primary DataCove, creating an Omnidirectional Federation. If a Unidirectional Federation is all that is needed, skip ahead to the Testing Federated Search section.

Configuring Federated Search on the Secondary DataCove
This section is only required if configuring an Omnidirectional Federation. Machines only needing Unidirectional Federation can safely skip this section and move ahead to Testing Federated Search.
Configuring the Secondary DataCove in a Federation allows it to search upon not only itself, but also the Primary DataCove. This is useful for DataCoves that are sharing workloads, dealing with different datasets and generally having a more cohesive search experience across a larger data volume, especially in cases of DataCove migrations where the data may be present in only one location at a time but still needed for e-Discovery, with the tumult of transition potentially causing confusion on which data is being retrieved.
The configuration of the Secondary DataCove is largely the same as the configuration of the Primary DataCove and the same steps above can be repeated. The process will simply be performed from the mirrored perspective of the Secondary DataCove with respect to how it interacts with the Primary DataCove. A brief refresher on the steps required are below. Full visual examples can be found in the step above for configuring the Primary DataCove.
Log onto the Secondary DataCove’s web interface, select Configuration from the top header bar, then click Federated Configuration on the left hand side menu.
Under Active Machines, select Configure This Machine and point the Secondary DataCove at its own IP address or FQDN. Click Save.
The page will reset back to Federated Configuration. Scroll down the Federated Configuration page again to Inactive Machines and click on Add Federated Machine.
Enter the Primary DataCove’s IP address or FQDN, then plug in the Product Key and Federation Key copied from the Primary DataCove’s Federated Configuration page. Click Save.
The page will revert back to Federated Configuration again. Scroll down the Federated Configuration page until finding Inactive Machines. Locate the newly added Primary DataCove, check the box next to it on the left, then click Activate Selected.
The Federated Configuration page will refresh again. Scroll down to Active Machines and verify both systems are showing the Responding and 6.4+ active indicators. If so, a full Omnidirectional Federation is now live and both DataCoves will now function as if they are working with one large dataset that is split between both of them.
Additional DataCoves can be added at this point, with the reminder that each additional DataCove will need to have its Federation configured both locally to itself and on all partner machines to keep the Omnidirectional Federation fully functional.
Testing Federated Search
As with any service dealing with large datasets over disparate systems, it’s always prudent to verify that the Federation is working and results are coming back as intended.
The simplest way of testing this is to log onto a DataCove that can search on other DataCoves, and run a search for data that only would exist on a DataCove that isn’t the one having been logged into.
In the case of an Unidirectional Federation, log onto the Primary DataCove and search for a date range or emails that would only exist on the Secondary DataCove.
In the case of an Omnidirectional Federation, log onto any DataCove and search for a date range or emails that would only exist on another DataCove than the one logged into.
A simple example is provided below in the context of an Omnidirectional Federation, wherein a migration is about to be performed from one system to another. The newer system does not have any emails on it, as evidenced in the below image.

On the appropriate DataCove, begin by selecting Email Viewing on the top header bar. The default page for Email Viewing is Search, and the search interface will be brought up immediately.
Run a search for a date range, such as Before in the dropdown date range option, followed by the present date, and then click Search.
In this example, a search initiated from the new system for data it does not have locally brings back emails that exist only on its Federated partner system.

If the Search is not bringing back any results, deactivating and reactivating a Federated partner machine from the Federated Configuration page may get the search working properly. Rebooting both machines to fully recompile their search structures is also a prudent second option.
If these steps does not resolve the issue, DataCove Support should be contacted for more advanced analysis.
Using Tag Synchronization
Tag Synchronization is an advanced function that not only replicates Tags and Legal Holds from a “Primary” or “Parent” DataCove in a Federation to other partner machines the first time it is run, but also enables future Tags and Legal Holds that have been created to automatically spawn onto the other systems in the Federation. After Synchronization occurs, emails that Tags or Holds are being applied on, regardless of where they are in the Federation, allowing for widescale Tagging or Holding across the entire Federation. Deletion of Tags/Holds are likewise synchronized, as well as Retention Policy schedules that determine their lifetime.
The Synchronization function is only recommended for Omnidirectional Federations and is designed for scalability of archives. Unidirectional Federation use of Synchronization would logically “give away” what is being Tagged/Held to the Secondary DataCoves since those Tags/Holds would be visible on those machines. Tags/Holds created on systems that are unaware of other DataCoves will not be replicated over to the other systems, leading to disparate Tagged emails between the systems over time.
Note: Tag Synchronization only replicates the existing Tags/Holds from other machines in the Federation; it does not replicate nor migrate emails that have been Tagged or Held on other systems.
In this example of a common scaling deployment, the "Parent” DataCove is a system that has been operating for a couple of years and already has Tags and Legal Holds on it. The Parent DataCove is nearing full capacity and cannot take in any more data.
A new DataCove, the “Child” DataCove, has been acquired and is being Federated with the Parent to grant additional storage capacity and will be taking over the receipt of new emails.
Both DataCove’s should be Federated in an Omnidirectional Federation. Once complete, the Child DataCove will be the system instructed to begin Synchronization, which will import the Tags/Holds from the Parent system.
Note: It is critically important to only select Start Synchronizing on the Child DataCoves that are expected to import Tag/Hold information from the Parent. Initiating Synchronization on the Parent from an “empty” Child DataCove that does not have any Tags/Holds configured will wipe out the Tags/Holds on the Parent DataCove.
Selecting the Start Synchronizing button at the bottom of the Federated Configuration page initiates this process, and after approximately one minute, the Tags/Holds from the Parent will be replicated onto the Child DataCove, and will be ready for use.

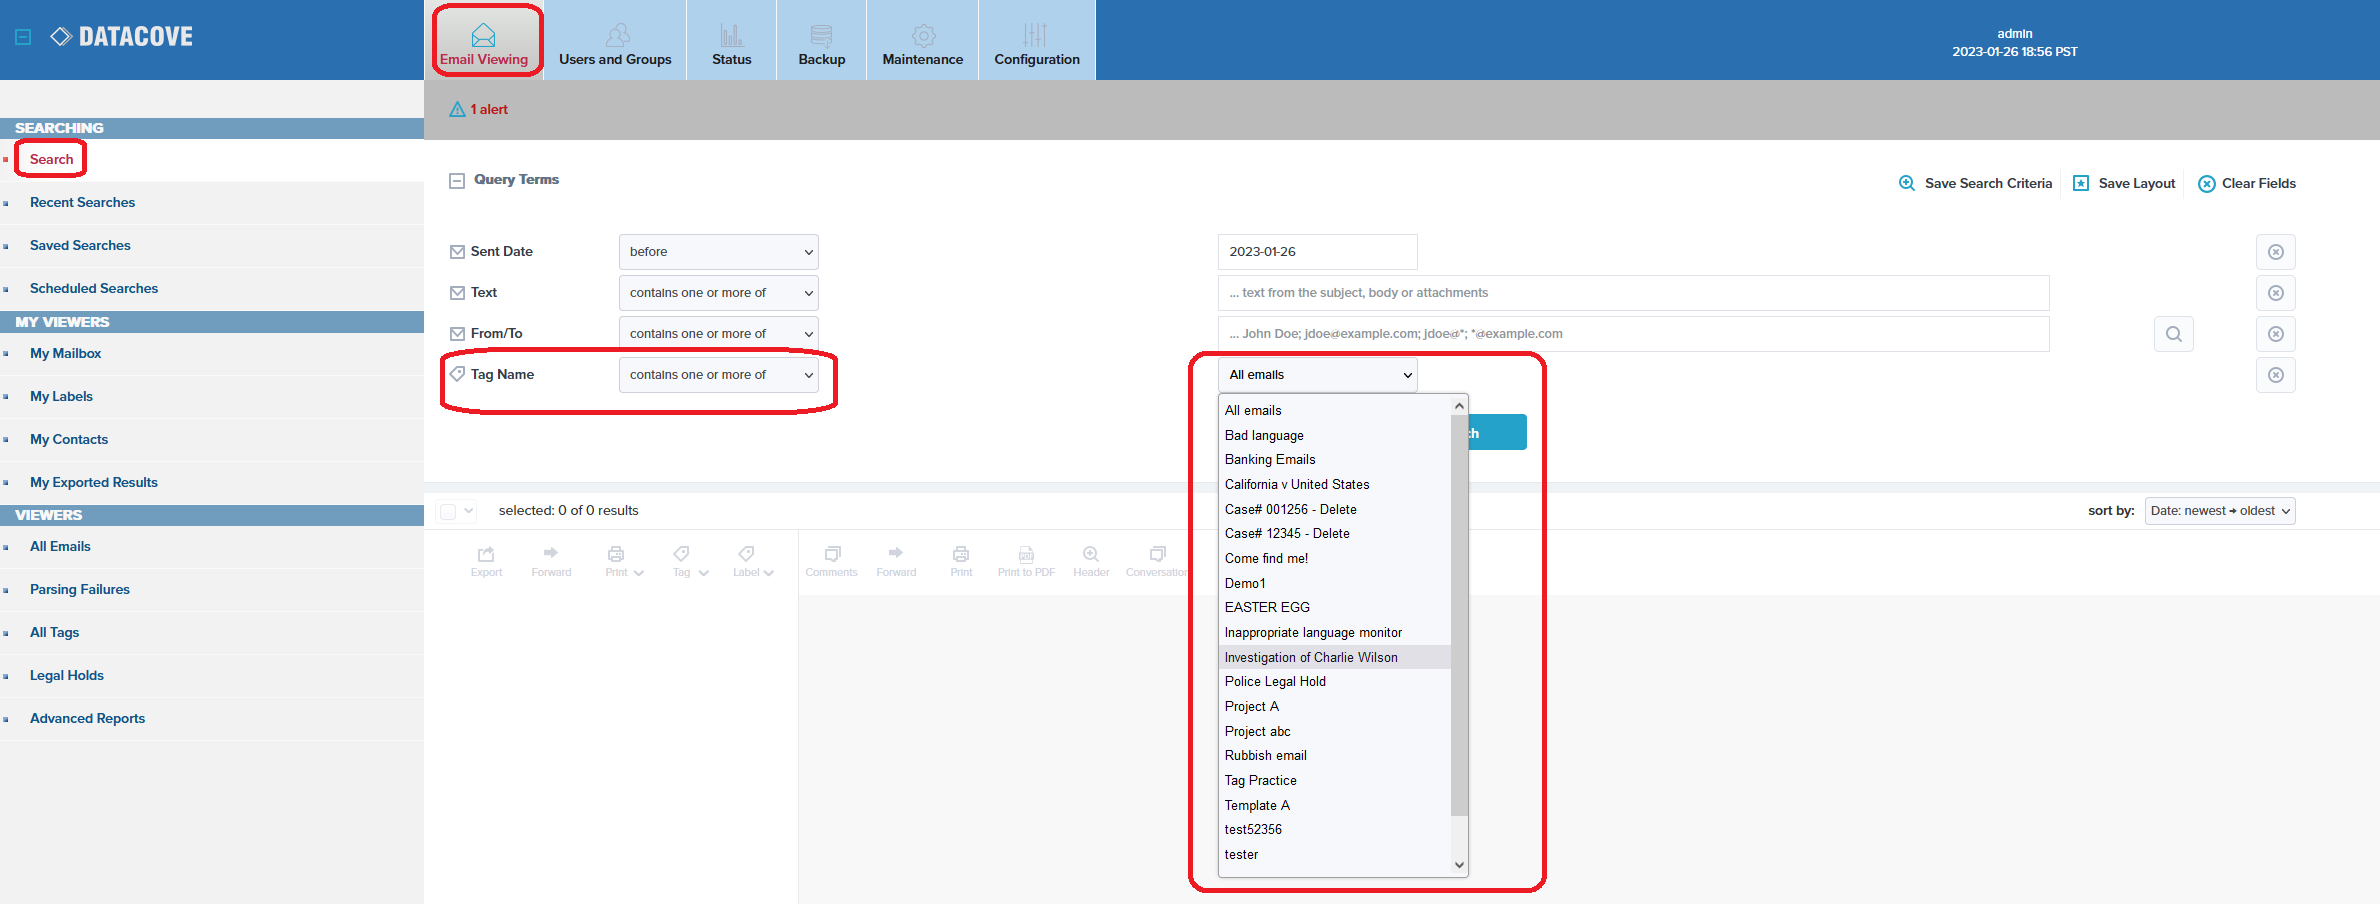
Once emails have been Tagged/Held in a Federation, using the local DataCove’s Tags or Legal Hold views will show you the local machine’s results, but won’t show the results that may be Tagged or Held on other systems in a Federation.
To find those in a cohesive manner, select Email Viewing in the top header bar and from the default Search page, select Add Search Term.

A popup window will spawn offering a list of additional search terms that can be added to the search pane. Select Tag Name.

With the Tag Name field now added, a dropdown box will appear with the names of all of the Tags and Holds that the DataCove is aware of. Selecting one or more of these will allow for a search to be run across all DataCoves in the Federation for emails matching that named Tag or Hold.
Deactivating Federated Search
When a Federation is no longer required, such as after a Migration is complete or when a machine is being retired and replaced with a newer system, the defunct systems should be removed from the Federation in order to improve Search speeds in the remaining members and to prevent any search errors.
When a search request is executed, it propagates to all of the systems in the Federation and then waits for results back. Waiting for results from machines that are no longer present only delays the responsiveness of the search and can introduce display errors for systems that partially respond to the query, but do not provide results, such as a system that is out of subscription.
In order to deactivate Federation, select Configuration in the top header bar, then Federated Configuration on the left hand side menu.
Scroll to the bottom of the page and depending on the nature of the deactivation need, follow the appropriate step below:
For removal of a single DataCove member, locate the Active Machines section, select the checkbox next to the appropriate system for removal, then click Deactivate Selected. This should be performed on each member of the Federation no longer expected to collaborate.
To entirely remove a Federation from a machine, such as in a post-migration scenario when Federation will no longer be needed, select Reset Federated Configuration to complete wipe out any search changes that result from Federation. This should be performed on each member of the Federation no longer expected to collaborate.
Once Federation is removed, the system(s) will return to only searching upon itself and any other Active Members.

