Importing PST files into DataCove
What are PST files and when would PST files be uploaded to DataCove?
Personal Storage Table files, more commonly known as “PST files” or “the bane of Microsoft Exchange administrators,” are a database of folders and emails that the Microsoft Outlook client produces as a user-facing means of storing their data in a location that isn’t necessarily on the Exchange Server itself and that is portable by the user.
While OST files, known as Offline Storage Tables, are where Outlook keeps an effective mirror of the folder and email structure we’re familiar with for its own use, PST files are meant for excess data storage and can be used for simple import and export procedures between Outlook clients beyond what OSTs do, allowing for very large data sets to be maintained within a single Outlook client without risking corruption of the data and allowing for easy movement of the data between systems. Unfortunately, PST files themselves do have a nasty tendency of corrupting themselves, especially the larger they get, hence the headaches they cause for Exchange administrators.
By virtue of the ubiquity of the Outlook client, many organizations possess PST files for their users and often centralize them on a file server or other network storage to provide redundancy of the data with hardware protections like a Redundant Array of Independent Disks (RAID) and mobility between user profiles when a computer is replaced or when the user uses a different desk/computer than their usual one. In scenarios like these, when a DataCove is first deployed, there is often a desire to import as much existing data as there is from the environment and have the end users then search within the DataCove for their emails, getting them used to the idea of searching a centralized repository for both old and new emails in a more efficient and, often more accurate, manner than what Outlook itself can do.
Plenty of organizations follow this up with a phase-out of PST file storage on their local networks to get rid of these perennial troublemakers, thus using DataCove as both a regulatory archive and as a convenience for the end users and system administrators alike.
In another common scenario, Office 365 Administrators may need to export a mailbox into a .PST file and upload that to DataCove for specialty eDiscovery purposes or to capture Non-Deliverable Report emails that were created from a network or ISP outage, which could’ve prevented DataCove from receiving the emails before their retry expiration. While these aren’t frequent due to the stability of the journaling process DataCove uses for email capture, regional events like hurricanes, flooding and large scale power outages are becoming more frequent and causing downtime events for many organizations, often forcing these kinds of situations.
Note: Any PST files being uploaded to DataCove should not be encrypted, password protected, and if possible, not compressed. Any such blockades can prevent DataCove from being able to interpret the file and consequently disallow import.
PST file “ownership” and impacts resultant from means of creation:
The creation of PST files plays a huge factor in how the data will be handled when uploaded to DataCove.
PST files that were created by the Outlook client, whether as an export or created by the client for local data storage, will have their SMTP Recipient Addresses from the emails stripped, meaning that while the FROM: field on any given email will be properly populated with a Display Name and Email Address as we’d normally expect, the TO: field may only possess the Display Name of the user, but not the email address. This means that when uploaded to the DataCove, searching for emails sent to that user’s email address won’t necessarily show emails that were imported from the PST file. Running a second text search for the Display Name can find those emails, but will often bring up additional undesirable results that would require manual filtering, making the process cumbersome.
While it is unknown why Microsoft chose to make this Recipient Stripping a standard of their PST files, it is a factor that must be understood to allow for proper eDiscovery of the emails. Given the obvious visibility consequences this brings, DataCove has an in-built method of “appending” an email address to PST files at time of upload to mitigate this issue. The appendment function essentially inserts a BCC Header into the emails as they are inserted into DataCove with a specified email address, allowing for easy searching for them once indexed.
This appendment functionality comes in a few flavors, such as using DataCove’s Artificial Intelligence engine to “read” some of the emails in order to determine who the “owner” of the PST file is and automatically adding their respective email address back into the emails, to prepopulating a text file with the owner’s email address (or the desired email address to attach) during the upload process and lastly to manually entering in the email addresses at time of upload itself.
In general, the Text File method is recommended for large scale PST uploads (upwards of 20 PST files) for accuracy purposes, and the AI AutoDetect and Manual Entry methods for smaller scale uploads.
Note: As with any AI technology, it is recommended to compare the PST file and the “owner” that DataCove detected for it for accuracy.
PST files created by Exchange or Office 365 export processes do not suffer from this SMTP Recipient Stripping, and are fine for upload as is.
Note: Large scale exports of PST files from Office 365 to bring in existing data is rarely necessary, as DataCove’s Email Crawler is almost always the more efficient means of pulling this data in. Read more about that technology here.
Upload options and recommendations
Depending on the scope of the PST files being uploaded, there are a couple different means of importing them to the DataCove. Both options and their means of execution will be discussed below.
For large scale uploads, best used when there are more than ten PST files that need to be imported at a time, the Network Share method is recommended.
For small scale uploads, when there are just a handful of PST files that need to be sent in, the Browser Upload method is recommended.
The Network Share method is best used for large scale imports of PST files, such as when a DataCove is initially deployed and a large amount of extant PST files are being brought in. This method is also best used for large individual PST files or when local system memory prevents using the Browser Upload method, as that process is intensive on the local machine being used for the data upload and not all workstations will meet the demand.
The Network Share method consists of creating an Server Message Block/Common Internet File System (SMB/CIFS) or Network File System (NFS) network share, placing the desired PST files for upload within and then mapping the DataCove to the share so it can import the data.
The example below will use a common Windows (SMB/CIFS) share, but the Network File System (NFS) share is also fine for use. For guidance on configuring an NFS share, please see this Knowledge Base article on configuring NFS shares for use with DataCove.
Begin by creating the network share and populating with a copy of the PST files slated for upload.
Specify an account that will have read access to that network share that the DataCove can use for the import.
Note: Be certain to only use a copy of PST files and avoid directing the DataCove at a network share full of live PST files that are in use by Outlook clients or any other applications. Changes being made in the live files during the upload process can cause the import process to fail, possibly skipping data that is otherwise desired.
Once the network share is ready, log into the DataCove and select Maintenance from the top header bar, then click Import Email on the left hand side menu.
For the Imported Email Source, locate PST on the dropdown list and then select Submit.

The page will now adjust to a network mapping box for population.
Add in the Username and Password combination to access the SMB share (enter in the domain field only if the account used is a domain account and not a local one), then populate the Hostname field with the Fully Qualified Domain Name (FQDN) or IP address of the server hosting the files.
Lastly, enter in the network path of the network share, omitting the server IP/hostname information since that is covered in the previous field.
Once all necessary fields are populated, click Next to have DataCove attempt to mount the network share.
Note: If there is an inability to mount the network share, red text will be displayed at the top of the screen. Recheck the username, password, hostname and path used for correct spelling as well verifying that the network share has been configured properly as a network share and that the account being used has proper permissions.

With a successful mounting of the share, DataCove will then request instruction on how the PST files in that share are to be identified for import.
Two options exist here:
“Search,” which tells the DataCove to go looking for all files matching a .PST extension. If there are PST files that are buried in subfolders, be certain to check the “Search for all” box so that DataCove performs a search for PST files not only at the root level of the share, but also any sublevels.
“File,” which requires the addition of a small text file specifying which .PST files to upload and allows pre-matching them with a desired email address for identification. This is a critically valuable method of “fixing” large Outlook-client created PST files which would otherwise have their SMTP Recipient addressed stripped.
In general, the Search method is fine for any PST uploads with a quantity of 25 or below and is optimally suited for using the AI AutoDetect or Manual Entry methods of appending email addresses to the PST files or when no address appendment is necessary.
“File” is the superior option when there are a large quantity of PST files that were generated from an Outlook client and not from an Exchange server, especially if they will need address appendment, as the same file will be used to both locate the files within the share as well as to match an email address to each file on a later page.
We’ll briefly discuss the “Search” method below, before moving onto the “File” section. The Search method is largely as described above, instructing the DataCove to list all files and folders in the share it has been pointed at from the previous page, then matching any of them that have a .PST extension for import.
If the “Search for all” box has been checked, DataCove will check all folders contained within the share for additional PST files that may not be at the top level.
Once the Search method has been selected, click Next. DataCove will take a moment to read through the contents of the share and then list them on the next Address Discovery page, discussed ahead in the PST Importing and Monitoring section.

DataCove will now present a list of all of the PST files it has read from the share during the search. Ensure that all desired files are here; if any are missing, verify they are in the share and that the Search for All box was checked.
Check the box next to the PST files to select them as part of the upload battery. This is the last opportunity to include or exclude any PST files from the process.
At this point, the DataCove has instructions on the files to upload and we’re ready to proceed to the next steps.
Click Next and move ahead to the next section for PST Insertion and Monitoring.

To use the File upload method, begin by selecting the “File” option.

The page will change to show a PSTList.txt file that can be downloaded and edited.
Right click on the PSTList.txt file link and select Save Link As…

With the PSTList.txt file downloaded, locate and open the file using Notepad.
This text file is used in two separate sections to provide instruction on how the file itself works and an ‘input’ section that specifies the content that should be read by DataCove.
The top section contains text preceded by pound signs (hashtags) and are used as comments for the code that the system is expecting. Any text with a pound sign prefixing the line will not be interpreted by the system as a command.
The bottom section contains the actual filenames and email addresses that will be associated with them.
Under the “# Some Examples” line, add in the name of the PST file, followed by a press of the keyboard key ‘tab,’ then the email address that should be appended to the file. Press Enter to move to the next line down and repeat the process until all filenames and email addressed are sequenced.
Do not place a pound sign in front of these file names; that will ‘comment them out’ and prevent them from being read.
Once the files and email addresses you intend to upload are set, remove the preconfigured examples from the text file and Save the changes.

With the PSTList file now prepared, select Browse and navigate the Explorer box that spawns to the populated PSTList.txt file.
Once selected, click Save and the file will be mapped for upload to DataCove.
Click Next.

DataCove will now present a list of all of the PST files it has read from the share that match with the list provided. Ensure that all desired files are here; if any are missing, verify their filenames in both the share and on the text file.
Check the box next to the PST files to select them as part of the upload battery. This is the last opportunity to include or exclude any PST files from the process.
At this point, the DataCove has instructions on the files to upload and we’re ready to proceed to the next steps.
Click Next and move ahead to the next section for PST Insertion and Monitoring.

For small PST file uploads (whether in total gigabyte size being under 60GB or total number of files being under 10), DataCove possesses a convenient browser-based upload function that can be used to select the files desired for upload and send them up without needing to create a network share at all. In order to import these, they must be uploaded to the system first so that DataCove can provide that option.
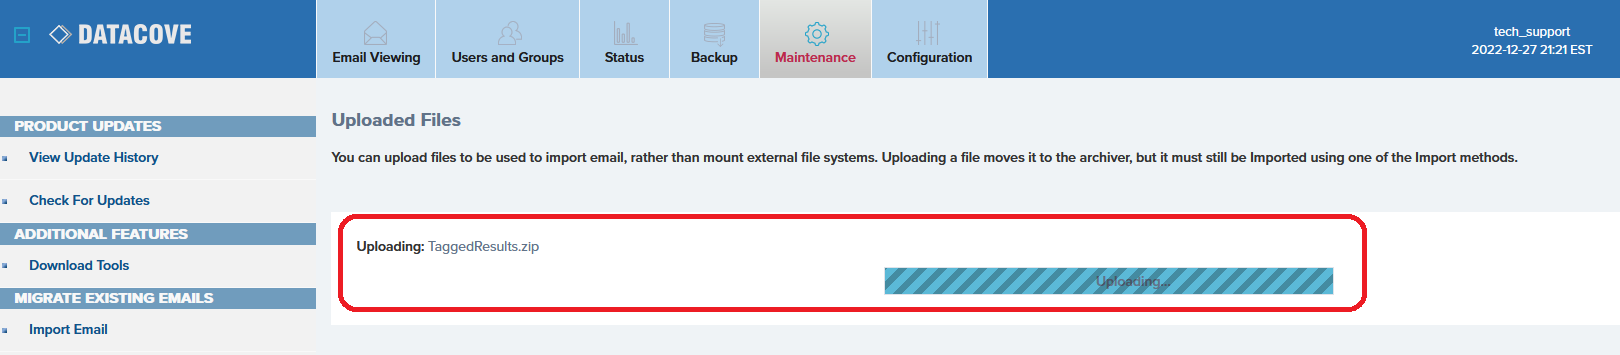
Begin by navigating to Maintenance in the top header bar, then select Uploaded Files on the left hand side menu.
Select the Browse button to open an Explorer window to select the files.
Once they have been selected, click Save to map those files for upload.
A text or email notification can be configured here to notify an administrator when the files have completed upload. This is generally meant for larger or slower uploads and isn’t generally needed for most situations.
Click Submit to begin the upload process.

DataCove will send a small pop-up dialog box with the advisory not to close the browser while this process is in progress.
Closure of the browser will terminate the upload process.
Speed of the upload is determined by the total upload size and the network bandwidth between the workstation and DataCove.
Click OK to begin.

The upload process will now start, showing a progress bar for the files being uploaded.
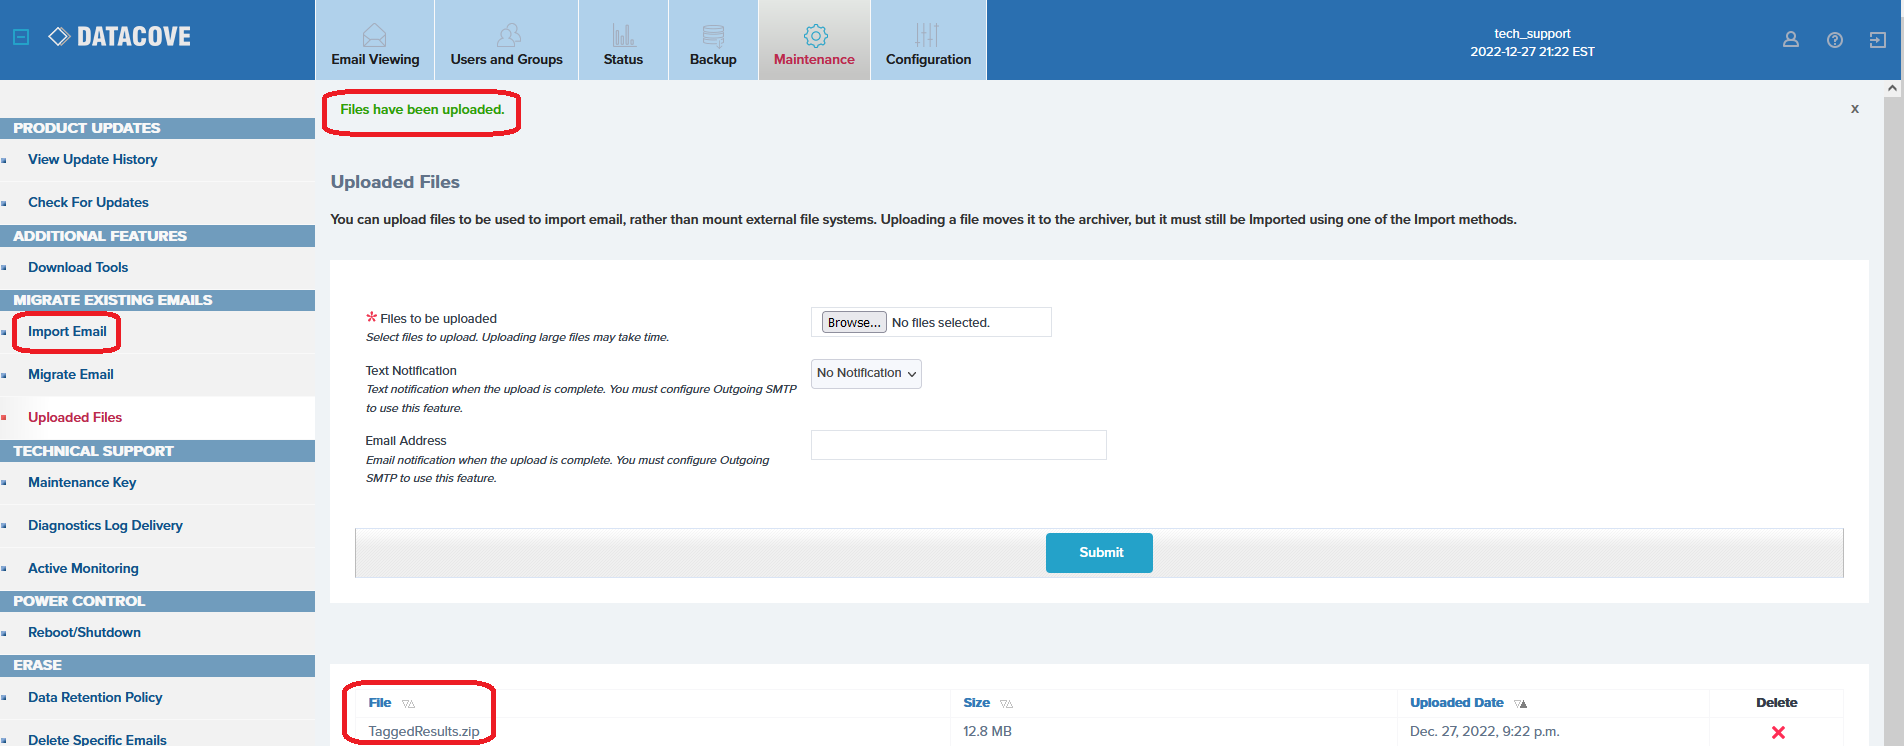
Once the upload completes, a green text alert will appear in the upper left hand corner of the page, with a listing of the files that were successfully uploaded appearing at the bottom.
Verify that all of the desired files have been uploaded, and if they have, select the Import Email function on the left hand side menu to reach the PST import process.
Note: If any files are missing, rerun the same Browse and Submit functions to add them in. Network interruptions or access to the files can halt the upload process, and DataCove will move onto the next file in line for the upload if this occurs. There is no need to remove any successfully uploaded files from the list beforehand.
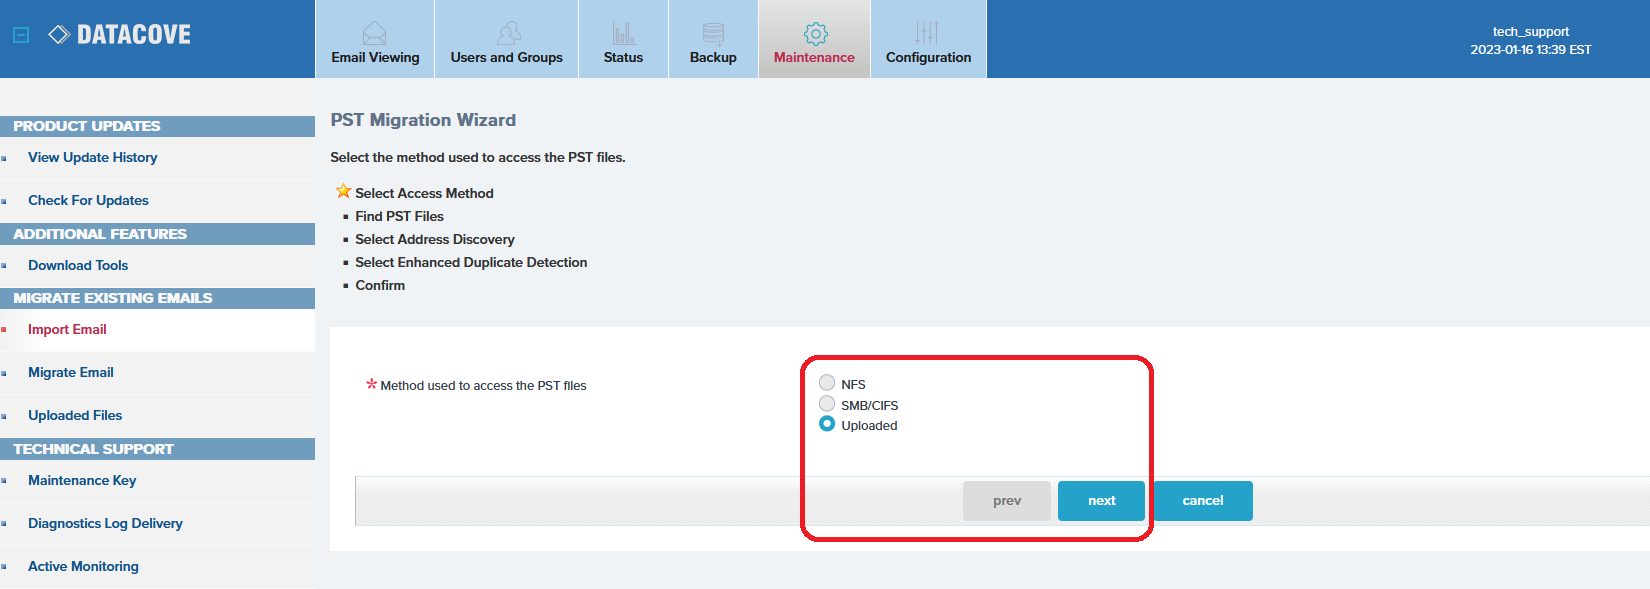
On the Import Email page, define the source of data as PST on the dropdown list and then select Submit.

For the method of access to the files, select the Uploaded radio box, then click Next.
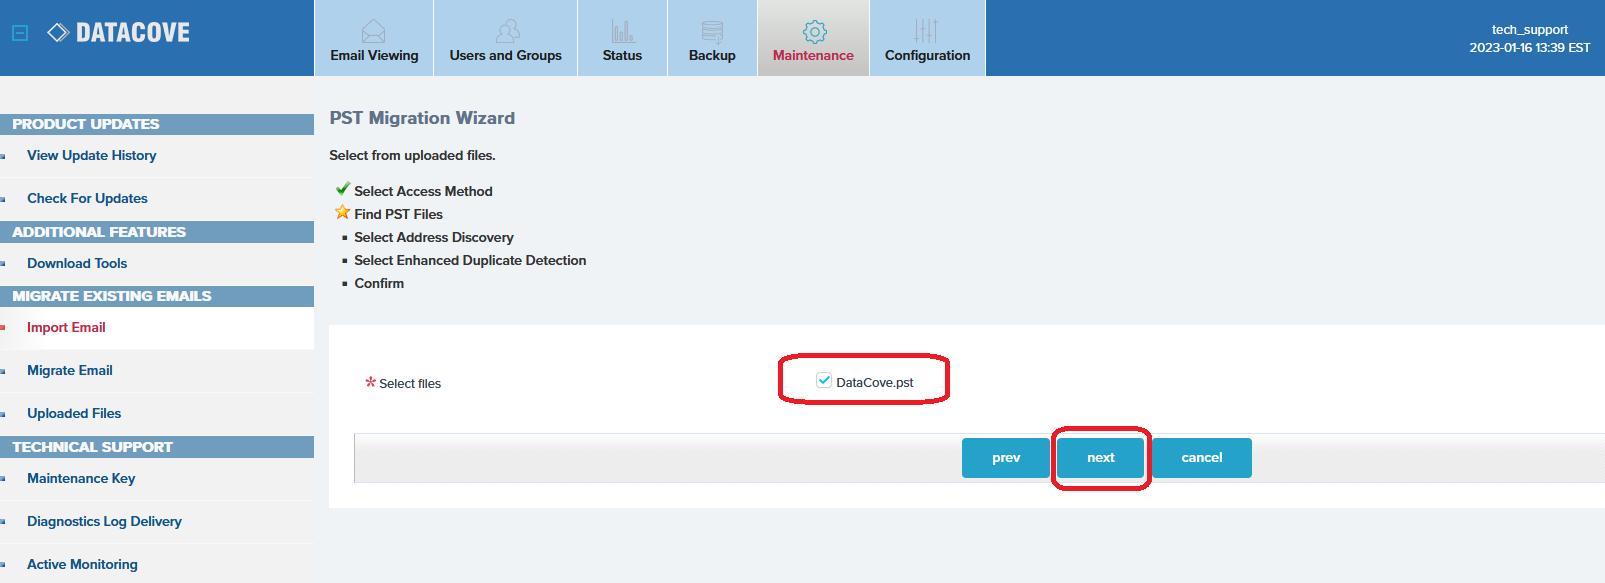
DataCove will now present a list of all of the PST files it has waiting in the Upload queue. Ensure that all desired files are here; if any are missing, recheck the Uploaded page to verify they are indeed present on the system.
Check the box next to the PST files to select them as part of the upload battery. This is the last opportunity to include or exclude any PST files from the process.
At this point, the DataCove has instructions on the files to upload and we’re ready to proceed to the next steps.
Click Next and move ahead to the next section for PST Insertion and Monitoring.
PST Insertion and Monitoring
With the PST files now recognized by the DataCove and ready for action, a few steps remain before the Insertion process itself can begin.
The first is Address Discovery, mentioned previously as Email Address Appendment. Address Discovery is the process of finding out an email address linked to a PST file and appending that address to the emails contained within, if necessary.
Whether this is required and which option is selected is largely determined on the source and type of the PST file(s) being uploaded. A brief list of recommendations based on the source of the files is below:
PST files that were created by an Outlook client: these should always have an address assigned or discovered for them.
For individual user PST files, use the address that the user has (or in the case of people have have changed their names, such as a married last name, and consequently have an updated email address, use the updated address if applicable) for the Discovery.
For journaling account PST files, it is highly recommended to re-export the PST file via the Exchange/Office 365 tools rather than Outlook to avoid stripping the recipient addresses. In the event this is not possible, appending a searchable address used specifically for eDiscovery tasks (eDiscovery@organizationname.com, for example) can be done instead, which should then be added to the Standard Operating Procedure to always search on that address whenever any search is being run to find emails that were uploaded from that file.
PST files created by Exchange or exported from Office 365: these do not need an address assigned to them and Discovery can be set to None.
These include both individual user PST files and journaling account PST files.
With those guidelines covered, there are four options for Address Discovery and Address Appendment:
Automatic, using DataCove’s AI engine to determine who the likely owner of that PST file is by reading the contents of the file.
Entered, which will create individual text fields for each PST file that can then have the specific email address to append manually entered on the page.
None, used in situations where no Address Discovery nor Email Address Appendment is necessary, such as for PST files exported from an Exchange or Office 365 server.
From File, used in situations where there are lots of PST files for upload and Address Discovery is best done from an instructional file that includes this information in advance.
All of these functions possess a function to allow for notification via text message or email address when the process finishes; this is best used when uploading lots of files to the system or when using the Automatic function.
Each of these will be discussed a little further below. Once the preferred option has been selected, click Next to proceed to the Enhanced Duplicate Detection section.
Automatic Address Discovery, the AI-based AutoDetect feature, will read through multiple emails in each PST file in order to estimate who the owner of the PST file is and what their email address may be. This email address will then be provided on the next page linked to the relevant PST file it is thought to belong to. If the detected email addresses are inaccurate, they can be manually reentered on the next page.
Depending on how many PST files are part of the upload, this process can take some time. Most files take a couple of minutes each.
As with any AI-based technology, it is highly recommended to check over the results to ensure they are the addresses expected.

The Entered Address Discovery option allows for manual entry of the email address to associate with the PST files being uploaded.
Selecting this option will provide another page after clicking the Next button allowing for assigning specific email addresses to individual PST files.
This is best used when uploading fifteen or less PST files and where data entry will be rapid.

The None for Discovery option simply ignores any attempt at address discovery or appendment and moves ahead to the next steps.
This is best used for PST files that do not require any address appendment, such as ones exported from an Exchange server or Office 365 and not from an Outlook client.

The From File discovery is the most advanced and specific form of appendment available and is optimally suited for very large PST file uploads.
A special text file is used to match the PST filename to the email address that should be associated with it, allowing for easy copy and paste operations to build out the dataset.
If there is a large quantity of PST files for upload, reviewing the previous section of Network Share Methodology and the From File section there is recommended for the exact procedure on how to use this option, as that method is likely the same one that will be used for uploading the PST files to DataCove in the first place.

Once an Address Discovery option has been chosen and finished, DataCove moves onto the Enhanced Duplicate Detection wizard.
Enhanced Duplicate Detection goes beyond DataCove’s regular attachment deduplication by attempting to match against the email date and the Message ID for all emails in the import. If any are found, they are discarded, preventing potential duplicates from later appearing in searches. Technically, the SMTP standard requires that each and every email has a unique Message ID and while most email servers and clients adhere to this standard, there are some that do not and can result in duplicate emails.
Enhanced Duplicate Detection is a means of mitigating these, but there is a very small, but theoretically possible, chance that two distinct and unique emails will match both the Date and Message ID fields that are being looked at with Enhanced Duplicate Detection. In this event, one of those legitimate emails would be discarded in and this could lead to very undesired results in the destruction of data.
In general, it is recommended not to use Enhanced Duplicate Detection. More emails are rarely an issue and a “better safe than sorry” approach is good practice when it comes to regulatory compliance.
Click Next to proceed.

The Confirmation page provides a summary of the options selected for review and the ability to go back and adjust parameters that are incorrect.
A listing of the access type DataCove will be using to reach the PST files, any network share permission data, the address discovery scope and a list of the PST files and associated email addresses will appear on this page.
If any parameters are incorrect, select the Prev button to go back and adjust the relevant data.
If the parameters are correct, select Finish to start the import process.


When the process is initiated, the page will change to a status tracking page.
This can also be found by clicking Status in the top header bar, then selecting System Status on the left hand side menu and locating the process called EmailMigration. Selecting the magnifying glass for this process can show the exact process’s status.
Once the process begins, the Activity line on the process will change to “Migrating Email from PST,” which will both induct any PST files from the network share or Uploaded data-store of DataCove and begin moving them to an appropriate area to be opened and read for insertion.

Progress on the EmailMigration process can be observed from here for progress, as it breaks out each PST file and its associated folders into their email sets (known as the Extraction phase), along with the quantity of emails in each folder being shown as the Insertion of the emails commences.
Insertion is the process that delivers the email to DataCove’s database for processing and indexing. Once those phases complete, the email becomes searchable.


The Insertion process itself splits off a child Migration process known as PSTInsertion. This separate subprocess (also viewable from System Status) shows the exact progress of the emails as they are being inserted into the DataCove’s processing and indexing queues.
Counts here are present in batches of 50,000, the measurement DataCove uses for optimal dataset efficiency.
Email deduplication is also present and counted at this level.

Once the PST migration completes, the PSTInsertion and EmailMigration processes will both reach a Finished status, visible at the top of the process pages.
These processes will then drop into the Inactive Jobs section of the System Status page, indicating their full completion and that all of those emails are now in the processing and indexing queues of DataCove. Within thirty minutes of the processes reaching this Finished state, all emails from the PST upload will be searchable and ready for use.
This concludes the PST Upload guidance article.