Active Directory LDAP Authentication for User Access
What benefits are there for User Access being granted via Active Directory and how does it work?
DataCove has two primary means of granting user access to the system, regardless of whether that access is administrative for IT, enhanced search privileges for Human Resources and Legal teams or just the individual search permissions for an end user to find and retrieve their own emails: Local User Accounts and Lightweight Directory Access Protocol (LDAP) Authentication.
Local user accounts on DataCove can be created individually or en masse, but live and die on the DataCove system itself, with usernames, passwords, permissions, homepages, search rules and timeout values all being unique to each account. More importantly, user status changes, such as continued employment or a shift to another department, would have another independent system where their accounts would need to be disabled or altered in the event of a change at the organization level, rather than a centralized location.
In small organizations where few people know of and have access to the DataCove, local user accounts are often perfectly fine for use, but larger organizations that have a great many users who will be using the DataCove, users who don’t want to remember yet another password and want to use their unified domain login, or for organizations who want to leverage their existing directory structures to automate user account management centrally, LDAP-driven authentication via Microsoft’s Active Directory is a function DataCove embraces.
An LDAP Authenticator functions much like an individual user account, but for many users all at once. All users who fall under an LDAP Authenticator will receive the same set of system permissions, but their search permissions will be determined by which email address and proxy email addresses they have in Active Directory. Wider search permissions, such as being able to search on a department of users or across all users, are also available. This range of coverage allows for granular assignment of access to end users, department heads, HR/Legal teams and system administrators and any combination thereof.
Note: While Active Directory is the domain management service of choice for the vast majority of organizations, DataCove does support other domain services such as OpenLDAP, eDirectory and Mirapoint-LDAP. Due to their relative rarity, this article will briefly mention the areas where differences in terminology may be required to allow those systems to work.
With these use cases in mind, DataCove can be instructed to poll a local Active Directory Domain Controller or Azure Active Directory Domain Controller whenever a user attempts to login in order to grant them the appropriate level of predefined permissions. These permissions can be defined based on the residence of the user in a specific Organizational Unit (OU), Common Name (CN) Container, Group Membership or simply that they exist anywhere in the Active Directory tree.
When a user attempts to log into the DataCove using their domain credentials, DataCove runs an Active Directory (AD) lookup with a hashed version of the username and password entered to verify that the username exists, is enabled and that the password matches. This is accomplished using a pre-populated service account that can offer read-only or above access to the domain and is transmitted over TCP 389 for the LDAP service.
Note: LDAP-S, the TLS/SSL secured version of LDAP over TCP 636, is fully supported by DataCove and highly recommended for use.
Binding an LDAP Authenticator for Active Directory
Begin by selecting Users and Groups in the top header bar, followed by selecting LDAP / Active Directory on the left hand side menu.
Next to the Add Auth button is an empty white text box. The name of the Authenticator should be typed into this box before clicking Add Auth.
It is highly recommended to make the name of the Authenticator something relevant to which users it is meant to allow access for, such as End Users, Legal or IT, especially if there will be multiple Authenticators configured for different groups with differing permission levels.
Do not use any special characters in the LDAP Authenticator’s name; no commas, apostrophes, hyphens, underscores, etc. These can cause the authenticator to fail due to command interpretation when being used.
The name of an Authenticator determines its order of review for access provisioning via alphabetical sorting. If a user exists in two different Authenticators that both have different permission allowances, the first alphabetical Authenticator that they exist within will be what determines which permissions they receive. For example, if the “Corporal Klinger” user exists in both the ‘IT’ and ‘End Users’ Authenticators, when they attempt to log into DataCove using their Active Directory credentials, they will always be given End User permissions as E comes before I in the alphabet. A simple means of mitigating this would be to recreate the ‘IT’ Authenticator as ‘AIT’, which would place it at the top of the alphabet and it will weigh users attempting to log in first for these permissions, and if those users did not exist within the IT group, they would then be tried under the ‘End User’ Authenticator, allowing for a proper cascading of permitted access to the lowest common denominator at the bottom of the list.

The Add Auth button will begin the LDAP Authenticator Setup Wizard, which will navigate through many steps that allow for a refined level of access.
This begins with a choice of the LDAP Server Type. Select the desired directory service here and then click Next.
Note: As mentioned above, DataCove supports multiple LDAP directory services, but will default to Microsoft Active Directory due to its ubiquity.

The Verify LDAP Attribute Names section default attributes are fine for an Active Directory environment. Select Next to move on if using Active Directory.
This attribute section can be meaningful for non-Active Directory environments, where Microsoft specific terminology like ‘sAMAccountName’ for the Username Attribute won’t necessarily be the same convention used in eDirectory or OpenLDAP environments. For organizations not using Active Directory, carefully review the attributes of a user entity inside of the directory structure to obtain examples of what the attributes correlate to each field and update them accordingly in the exact level of case sensitivity they are shown in.
Once updated to match the directory service in use, click Next.

The LDAP Bind and Search page contains the details for DataCove to communicate with the directory. Each line here is critical and broken out into detail below:
Server Name is referring to the Domain Controller or other directory service access point that DataCove should inquire with for a list of users. This can be populated with either an IP address or Fully Qualified Domain Name (FQDN). DataCove must be able to reach this address over the network.
Use SSL and Port Number are partnered fields that determine upon which port and protocol DataCove should communicate with the Domain Controller. Standard insecure LDAP uses port 389 and this is commonly available for most organizations. Many versions of Standard LDAP today use the STARTTLS command after initial connection handshake to encrypt traffic exchange, but not all systems do this. By checking the Use SSL box, the Port Number will automatically change from TCP 389 to TCP 636, the port used for LDAP-S, or Secure LDAP, wherein data is TLS encrypted from the start.
Bind Username and Password specifies the username of the account that will be used to make the Read query to the directory. This account need not be an administrative account, but can be any account that is live and able to login within the directory. In general, this is recommended to be a low level service account or the like to minimize the chance of a password being reset and to mitigate unnecessary permissions being handed out. The format for the username should be Domain\Username for local directory systems and a fully qualified email address, such as AADReadServiceAccount@domainname.com, for Azure Active Directory Service Domain Controllers.
BaseDN, or Base Distinguished Name, is long string of addressing used to instruct DataCove upon where in the directory’s forest it should start seeking user accounts to allow in. Depending on which users and scoping method are desired to be allowed in, this can change dramatically.
The syntax for a BaseDN string does not use spaces between elements, but are instead comma separated. However, spaces inside names of Organizational Units (OUs) or Common Name (CNs) Containers are allowed.
Most environments will have case-insensitivity active by default, meaning that no term needs to be capitalized for it to work. In the event of a rare situation where case-sensitivity is enforced, match the entry from the directory exactly in the string.
Special characters in a term, such as an apostrophe or other punctuation, can cause the term to fail. In situations where these are present, Group Membership-based filtering is recommended.
All options will have one element in common: the Domain Component or “DC” part of the string, which will always be used to designate the base domain and top level domain, along with any subdomains. These will always be at the very end of the string and should reference the local domain of that the domain controller or Azure Active Directory controller provides. As an example, “dc=cservices,dc=datacovehosted,dc=com” would be the Domain Component string for the example domain pictured below.
Note: If left with just the base domain component information listed, this is instructing DataCove to search through the entire forest for all users. This is beneficial for many organizations who are simply looking to provide bulk user access with minimal permissions. When using Group Membership Filtering, this is the recommended BaseDN string to use, as it will find Groups anywhere in the forest.
For granting access to users in specific departments, sites or other defining elements, the use of Organizational Units (OUs) is an excellent choice. Many organizations use these hierarchical containers to place users who all belong to a specific classification, and if access is desired just for these users, specifying the OU that they are in allows for them and them alone to be granted access. The syntax for this would be “ou=Example Organizational Unit,dc=cservices,dc=datacovehosted,dc=com” to only allow in users of the “Example Organizational Unit” Organizational Unit, such as an Accounting department. Organizational Units can be identified as a folder icon with a golden building block upon them.
In some uncommon situations, Common Names (CNs) Containers are used instead of OUs. These can be used in the same exact fashion as an OU in the BaseDN string, such as “cn=Users,dc=cservices,dc=datacovehosted,dc=com” to allow in users of the “CommonrNameHere” Container, such as the Remote Users at branch location. Common Name Containers can be identified as having a simple yellow folder icon in Active Directory, without any further image implanted on that folder.
Multiple OUs or CNs are allowed to be used by a single Authenticator. These should be separated by Newlines in the BaseDN box.

Filter determines which types of objects are being allowed for login. Since a directory service contains all sorts of objects, like groups, computers, users and more, the filter limits the allowed type of object via this filter. The default settings of ‘Person’ and ‘User’ are fine for Active Directory environments; other directory services may require different filtering parameters based on what they refer to users as.
Scope determines where in the directory forest the Authenticator is allowed to go. Leaving this setting at the default Subtree is best for almost all use cases.
Subtree offers the most complete lookup, beginning the Authenticator’s search for users at the level specified in the BaseDN string and then going to every accessible layer underneath. This Scope is recommended when using a BaseDN string of just the Domain Components, as it starts at the root of the forest and searches everywhere in it.
Base limits the Authenticator’s search to only the level of OU/DC specified, and no further. If the users desired for access exist at the OU level specified, but there may be additional OUs within that OU whose users are not desired to have access, this Scope would be best.
OneLevel is a combination of Subtree and Base, allowing for the Authenticator search for look for users at the OU level specified, as well as one level deeper, but not further into additional nested OUs that may be two or more layers deep.
Address Required specifies that any user accounts found matching the above criteria must have an email address associated with them. Since any directory service will be populated with a large number of objects, many of which will not be users and may or may not have email addresses, this could potentially allow objects like computer accounts to log into DataCove, creating a security risk of a shared access login. While most such accounts won’t have email addresses, which will greatly limit their ability to search within DataCove depending on search permissions assigned, it’s highly recommended to leave Address Required checked to limit the types of users that can be allowed in.
In very rare and exacting circumstances where a user account is created for an entity that won’t have any email address but will need access to the DataCove and be requested to log in via domain credentials, this box should be unchecked for them. This is essentially the only infrequent and unique situation where this may get changed, and it is strongly suggested to use a dedicated LDAP Authenticator for such an account, rather than one that will also apply to any other users besides these special accounts.
LDAP Server Timeout defines the amount of time DataCove should wait for a response from a Domain Controller before terminating the connection attempt. This timeout value can be the determination between a slow login or an outright rejection to login depending on the latency between the DataCove and the Domain Controller being used for credential authentication. The default 30 seconds is fine for most environments and is very forgiving of delays.
Select Next once all fields have been populated.

The LDAP Group Membership Filtering page offers the choice of further limiting access to the DataCove based on Group Membership, rather than just the presence of a user in a specific CN or OU. By using Group Membership as the limiting factor, users can be placed all across the organization and only select users allowed to log into DataCove, as determined by whether they are a member of an existing group or one purpose-created for the role of allowing specific users into DataCove. Use of Group Membership Filtering overrides the use the BaseDN string as being the deciding factor of who is allowed to login.
If not using Group Membership Filtering, leave the default “Allow all users found by the LDAP search to log in” radio box selected, then click Next.
If planning to use Group Membership Filtering, select “Only allow users belonging to certain groups to log in” and continue reading.
Note: Group Membership-based filtering should have the BaseDN string on the previous step performed at the root of the directory forest to ensure that groups, no matter where they are placed in the directory structure, will be found and interpreted. Such a string would look like “dc=cservices,dc=datacovehosted,dc=com” to allow DataCove to search within the forest for groups.
The default Group Filter, Group Name Attribute and Group Member Attributes are fine at their defaults for Active Directory environments. Other directory services may use different terms and, using an existing group as an example, should be reviewed to determine what attribute name they operate with.
Group Names is is the section to specify which groups of users are to be allowed to log into DataCove. Type in the desired names of the groups to allow them access, separated by Newlines if there are multiple.

If a Group does not yet exist that fits the desired users, or the users are otherwise sprinkled across many different OUs or other Groups and would be cumbersome to add in, creating a dedicated DataCove Group is the best practice.
To do this, log into a Domain Controller or other system possessing the Active Directory Users and Computers (ADUC) console, and launch the ADUC application.
Locate the OU where your organization normally stores Groups, and in empty white space on the right hand side of the screen, right click to open the Context Menu.
Hover over New to expand the Context Menu, then left click on Group.

A wizard will launch to configure a new Group object.
The Group should be given a name, with something highly descriptive of the task recommended. “DataCove Administrators” or “DataCove Users” are good example that will make finding and working with this Group in the future faster and easier.
The Group Scope and Type should be left with their defaults of Global and Security.
Click OK once the Group settings are confirmed.

Once the Group is defined, it will appear in the list of objects.
Right click on the newly created Group and select Properties.

The Properties dialog box will appear.
Select Members in the top tabs, then click Add on the bottom left hand corner.
This spawns another dialog box that allows the specification of users to be added to this group.
Type in the username(s), then click OK to add them to the group.
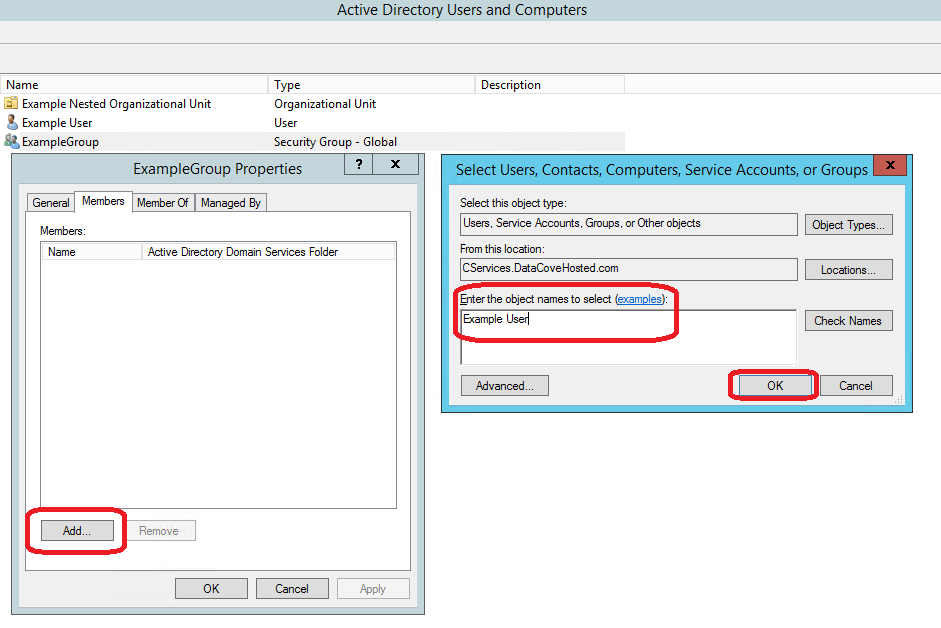
Once the users have been added successfully, they will appear under the Group’s Members tab and are now ready to be allowed into DataCove.
Click OK once all users have been added.

Back on the DataCove, type in the name of this newly created Group into the Group Names field, then click Next to move ahead to the next section.
Next, the Default Search Options for the users who log in via this Authenticator can be set. The search options are predefined rows for searchable content that are otherwise tucked behind the “Add Search Term” button on the Search interface.
With searching for emails being the primary reason to grant access to the DataCove, this is a fairly core function and can make a big difference in how efficient the search is to the users. Too few options and the searches may not be effective, too many and they become overwhelming.
DataCove’s Software Development Team has long considered this equation and uses the standard four options of Sent Date, From Address, To Address and Text Search (which searches subject lines, message bodies and text-based attachments) as being the best search setup for new users, with advanced searches like Attachment Name or Message ID to be a little uncommon to grant to the day to day user.
Depending on whom this Authenticator is designed to let in, the users may be basic or advanced and that should inform whether they should receive the Default Search Options or whether customizations would be useful. In the case of say, sophisticated Legal team users, it may be prudent to grant their Default Search Options a different set of functions to let them more efficiently use the system without having to add their own search customizations to it later.
For most Authenticators, selecting “Use Default Search Page” is recommended. An example image of what those default options are is pictured below.
Select Next to continue.


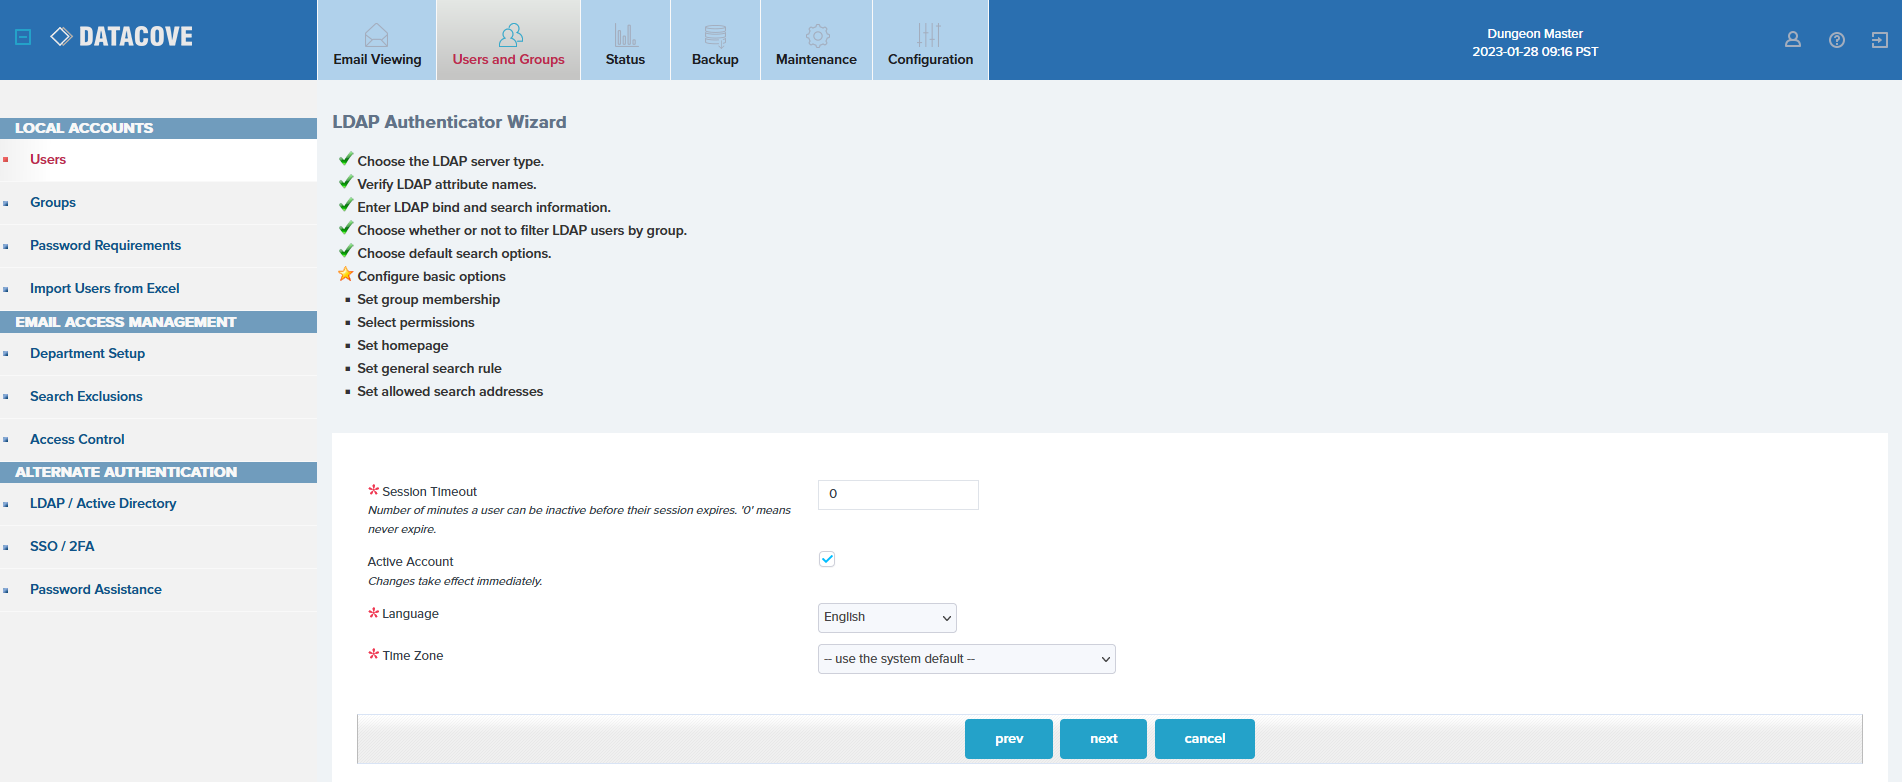
The Basic Options wizard specifies a few general items that will apply to all users, such as a Web Interface Session Timeout value, which logs users out after a period of inactivity, the Language default they are given when logging in, and which time zone will automatically apply to them.
While most of these are easy to determine, the timeout value is a particularly valuable one to adjust depending on which users are being given access. For the average end user who will pop in, search and forward emails to themselves or otherwise do quick retrievals in short order, a 10-15 minute timeout is solid.
For advanced users, like IT, who are more careful about locking their systems when away from them or logging out of sensitive applications, a 30-60 minute timeout or no timeout at all can be useful. The more times the user will be in the system per day, the more beneficial a longer timeout value is, but that must be counterbalanced with how careful the user is to secure or close a system that can search on sensitive data, and potentially everyone’s sensitive data.
Once the Basic Options have been defined, click Next.
Selecting a Group Membership for the Authenticator is a little different than the Group Membership dictated by the directory system; these Groups are solely present on the DataCove as locally created entities that provide system navigation permissions. At this time, special default permissions for End Users, Legal/Human Resources teams and System Administrators have already been predefined and are available on the next step.
Unless custom permissions are needed for this Authenticator as well as additional Authenticators or other local users on the system, creating a Group on DataCove to use for this function is largely obsolete. The Permissions defined on the next page will already apply to to all users on this Authenticator without needing to create a Group for them in advance.
Select Next to continue.

System Permissions determine which pages and functions of the DataCove the users allowed in by this Authenticator will have access to. Note that having access to the Search section of the DataCove does not necessarily allow a user to search on everyone’s emails; that is a separate permission defined on a future step.
While DataCove has a tremendous granularity of permissions available, most Authenticators will fall under one of four different permission defaults, with three predefined user-type defaults available by clicking on the left hand side context box for User Roles:
Root permission, selected by checking the box for Root at the top of the permission tree, grants Superadministrator grade permissions: a user who can visit any page and change any function, including their own search rule parameters. This is generally reserved for IT teams that must maintain the system and keep it functioning, while also needing to run searches for data restoration or to train other users on how to use the system.
HR/Legal, selected by clicking on the HR/Legal link on the left hand side User Roles box, provides the ability to run searches, apply Tags and Legal Holds to emails, Save and Schedule searches to run automatically and create Departments, user accounts, blacklist email addresses so that no one can view their content and view the Audit Log, which tracks all user activity on the system. As a subfunction of being able to create user accounts, this group can technically create an administrative account for themselves and this may be undesirable. Unchecking the Account Administration permission will resolve this.
Admin, selected by clicking on the Admin link on the left hand side User Roles box, provides the ability to adjust the system’s Retention Policy, configure the sources of emails to archive into DataCove, Federate DataCoves with other DataCoves for clustering, reboot and shutdown the system, add IP Address Access Control Lists, update the system and create user accounts. It notably does not have the ability to search or view emails, nor view the Audit Log, but does possess the same Account Administration permission that could allow a user allowed in by this to create an account that would allow them to do so. Unchecking the Account Administration permission will resolve this.
End-User, selected by clicking on the End-User link on the left hand side User Roles box, provides the most restrictive set of system permissions: only the ability to search and save their own searches to run again later. This is generally recommended for end users who will not be using any advanced functions of the system and merely need to search and restore emails for themselves.
Select a predefined permission set or customize it as needed, then click Next.

The Set Homepage wizard will allow the selection of a landing page for the user once they are authenticated and allowed into the system. This Homepage can only be set to a page which they have access to based on the previous page’s permissions.
The general recommendation for this page is “Search” as most users will want to get off to the races of finding their data as soon as possible.
For organizations using the Exchange Web Service tie-in feature of Folder Synchronization, My Mailbox may be preferable as a homepage.
Select Next once the desired homepage has been selected.

The General Search Rule wizard is a major mechanism in terms of DataCove access, as it defines what a user can search upon once logged in. The previous permission pages determine where a user can go in DataCove’s web interface, but this Search Rule determines whose email that user can look at.
There are four primary settings that can be selected, with additional granularity being available on the next page:
No default search addresses doesn’t allow the user to search on any email addresses, except ones explicitly authorized for them under the Allowed Search Addresses wizard, which is the step after this one. This is used for granting access to accounts that otherwise shouldn’t have access internally, such as external investigators, outside legal counsel or other non-internal or untrusted users.
User can search on their own addresses is designed for end user access and specifically allows the user to search on email addresses listed under the EmailAddress and ProxyAddress attributes within the directory system. They are not allowed to search on any addresses that do not belong to them, unless granted on the following page.
User can search on user addresses within the Department(s) they belong to is a more advanced permission, designed for use by departmental supervisors. This allows the user to search upon not only their email address, but also those of other users who belong to the same Department that they do. Departmental affiliation is configured under DataCove’s Department Setup section either manually or via LDAP synchronization to the directory system and should be set up prior to attempting to use this permission.
User can search on all addresses is designed for HR/Legal departments to search across all user emails, as well as for IT Administrators who are also needing to conduct wide ranging searches and possible email restorations, such as for deleted user emails. This search rule is only mitigated by the Search Exclusions function, which if used, can blacklist certain email addresses so that even a user with this panopticon-grade permission cannot view emails of certain users unless granted an explicit override.

Once a Search Rule has been set, a Search Results Limit can be chosen.
The Search Result Limit is a maximum search result number to be returned to a user no matter how many results may actually be present, performed by curtailing the search process as soon as the result counter reaches the specified limit.
This was originally designed to prevent users from consuming too many system resources with overly-broad searches while they look for their desired emails and to instead encourage them to narrow down the search criteria, but is largely a relic of the days before pure-SSD based hardware DataCoves and the heavier resources available in virtualized environments.
The general recommendation at this point is to the set this limit to 0, meaning unlimited. All hardware appliance DataCoves are capable of handling the throughput of several to tens of users searching and exporting simultaneously at this time, which that number scaling up considerably with larger systems. Virtual machine resources may vary depending on local resources granted to the system, but it’s best to start with unlimited and then either lower the limit later or add additional resources to the VM as a best practice.
If potentially dozens to hundreds of users may be using the DataCove daily, setting a high limit of 10,000 or similar would be a reasonable compromise that allows significant search lookup capacity while also preventing the user from searching for all of their emails over all the past years in a single go.
Once these parameters are set, select Next to continue.

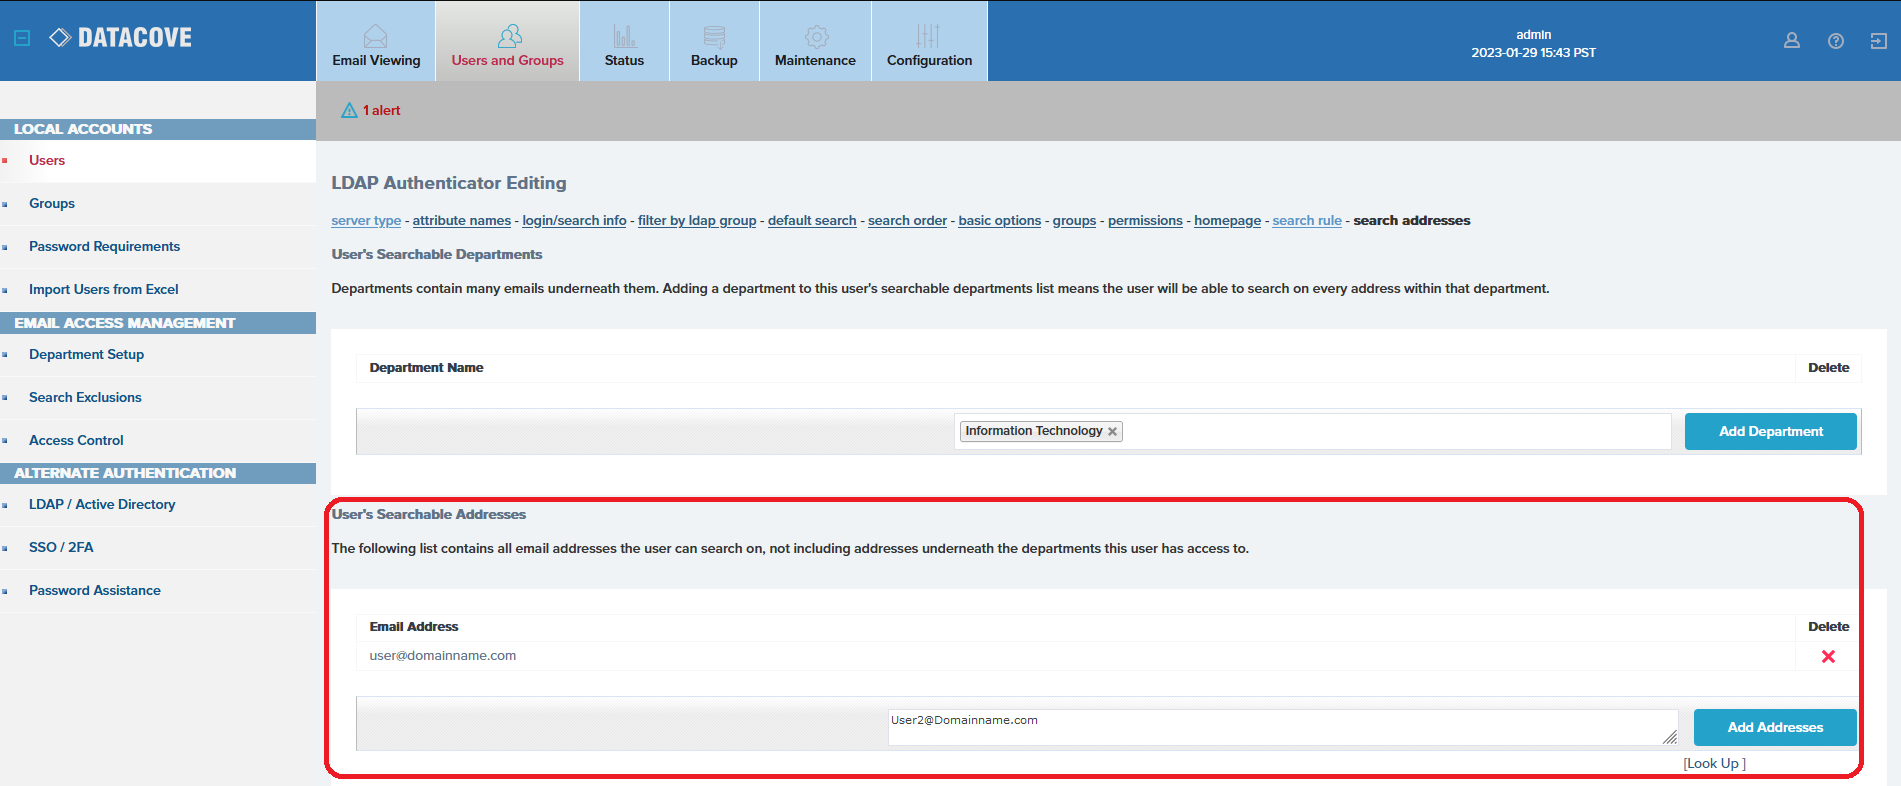
The Search Addresses wizard allows for two different layers of granular address additions:
User’s Searchable Departments, if configured, can be assigned to a user that allows them to search upon anyone in the Department. These Departments can be configured on the DataCove via manual email address addition or via Active Directory synchronization over LDAP. This is generally used for supervisors of those departments, but can be scaled up to multiple departments as well, for example, a CFO being able to monitor the Accounting department, Human Resources department and perhaps Facilities as well; whichever departments may fall under their purview.
User’s Searchable Addresses does not require prerequisite configurations the way Departments do, but can instead have email addresses simply typed or copy pasted in. These addresses will be searchable to all of the users under the Authenticator. While not normally used in an LDAP Authenticator setting, they can be used to grant access to specific addresses without necessarily having access to other addresses. More commonly, they are used to grant access to a predecessor’s email for someone new stepping into that role.
Once the desired addresses or Departments have been assigned, select Finish to conclude the LDAP Authenticator setup wizard.

Testing the LDAP Authenticator
With the LDAP Authenticator now set up, there are two different sets of tests to run against it to ensure all of the desired users have been found and that the proper methodology for login has been identified.
The previous configuration step should already have refreshed the browser back onto the LDAP / Active Directory page in preparation for the connectivity test, but if it did not, select Users and Groups in the top header bar, then click on LDAP / Active Directory on the left hand side menu. Locate the newly created LDAP Authenticator and click on the green circled check mark button for Test.

On the Test page, select the Run Tests button to begin running a battery of tests against this new LDAP Authenticator. The tests include:
Verification of communication with the Domain Controller at the specified IP address and port.
Successful login with the username and password provided.
Enumeration of the users who were located within the specific BaseDN string location and Scope who meet all of the criteria for a valid user account and will be able to log into DataCove.
Accounts detected that do not have an associated username with them, and thusly will not be able to log in to DataCove. Computer Accounts are often in this list.
Accounts that do not have an email address or proxy address associated with them, which the absence of prevents DataCove from assigning a baseline email address to them and will automatically prevent them from logging in. This is the default behavior unless the “email address required” checkbox was unchecked in the earlier configuration step.
Accounts that are enumerated are matched against the Groups specified and only those matching the Group-membership desired are allowed in.

Failure at any of these tests will immediately fail all subsequent tests automatically, with the most common errors being detected in the first three sections, all of which provide some basic hints at what needs to be checked to get the Authenticator working.
On connecting to the Domain Controller: Failure here indicates an incorrect FQDN, IP address, port or inability to reach the Domain Controller over the network.
On logging in: Failure at this level indicates an incorrectly typed username or password, or a disabled account. An example of how this looks is below.
On Good User enumeration: Failure at this stage indicates invalid Distinguished Name syntax, usually an accidental period instead of a comma, a hyphen instead of an equal sign, or a space where there should be none (trailing or preceding) in the BaseDN string.
On missing usernames: This is most often a result of the BaseDN string being set at a level that does not find the desired users, such as too far out on a branch OU.
On missing email addresses: In many environments, user accounts that have been around a long time, imported from other environments or mergers or haven’t had a standard methodology on setup due to turnover events over time can sometimes be missing important attributes, such as the email address. Merely populating this address can fix this issue.
On Group Policy adherence: a mistyped group name, preceding or trailing space or BaseDN scope level being set too tightly to find the Group entity are the most common errors.

Once the Authenticator is successful at its test and some good user accounts are authorized for access, determining the logon username is next.
Open a new InPrivate, Incognito or other non-cached, non-cookied browser window.
Navigate to the DataCove web interface and attempt to log in with a Directory based username and password combination.
For most users, this will be their regular domain Username and Password, now usable on DataCove.
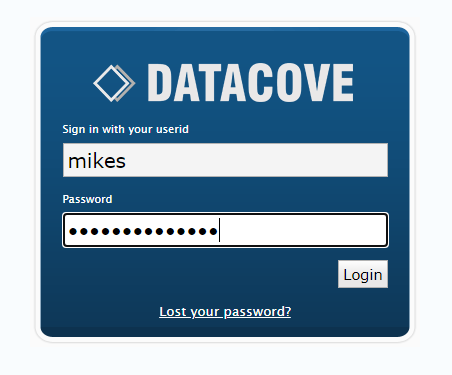
In environments where more complex Usernames are in play, prefixing the domain may be necessary.
Identifying the domain prefix is possible by reviewing the Account tab of a user’s Active Directory entity and looking for the User Logon Name (pre-Windows 2000) section.


Upon a successful login, the LDAP Authenticated user will only have permissions and access privileges as were specified during the Authenticator setup.
Note in the below image that only the Email Viewing header option is available; all of the other administrative or higher level options are hidden from view. This is the expected visibility level from an Authenticator bound with only End User permissions. Depending on the permissions chosen, different menu options will be visible within the top header bar and on the left hand side menu for the users.

This concludes the LDAP Authenticator setup guide.
With user accounts now bound to log in via Directory credentials, a new layer of security options also becomes available, such as using MultiFactor Authentication (MFA) for the user accounts on DataCove. Some commonly used providers like Azure Active Directory and Duo have separate setup guides that can be found at the below links:
Azure Active Directory: https://datacove.net/knowledge-base/configuring-azure-active-directory-multifactor-authentication-for-datacove
Duo: https://datacove.net/knowledge-base/configuring-duo-multifactor-authentication-with-datacove