Disaster Recovery: Remote Backup and Restoration
Overview of DataCove’s Backup Options
On the Nature of Backups
Types of Backup Location
Configuring an SMB Network Share for Backups
Configuring the Embedded Local Disk for Backups
Scheduling backups to run Automatically
Initiating a Manual Backup
Troubleshooting a Misbehaving Backup
Identification of a problem via Email Notification
Identification of a problem via Web Interface
Running the Full System Health Check for Remote Backups
Failure to Mount the Backup Location
Network Communication with the Backup Location
Hostname Resolution of Backup Location
Incorrect Username or Password
Creating a Local User Account for authentication
Creating a new SMB Network Share
Failure to Write/Rewrite Files
Read Only Property set on backup share
Disabling Inheritance of Permissions
Backup Location Capacity Issues
Backup (or Database Backup) Not Finishing
Restoring from a Backup
Overview of DataCove’s Backup Options
All systems need a backup. This is not to be contested; it is a simple fact of the IT world that eventually, some how and some way a system will break. Whether from an internal cause like a critical hardware component failure, a software update that breaks a feature or database (a common reason why Windows servers are often behind on updates; the risk involved with an update inspires a great fear of potential downtime) or external factors like a rogue administrator, attacker, adverse weather event or natural disaster.
While DataCove’s are designed with endurance and redundancy in mind, as are many of the various client-hosted virtual machine hosts out there, there is no stopping the eventuality of a breakdown at some point.
To that end, DataCove accommodates for this in two different and layered fashions: Remote Backup and Warm Standby.
Remote Backup, DataCove’s primary means of recovery in the event of a disaster, is a copy of the contents of the entire DataCove, sans operating system and a few system specific keys, that is regularly and automatically backed up to a network share or SATA-attached hard drive.
All emails, indices, database, logs, configurations and more are contained in this backup, allowing for a complete restoration of a downed system exactly as it was at the time of the backup.
Backups are commonly kept onsite, but can be pushed to an offsite location instead.
Multiple simultaneous backup locations are not available, but the Warm Standby feature, covered below, is the recommended approach for this level of redundancy.
The Recovery Time Objective (RTO) from the backup has multiple variables involved, such as total data size, network speed, performance specifications of the DataCove that is being restored to and more, but is generally within three days for small systems and seven to ten days for large systems.
A Remote Backup can only be restored onto a completely new and empty DataCove, whether physical or virtual. It cannot be restored, fully or partially, onto a machine that has any emails on it, including the production machine the backup was taken from.
Warm Standby, otherwise known as High Availability Mode, is a rapid response method of access restoration, resulting from constantly replicating data from one Datacove to one or more Passive DataCoves, in an Active/Passive relationship. In this scenario, an Active (or Primary) DataCove receives all email, performs all of the email processing and indexing, handles all search queries and exports and everything else expected from the system. While it is doing so, it’s also sending copies of the “finished” data that it stores over to one or more additional Passive DataCoves.
Passive DataCoves are generally located at a warm site or somewhere else offsite from the Active DataCove to provide locational redundancy, in case of a problem at the primary site.
This is an additional layer of redundancy that can be added onto any DataCove via the purchase of a second DataCove system and subscription, including Hosted DataCoves.
This is generally reserved for high-compliance organizations who are under the additional duress of needing to rapidly respond to many eDiscovery or Freedom of Information Act (FOIA) requests and cannot countenance any downtime in their flow. Large metropolitan cities, police departments and state and federal agencies tend to need this more than most organizations.
Remote Backup can be used on the Active Datacove, in addition to Warm Standby, for additional redundancy.
Remote Backup is the focus of this article, with Warm Standby being covered on a separate article.
On the Nature of Backups
There are a few key points to keep in mind when Remote Backup is being configured, which will be delved into below.
Backup methodology:
The first time a Remote Backup is run to a new location, a full backup will be created, which will include all data on the system at that point in time.
Subsequent runs will be incremental backups, appending new data to the original backup.
If a Data Retention Policy is in place or the Email Deletion features are used, backups will switch from incremental to differential, only maintaining data that the DataCove itself has and removing data from the backups that is no longer present on the DataCove. This is designed to prevent a situation where the backup contains data that the organizations should no longer have and the inherent liability that would then bring with it.
Differential backups, due to their enhanced complexity and need for numerous directory and individual file rechecks, will make backup runs take considerably longer on the next run after a Data Retention Policy purge has been carried out; this is normal behavior and only effects the backup that runs immediately after the purge process completes. Backups that run after the initial post-purge backup will run at their normal speed.
At least weekly (and more often for more frequent backup schedules other than Daily), DataCove will execute a companion process for Remote Backup known as “Database_Backup,” wherein the system will push a “snapshot” of the Database of the system out with the rest of the data. Several of these snapshots are used and
Backup interruptions:
If a DataCove’s backup run is interrupted for any reason, such as a network outage, reboot of either the DataCove or the backup location, using the “Pause backup” function on DataCove, etc, the next scheduled run of the backup will resume from the point the backup left off.
DataCove leaves small files, known as “checkpoints,” as it writes to the backup location that compare its current state of data to that which is on the backup location and marks them as complete in batches. This allows for rapidly resumption from any interruptions, as these checkpoints merely need to be “read” when the backup process resumes for the DataCove to find its place in the process.
This resumption process adds a short delay to the subsequent backup run as the files are read prior to the backup starting to write again, but greatly increases the speed of an interrupted backup rather than instituting a file-by-file comparison of what has been backed up and what hasn’t.
There can be only one:
Only one live backup can be maintained at any point, whether it is a network share backup or local disk backup.
While it is feasible to change backup locations to create a new backup somewhere else, including with intent to leave the old backup where it is for preservation purposes, going “back” to an old location and reusing it will leave gaps in backup data and is absolutely not advised. In this scenario, going “back” to an old backup location after already having created a new backup elsewhere will only incrementally append new data to that old location that is ‘new’ from the time the most recent backup ran, which would’ve been on the new location.
As an example:
DataCove is backing up to Location Alpha on July 30 and July 31.
The backup location is changed to Location Beta on August 1 and a full backup is made there.
The backup location is changed back to Location Alpha on August 5 and backups are resumed.
In this situation, all of the logs, emails, database entries and more from August 1 to August 5 would not be backed up to Location Alpha, leaving a gap. In general, it is not feasible to rotate between multiple backup locations without causing data loss and incomplete backups.
Backups can only be restored onto an empty system:
A Remote Backup can only be restored onto a completely new and empty DataCove, whether physical or virtual. It cannot be restored, fully or partially, onto a machine that has any emails on it, including the production machine the backup was taken from.
The nature of the restoration is a complete overwrite from start to finish, meaning that the database that gets restored needs to be matched against all the files that it is expected to restore. This precludes the ability to conduct partial restorations and means that the backup is a true mirror of the DataCove at all times; no more, no less.
Frequency of backup:
Backups are generally recommended to be run daily.
This is easily achieved via DataCove’s built-in backup scheduler, which can operate within the span of every hour at the minimum and once a week at the maximum.
Backup sizing considerations:
Every few backups or once a week, whichever is shorter, DataCove will create an additional database backup and include that separately into the backup files. These are built out this way to offer parallel processing of databases so that restoration can be made much faster, at the cost of some overhead on backup space consumption. Up to 15% more than maximum DataCove capacity can be used for these additional database snapshots, and it is recommended to size the backup location to 15% over the maximum size of the DataCove as a result.
This additional database backup can be observed as a companion process for Remote Backup that displays as “Database_Backup,” which is tracked independently of the Remote Backup process and will make the scheduled Remote Backup process run take anywhere from a few minutes to a few hours longer when it does run.
Moving existing DataCove Backups to a new location:
While it is possible to move an existing network share containing DataCove’s backup to a new directory or server, the attempt to move tens of millions (sometimes hundreds of millions on larger systems) of tiny, encrypted files tends to put such a strain on most operating systems that it is a slow and cumbersome process.
In general, if a backup needs to be moved, it is best to change DataCove’s backup location to the new location and have it create a new backup there, then delete the old backup after the new one is fully finished (not before, as that would remove any redundancy that the backup provides in case of a problem in between the runs). While a full backup will take time to run, it’s usually less than the time and strain it would take to move an existing large backup.
Backups on Hosted DataCoves:
Tangent provides the backup space and schedule for backups of DataCoves that Tangent hosts on behalf of clients. These are configured at time of service rollout and should never be changed by the client unless there is a need to backup to a client-specified-and-provided storage resource.
Backups on physical DataCoves:
Physical server DataCoves, meaning DataCove’s that come as a complete rackmount server solution and not a virtual or hosted system, have a special relationship with backups: emails that arrive on the system are kept twice, at least temporarily.
One copy is retained in its original, unprocessed form, with the second copy being the long term archival copy that goes through the full processing, including attachment deduplication, shredding, indexing and more. This second copy is known as the “processed” email and lives on the DataCove permanently unless a Retention Policy removes it at some point.
The “original” format copy is retained on the DataCove for redundancy purposes until a backup is made that includes it’s “processed” partner, after which the original is deleted since a copy of it has been committed on another medium and is considered safely “off disk.” This is largely a relic of the olden days when DataCove’s possessed tape drives for extra long archival copies, but has been carried over to our current generation Remote Backups.
If backups are not configured or are otherwise not running on a physical DataCove, this safety measure can lead to increased disk capacity consumption due to the extra copy being retained. For physical DataCoves, it is always recommended to have a backup configured to prevent this.
Virtual machines, both local and hosted, do not replicate this behavior since host level backups can be run in addition to the DataCove’s Remote Backup functionality
For this reason, it is critically important that the physical DataCove’s backups are configured and running at least daily to ensure there is no excess space consumption on the system, which would lower it’s effective capacity and retention duration.
Types of Backup Location
There are multiple types of location and protocol that DataCove supports for the Remote Backup functionality, with an overview of each option below. Selecting the option
Embedded Local Backup
This option is specific to physical DataCove servers only; virtual and hosted DataCoves do not support additional disk attachments in this fashion.
All physical DataCoves possess an built-in backup disk that is separate from the RAID array that the operating system and main data vault live on: this disk is entirely independent and can be used for local disk-to-disk backups for sites that may not have the 1TB or 12TB on their NAS or SAN to simply throw at a backup for a server. Tangent recognizes that the cost of disk storage can be a barrier for some organizations and has opted to take advantage of our manufacturing economies of scale and simply include backup storage into the DataCove itself.
This built-in backup disk uses a SATA interface for high speed access and enhances recovery speed over what network storage can provide in most cases.
The largest caveat to using the Embedded Local Backup is that the backup disk physically resides in the same chassis as the DataCove’s main storage arrays, making it only redundant against storage volume corruption or failure. Local disasters, power surges, theft or more are still dangerous to the backup disk since it’s contained within the same server.
To offer some flexibility with this locality concern, the backup disk can be removed and replaced with another same size or larger disk in order to create point-in-time recovery windows for the DataCove, especially useful when kept offsite. The same preclusions of only ever having one “live” backup and never rotating used disks does apply, however.
If a backup disk is replaced, a reinitialization must occur on the new disk to prepare it for use. Contact DataCove Support for guidance on the process.
Server Message Block/Common Internet File System (SMB/CIFS) Share
The most common form of network share that is employed at the vast majority of organizations is the simple Windows network share, also known as an SMB/CIFS share, with a service account being used for read and write permissions to the directory. The vast majority of DataCoves will wind up using this type of backup location due to the ubiquity of Windows environments and of SAN/NAS solutions that support SMB.
With the winning combination of being familiar, extremely easy to set up and map to, SMB is the type of share this article will be discussing further below.
DataCove supports the SMB2 and SMB3 protocols for share access.
Network File System (NFS) Share
For sites who are already use Linux-based systems or who are looking for the highest backup performance over the network, DataCove natively supports and prefers NFS shares due to it’s Linux backend. Without the overhead that comes from SMB, NFS network shares provide extremely rapid read and write access that can accelerate large backups and expedite sizable restorations.
As most organizations are unfamiliar with configuring an NFS share and many do not even have the server role installed to use it, a separate DataCove knowledge base article addresses all of those questions here.
DataCove supports NFS2 and NFS3 protocols for share access.
Offsite backup to Tangent
A separate add-on service offered by Tangent for organizations wanting to take advantage of offsite backups but who don’t have such environments already built out is the DataCove Cloud Backup option.
DataCove Cloud Backup is an NFS network share provided for an individual DataCove to back up to, in the same fashion as an on-premises NFS share, but kept offsite in Tangent’s SOC2 certified, highly redundant and protected California datacenter.
In addition to keeping the backup offsite and out of harm’s way, DataCove Cloud Backup offers Remote Restoration onto a temporary Hosted DataCove in the event of downtime or inaccessibility of the on-premises DataCove, becoming the closest thing to a Warm Site that many organizations can obtain on a tight budget. In the event of a system failure or other issue with the on-premises DataCove, notifying DataCove Support of the incident will allow for the creation of a new virtual machine to restore that back onto, vastly expediting the recovery process over the regular troubleshooting and possible construction of a replacement system and more that would be necessary for a DataCove that wasn’t using this Hosted Backup service.
Configuring an SMB Network Share for Backups
The process to configure an SMB Share on a Windows Server is straightforward one, but comes with a few considerations.
The DataCove should be able to reach the server hosting the SMB share. Not only does this cover network pathing, but also any Managed Switch exceptions for SMB traffic that are necessary or VLAN tags that may be needed for the DataCove to communicate with the file server.
The server should have enough space to mirror the DataCove’s full size, plus 15% overhead for extra database snapshots. If a DataCove has 300GB of data currently but is a 1TB system, the backup size should be 1.15TB in maximum capacity. Just as the DataCove only has 300GB on it today, it is likely that that will grow over time until it reaches a significantly higher amount and the backup location chosen should be able to accommodate that. Moving the backup later is undesirable and time consuming, so unless there is no other choice, be sure to size properly for the full size of the DataCove.
It is recommended to use a Windows Server or SAN/NAS system for the backup location and not a desktop version of Windows. While there isn’t a functional difference between the two for the purposes of SMB shares, there does tend to be a troublesome habit of desktop versions of Windows like Windows 10 or Windows 11 to often be doing double duty as someone’s workstation or filling other roles which can interfere with that of DataCove’s preference for a file server.
With those items laid out, to begin, log into the Windows Server and determine where the SMB share will be created.
Right click on an empty space within the directory of choice and select New… and then Folder to create a new folder that will be used for the SMB share.

Name the newly created folder something that will be recognizable in the future, such as DataCoveBackup.
Right click the folder and select Properties.

Select the Sharing tab at the top of the dialog box, then select Share under Network File and Folder Sharing.

The Network Access dialog box will now spawn.
Enter the username of a service account or other desired account to use that will be given permissions to this share. This account will later be entered on the DataCove to give it permissions to access the share.
Note: It is highly recommended to use a dedicated service account for this rather than any user account, as a password change on the account will require a password update on the DataCove as well; something easily forgotten and with very dangerous ramifications long term. Creating a dedicated DataCove service account, either locally on the Windows server or on the domain itself is the advised procedure.
Once the username has been entered in, select Add to authorize this account for access to the share.
Change the Permission Level of the account to Read/Write so that the DataCove will be able to write files to the share.
Once done, select Share at the bottom of the dialog box to create the share.

A progress dialog box will briefly appear, after which Windows will display the UNC network path to reach the share.
The full network path is not important for DataCove, as we’ll be specifying the IP address/hostname information separately, but everything following the last backslash is.
Once this page displays, click Done.

The Create Share dialog box will now close, returning to the Properties window.
Note: No further modifications to the Security or Inheritance tabs are required in most situations, but these may need to be checked if the DataCove’s backup share is placed in a location that is already shared for other resources. It is not recommended to place the DataCove’s backup share in a nested shared location to avoid any other policies or inheritances from impacting them.
Select Close.

With the SMB share now created, it is time to bind this location to the DataCove for use as a backup.
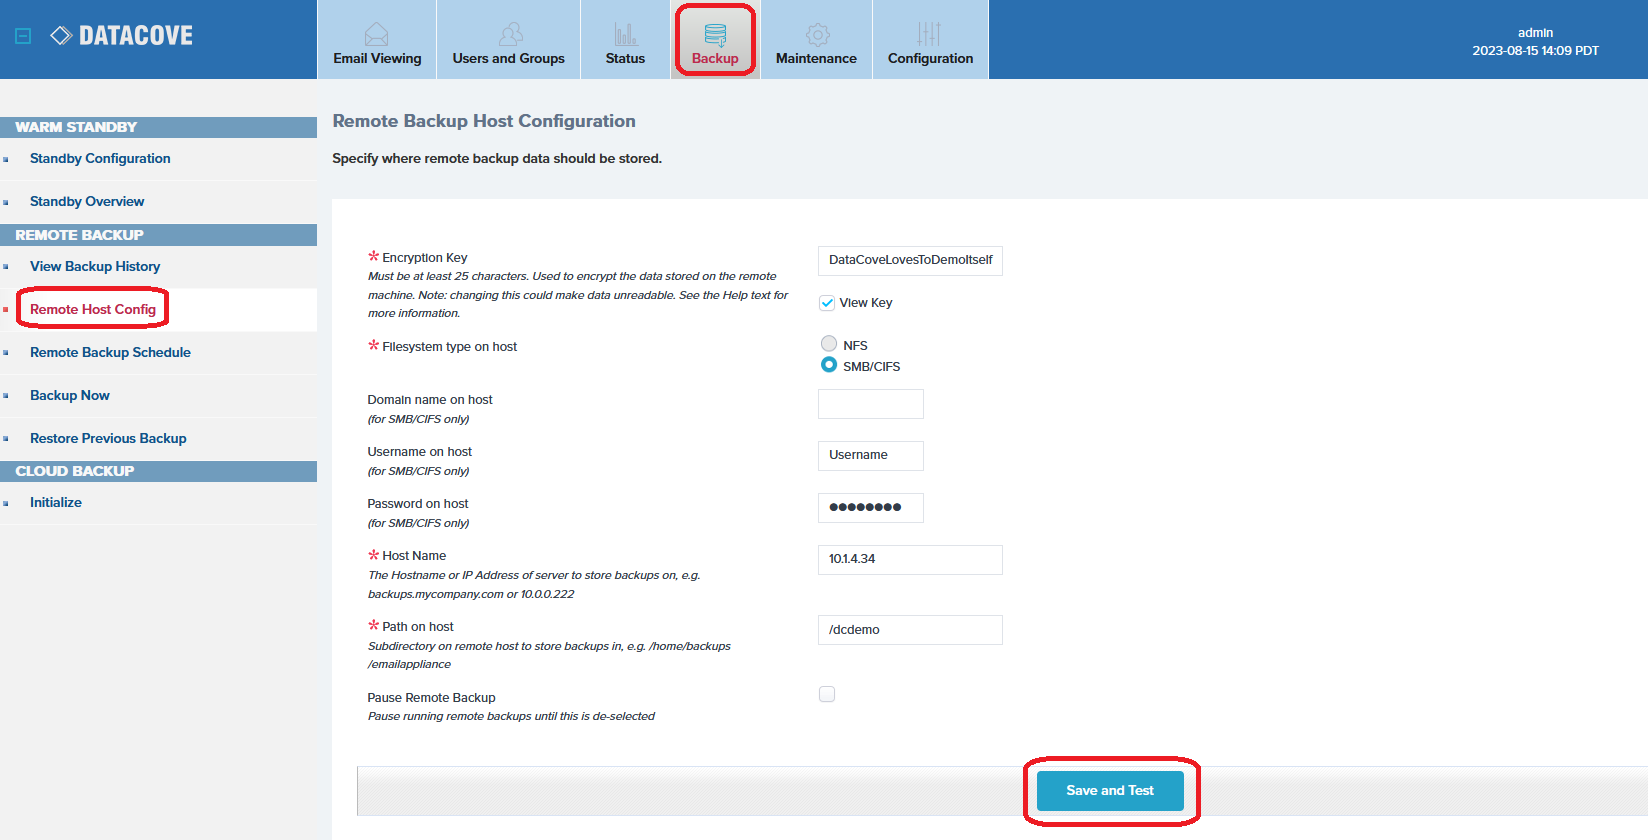
To begin, log into the DataCove’s web interface and select Backup in the top header navigation bar, then click Remote Host Config on the left hand side menu.
Populate a 25-60 character alphanumeric Encryption Key that will be used with the 256 AES encryption that all files routed to the backup will be secured with.
This Key is critically important to reserve in at least two digital locations and one physical location; if this Encryption Key is lost, the backup cannot be restored by another DataCove.
Select Filesystem Type on Host, select the SMB/CIFS radio button.
If using a domain-registered account (an account that lives in an Active Directory or other directory based environment, rather than a local machine’s login), enter the domain prefix in the Domain field.
Apply the Username of the account that has access to this SMB share; this would be the service account (or other account) granted read/write access in the previous step.
Enter the password for that account.
Enter the Fully Qualified Domain Name (FQDN) or IP address of the backup server in the Host Name field.
Enter the path of the network share itself, preceded by a forward slash (/).
Click Save and Test.
If the SMB share fails to mount, a red text error will appear at the top of the screen with a request to verify the spelling and parameters defined in the hostname/IP address field, the network path and the credentials. Review those items, make any corrections necessary, and then click on the small grey “x” button to the right of the text to dismiss the alert before attempting to Save and Test again. The red text alert will remain otherwise, potentially causing the results of the new test to mistaken as failing when they are in fact succeeding.
Note that a second line item in green text will appear specifying that the backup location has been saved. This will always appear as the DataCove is confirming that the data entered has been saved, but should not be accompanied by any red text when verifying a successful mount.

An example of a successful mount will have just the “Remote Backup location has been saved” in green text without any accompanying red text.

Once a a successful mount has been achieved, skip ahead to the Scheduling Backups section.
Configuring the Embedded Local Disk for Backups
Embedded Local Disk backups utilize the additional disk that is built into every DataCove and can be used for disk-to-disk backups without needing to create a network share of any sort.
To begin, log into the DataCove’s web interface and select Backup in the top header navigation bar, then click Remote Host Config on the left hand side menu.
Populate a 25-60 character alphanumeric Encryption Key that will be used with the 256 AES encryption that all files routed to the backup will be secured with.
This Key is critically important to reserve in at least two digital locations and one physical location; if this Encryption Key is lost, the backup cannot be restored by another DataCove.
Select Embedded Local Drive as the “Filesystem type on host” to direct the DataCove to use the onboard backup disk.
Select Save and Test once configured.

DataCove will now attempt to mount the backup disk for use.
If the mount is successful, green text will appear at the top of the screen specifying that the Remote Backup location has been saved.
If any red text appears saying that the disk was unable to be mounted, contact DataCove Support for assistance.

Scheduling Backups to run Automatically
Once the backup location has been set, the system is ready to schedule the backups to run automatically.
To define a backup schedule, select Backup in the top header bar, then click Remote Backup Schedule on the left hand side menu.
Multiple options exist for backup scheduling, such as:
Running daily (the recommended timeframe for backups).
Running every few hours.
Running once or multiple times per week, but less than daily.
Scheduling the backups to never run (and preventing them from ever running, if desired).
Manually initiating backups without using DataCove’s scheduler.
Note: While backups can be run manually if desired, it is strongly recommended to automate the process to avoid potentially forgetting to backup and risking the redundancy that backups provide.
Each of these possible combinations will be covered below.
To schedule a backup to run daily, select the Backup Frequency radio button for Daily, then define at what hour and minute the backup should initiate.
The clock used by DataCove is a 24-hour clock, meaning that 15:00 is 3pm local time, and 20:00 is 8pm local time, as examples.
The recommended window time for a DataCove is after 6pm local time, after the majority of email traffic for the day has ceased, but before the 2am DataCove self-check for the Nightly Email Notification’s report, to ensure accurate backup information reporting on the next day’s Email Notification.
If DataCove is backing up to a network share, any contention with the system hosting the backup share’s other duties, such as other system’s backups running concurrently, should be taken into consideration when scheduling DataCove’s backup.
DataCove’s backup throughput is low, generally within 10Mbps - 40Mbps and is not impactful to most networks, but for some heavily loaded backup locations, this may be worth considering.
Once the backup time has been set, click Submit to schedule the backup to run daily.
With a backup schedule now set, proceed ahead to the Backup Process Observation section.

To schedule a backup to run every few hours, select the Backup Frequency radio button for Hourly, then define exactly how often the backup should run.
This ranges from every one hour to every twelve hours.
The lowest advisable backup frequency using the Hourly method is every six hours, as more frequent runs can adversely impact overall system performance during business hours.
Note: In general, if the level of redundancy and Recovery Time Objectives (RTO) required for backups is anything below four hours, using the Warm Standby function is the recommended method of providing rapid recovery and superior resilience for highly regulated or high-compliance organizations.
If DataCove is backing up to a network share, any contention with the system hosting the backup share’s other duties, such as other system’s backups running concurrently, should be taken into consideration when scheduling DataCove’s backup.
DataCove’s backup throughput is low, generally within 10Mbps - 40Mbps and is not impactful to most networks, but for some heavily loaded backup locations, this may be worth considering.
Once the backup frequency has been chosen, click Submit to schedule the backup to run at the desired frequency.
With a backup schedule now set, proceed ahead to the Backup Process Observation section.

To schedule a backup to run weekly, or multiple times per week, select the Backup Frequency radio button for Weekly, then define on which days and at what hour and minute they should initiate.
Holding down CTRL on the keyboard and left-clicking additional days will allow for the selection of more than one day per week to schedule a backup.
The clock used by DataCove is a 24-hour clock, meaning that 15:00 is 3pm local time, and 20:00 is 8pm local time, as examples.
The recommended window time for a DataCove is after 6pm local time, after the majority of email traffic for the day has ceased, but before the 2am DataCove self-check for the Nightly Email Notification’s report, to ensure accurate backup information reporting on the next day’s Email Notification.
If DataCove is backing up to a network share, any contention with the system hosting the backup share’s other duties, such as other system’s backups running concurrently, should be taken into consideration when scheduling DataCove’s backup.
DataCove’s backup throughput is low, generally within 10Mbps - 40Mbps and is not impactful to most networks, but for some heavily loaded backup locations, this may be worth considering.
Once the backup time has been set, click Submit to schedule the backup to run weekly.
With a backup schedule now set, proceed ahead to the Backup Process Observation section.

Scheduling a backup to never run can be performed by selecting the Never radio button, then clicking Submit.
For physical server appliance DataCoves, if setting the schedule to Never, it is also recommended to select the checkbox for “I never intend to schedule this job.”
By selecting this box, the DataCove is being instructed to not withhold the extra “raw” email that is otherwise retained for redundancy prior to a backup being committed, freeing up disk space that would otherwise be indefinitely reserved until a backup is made.
An additional warning will pop-up when this option is selected with an advisory that backups are permanently being disabled by selecting it, meaning that Remote Backup cannot be used in the future to backup emails from the system.
Select OK to proceed with the submission process.
If setting the backup schedule to Never, the remainder of this article is largely superfluous and can be skipped, as no backups will be available for the upcoming steps.
Note: Instructing the DataCove not to run backups is extremely inadvisable, as there won’t be any redundancy for the system beyond what the RAID systems provide (in physical server appliance scenarios) or what the backend backups/services handle for local virtual machines or Hosted virtual machines make available. This can be used with relative safety in virtualized environments where another backup software running at the Hypervisor level is making backups of the virtual machine itself, but it is recommended to still use the DataCove’s backup for an additional layer of redundancy.


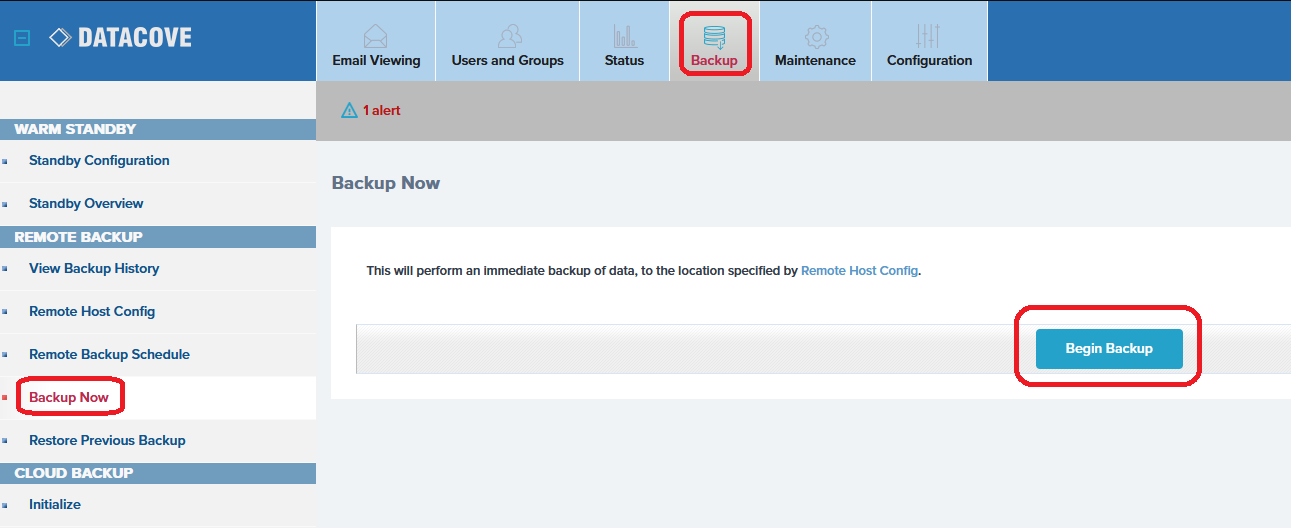
Initiating a Manual Backup
In the event that a backup is not desired to be scheduled but will be run on occasion by hand, a system administrator can initiate this process by selecting Backup in the top header bar, then selecting Backup Now on the left hand side menu.
Clicking “Begin Backup” on this page will initiate a backup to the location defined previously under the Remote Host Config page.
Manual backups, depending on how often they are run, are far more likely to take longer than a regularly scheduled backup and have a very high likelihood of initiating a Database Backup in conjunction to the Remote Backup itself, as the amount of data that may be pending backup is naturally going to be far larger than that of a regularly scheduled run and more data will need to be moved over.
Observing the Backup Process
The Remote Backup’s progress can be directly observed as it writes data from the DataCove web interface. This is found by selecting Status in the top header bar, then selecting System Status on the left hand side menu.
If the Remote Backup is currently running, it will appear in the top half of the page under Active Jobs. If the process is finished or inoperative, it can be found under the Inactive Jobs section in the bottom half of the page.
No matter the location, locating the process labeled as “RemoteBackup” and selecting the Magnifying Glass will drill into the details of its operations.

In viewing the Remote Backup process, fields such as the Start Time of the backup run and the End Time (if it has finished) will be visible, along with counts of how many emails and attachments have been routed to the backup location.
An approximate progress percentage is also displayed under the Activity line, allowing for an understanding of how far along in the backup process the system is.
If a Database Backup is also scheduled to run, the Remote Backup process won’t end until the Database Backup companion process ends.
The “Database_Backup” process can be found under the same System Status page where the Remote Backup process is located and has similar information as to its progress when viewed.


Once a backup completes, the process will enter the Finished status and drop into the Inactive Jobs section of the System Status page.
This will also provide a final count of how many emails and attachments were uploaded to the backup location.
At this point, the backup is complete and the system is then waiting for the next backup to run at the scheduled interval.

While the Remote Backup’s process page will change to reflect current information upon each backup, DataCove maintains a full log of all backups that the system has run through in the past. This Remote Backup History log page can be found by selecting Backup in the top header bar, then clicking in View Backup History on the left hand side menu.
Start times, end times and the total file count of the backup (inclusive of the total number of “documents” that were uploaded, meaning each email header, email body and individual deduplicated attachment that the DataCove received since the last backup) will be recorded here, along with a few additional system log files. In general, this file count will be at least twice the amount of emails received since the last backup and often significantly larger.
Older results can be seen by selecting additional history pages from the upper right or bottom right hand corner of the page or by increasing the amount of results shown on a per page basis.
For example, to see the entire 262 results that the below example image has, entering the quantity of 300 in the white box containing “20” for results to display per page and then hitting Enter will refresh the page and show a maximum of 300 results in it, with any excess logs becoming paginated.

Troubleshooting a Misbehaving Backup
Backups on DataCove can fail for a number of reasons, almost always for issues outside of DataCove’s control, and some commonly encountered issues and the steps used to troubleshoot them are below. If these steps do not resolve the issue, please contact DataCove Support for more in-depth analysis.
Diagnosing a backup issue begins with observing that the backup itself is not running or not writing an appropriate amount of data to the backup location. This is most commonly identified from the DataCove’s Nightly Email Notification, which sends status alerts daily about DataCove’s processes, update availability and more. With these arriving daily right to a system administrator’s mailbox, these are easy to use to find out if a problem is occuring.
The expected type of alerting that these Email Notifications provide will be a numerical count in the “Alert” or “Warning” headers at the top of the email, followed by details further below under the “Scheduled Backup Report” section.
In the context of the below example, sent on 8/13/23, DataCove is advising the administrator that the Remote Backup (referenced by the internal process name of ‘rembackup’) is scheduled to run at a certain time, daily, but that the last backup ran on 8/5/23; a very straightforward indicator that the backup has not run for at least a week. A further note indicates that the current backup has been running for far longer than anticipated.
As noted earlier, most backups only take a few minutes to a few hours to run, depending on the scope of data they must copy out, but no regularly running backup will ever take more than a week; this is the second indicator that something is awry.

The more hands-on method of identifying a backup’s status is to check directly on the DataCove itself.
Outside of the email notification informing an administrator of backups not operating, logging into the DataCove and reviewing the Dashboard page provides a brief historical view of the most recent backups. This view can help identify when backups stopped operating and how long they may have been in that state.
The Dashboard can be found by logging into the DataCove web interface and selecting Status in the top header bar. The Dashboard is normally the default landing page for the Status section, but in the event it is not on the system being checked, select Dashboard on the left hand side menu.
Scroll down on the Dashboard until the Remote Backup section becomes visible.

This Dashboard view of the Remote Backup settings provides a quick review of when and how often the backup runs via the Schedule section, the Backup Location (such as a network share) and the Backup History that shows when the last few runs had initiated and their results.
By reviewing the “Backup History” column for the last runtime, as compared to the “Schedule” listed above it, confirmation of whether the backups are running on time and according to schedule can be made. Gaps or the lack of recent backup entries that are not consistent with the Schedule are signs that trouble may be occurring with the backup.
In the next column, “Duration” should always show a runtime of at least 2-3 minutes at the minimum. Occasional longer runtimes are normal, but there should not be any “0 minute” durations.
The “Count” column should always reference a triple digit quantity of files, if not many thousands. Any counts of zero in this column could suggest a lack of new journaled email fetching or email processing backlogs. This wouldn’t directly be a backup-related problem, but a fetching-related one, and that would be a far more serious issue to need to resolve that should be escalated to DataCove Support as soon as possible.
Lastly, the “Successful” column provides a straightforward indicator of whether the backup process, and any companion processes like Database Backup, completed successfully, whether or not any data was backed up. These should always reference “Pass” and never “Fail,” as any failed entries indicate a problem with the backup itself.
With these identifiers for backup issues covered, let’s discuss diagnostics.
To aid in diagnostic specific issues with the Remote Backup, DataCove has a built-in battery of tests that can be run by the system to verify the backup location is in good functioning order. These are found by clicking Status in the top header bar, then selecting Full System Health Checkup on the left hand side menu.
While this function does exactly what it describes, a “Full” system health check, used for diagnosing and providing advisory across all of DataCove’s subsystems, in the context of this article, only the Remote Backup section is necessary.
By selecting Remote Backup from the list of available tests on the right hand pane, the health checkup can be limited to just the scope desired.
Note: Attempting to run the Remote Backup test while a backup is running will fail, as the same processes used for both operations will be in use simultaneously and unavailable for the test to run. If there is a suspicion of a backup issue while a backup is in progress, or may be stuck, Pause the Remote Backup process first. This is covered in a troubleshooting step further below.

The test page will now drill down into the backup test module, avoiding the additional tests that the Full System checks would otherwise add as overhead.
On this page, click Run Tests to begin the test battery.

The tests will launch in sequence, starting with basics like logically mounting the Remote Backup location, attempting to create a directory on it, writing a file to that directory, making changes to that file and more.
These tests all confirm that different aspects of the Remote Backup process are viable and functioning, with the vast majority of failures being detected within the first four tests. Of those failures, most will occur on Mount, and are generally access control issues, with a scant few falling under the file creation or rewriting/editing of files tests.
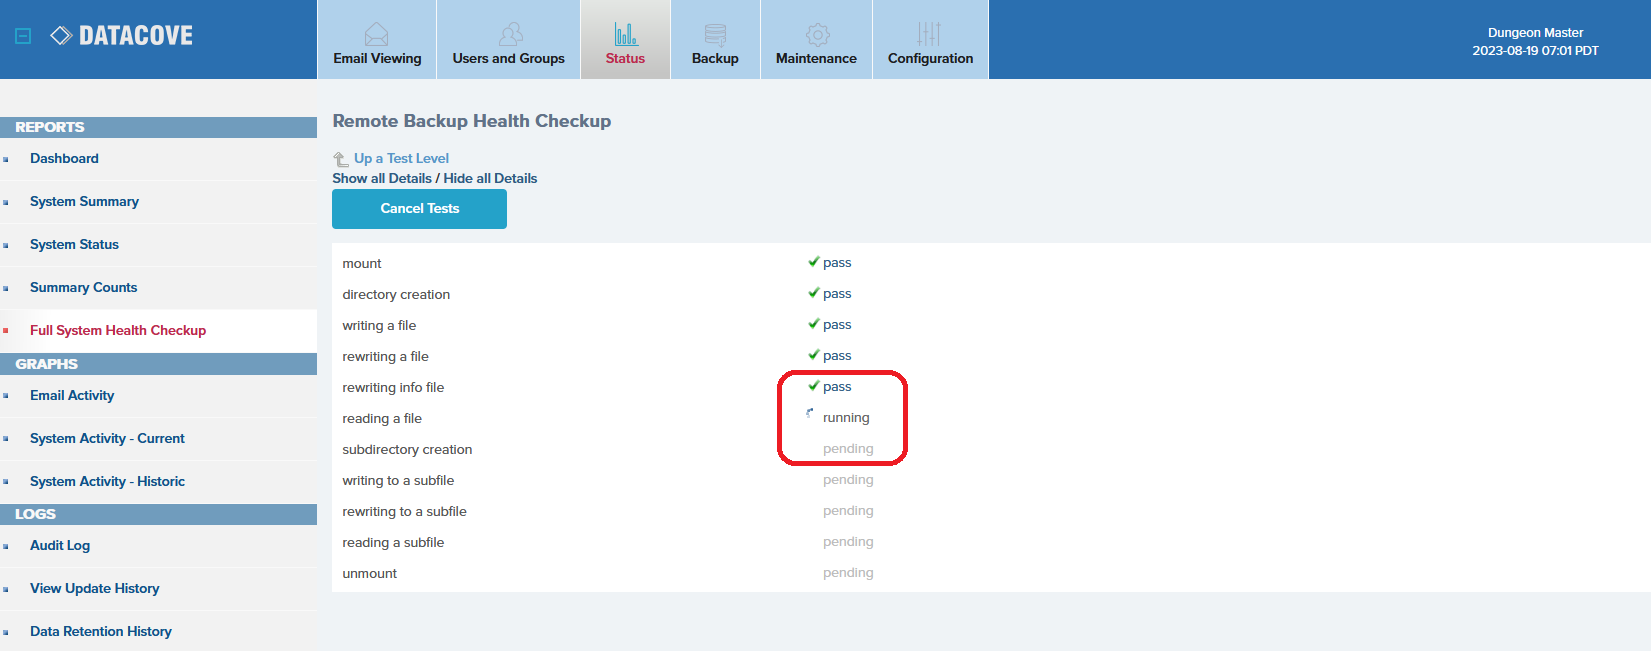
Once the tests complete, select the “Show all Details” link, located above the Run Tests button, to expand the results of each test.
This will create a breakout of what the test was checking for, and based on the success or failure condition, the results can help narrow down the potential failure points.

Failure to Mount the Backup Location
Failing to mount the backup location tends to boil down to a few fairly simple issues, but they can take some time to verify the various possibilities. Below are the most commonly observed issues and some troubleshooting steps that can be taken to resolve them.
Simply put: can the DataCove reach the specified backup location over the network? A Ping test can help identify this, but the command must be run from the DataCove since it is the DataCove that is trying to communicate with the network share.
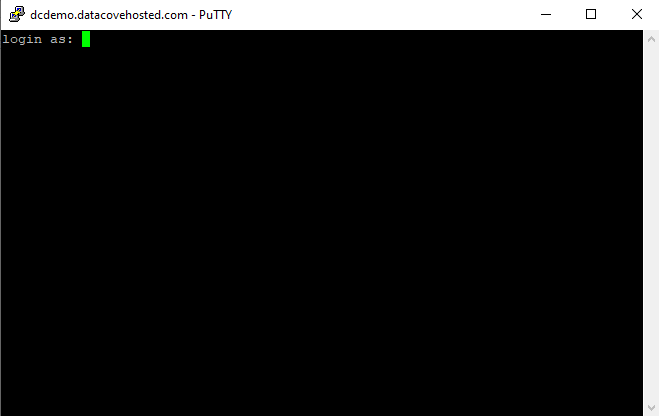
Testing of DataCove’s ability to communicate with the backup location is best conducted via the DataCove console menu, accessed using an SSH-capable tool like Putty or SecureCRT. Guidance on downloading the Putty SSH-tool can be found in the first section of the Changing Network Settings knowledge base article, found here: https://datacove.net/knowledge-base/updating-datacoves-network-configuration
Launch the Putty application. When Putty launches, a window will appear asking for a few parameters to be assigned.
Type in the DataCove’s Fully Qualified Domain Name (FQDN) or IP address and assign the connection type to SSH.
The Port used will automatically change to 22.
Select Open when ready.

Once the communication handshake has completed, the DataCove will respond with a login screen similar to the below image.
The default login for the console system configuration menu is as follows, but if this password has been changed, be sure to use the new password:
Username: cliadmin
Password: ChangeMe
Once authenticated, the system will present its configuration and diagnostic menu, as displayed below.

Type “3” for the Network Diagnostics menu, then hit Enter.
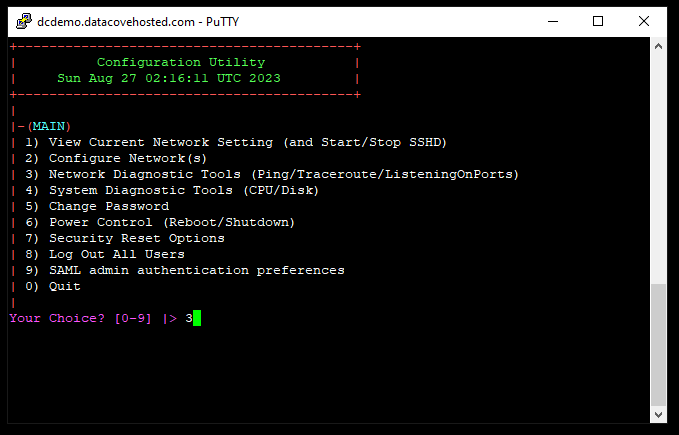
Type “P” for the Ping command, then hit Enter.
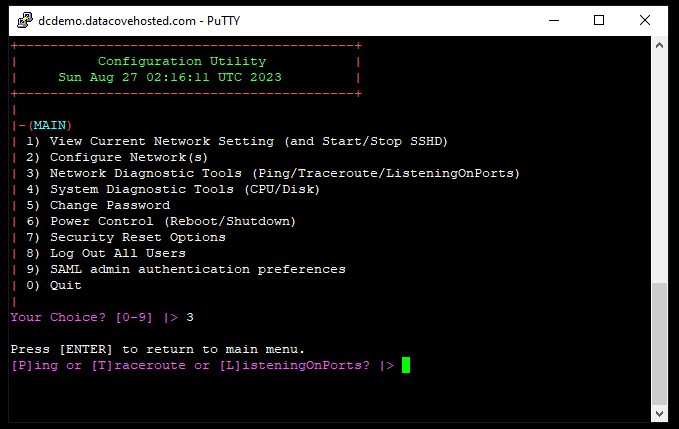
Type in the IP address or Fully Qualified Domain Name of the server hosting the network share, then hit Enter.

The results that are returned, if the Internet Control Message Protocol (ICMP) is enabled on the network, should show a successful response from the remote server. A successful response means that communication to the server at the most basic level is solvent, but does leave open the possibilities that a local firewall, Managed Switch or other filtering systems may be blocking access over the protocol being used to connect for the backup itself (SMB or NFS).
As the possibility of specific protocol blockades of this nature are less likely, it is recommended to pursue the other troubleshooting options described below before checking through firewall settings or switch policies.
Note: If ICMP is blocked on the network or not enabled on the remote server, often a reality in high security networks, this test cannot be used.
If the backup location server’s hostname, as opposed to an IP address, was used for the backup location under Remote Host Config, are DataCove’s configured Domain Name Servers (DNS) accurate to receive resolution?
DataCove’s current DNS settings can be found by clicking on Status in the top header bar, then selecting Dashboard on the left hand side menu. Scroll down on the page until Network Information is located and verify that the Name Server fields are populated with the correct Name Servers for that network and are up to date.
Many organizations change Domain Name Servers over time and DataCove is an oft forgotten system to receive an update to the latest Name Servers, which can impact services that have hostnames specified to reach them.

A simple way of testing if a DNS issue is to blame for a backup location being unable to mount is to review the Remote Host Config page’s Host Name field. If a server’s hostname is listed there, replace it with the IP address of that same server, save the change and rerun the Remote Backup test battery. If the test now succeeds, the issue is likely DNS related and updating DataCove’s network settings.
To do so, select Backup from the top header bar, then Remote Host Config on the left hand side menu.
Locate the Host Name field and change the hostname to the IP address of that server.
Select Save and Test afterwards to see if the backup location now mounts.

If this IP address replacement of a hostname is successful in getting the network share to mount, it could mean that the DataCove’s Name Server bindings are out of date or not responding.
If this is the case, updating the DNS settings of the DataCove can be accomplished from the console menu. To do so, follow the instructions in the Changing Network Settings knowledge base article, found here: https://datacove.net/knowledge-base/updating-datacoves-network-configuration
The simplest and most common issue in a backup location failing to mount is that there is a misspelling in the username or password used to obtain access. Retyping the username and password slowly and carefully is usually the quickest resolution to this, but if that does not resolve the issue, more advanced procedures are below.
Begin by attempting to mount the network share from a different Windows computer (that can reach the network share over the network) using the same credentials. This would be the same procedure as mapping a Windows system to any other network share.
Open File Explorer and navigate to This PC.
In the ribbon, select Map Network Drive.

Assign an unused Drive letter to this network share (Windows will normally pre-select an unused one in advance; this is fine to use), then specify the Server Address and Share name in the Folder field.
The format of the Server Address is preceded by two backslashes, then either the hostname or IP address of the server hosting the share, followed by one additional backslash and then the name of the Shared folder itself.
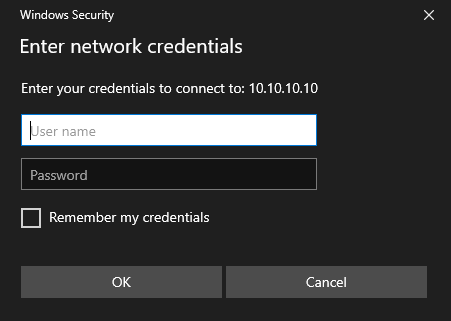
Select the checkbox for Connect Using Different Credentials, then click Finish.

A dialog box will appear asking for the credentials to be used when connecting to this share.
The credentials used should be that which the Network Share has allowed for DataCove, and the same ones that DataCove will use.
Specify the domain prefix (if necessary) with a backslash, then enter the Username and Password.
Click OK.
If the credentials are accurate, the network share should spawn in a new window and show the contents of the location.
If a rejection occurs, recheck the username and password for accuracy. If it is still failing, this may be a sign that the account is locked or the Share does not have the appropriate permissions for the user account planned for use.
If the account is locked, or a password needs to be changed, log into a Domain Controller and launch the Active Directory Users and Computers control panel.
This control panel can be found by clicking the Start button on a Domain Controller, then locating Windows Administrative Tools and finally Active Directory Users and Computers.

Once inside the control panel, locate the service account that is being used for access to the Network Share by DataCove and right click it.
Select Reset Password from the context menu.

Enter in a new password that adheres to your organization’s security policies for length and difficulty.
Uncheck the “User must change password at next logon” box, if it is checked. Having this checked may allow the account to only log in once for one backup, with all subsequent backups failing due to the requirement to change the password, which DataCove cannot perform.
Verify that the Account Lockout Status is set to Unlocked; if this is Locked, the account won’t be allowed to login regardless of the password reset. Accounts can get locked due to repeated attempts to log in with incorrect credentials, such as a wrong password.
If the account is locked, check the box for “Unlock the user’s account.”
Click OK.
With the password now reset and the account unlocked, mounting the Network Share can now be retried.

If the above steps still haven’t worked, using an account that is local to the server or device hosting the network share is another good way of eliminating any domain policies or permissions from getting in the way.
The steps to perform this vary from device to device, but for a Windows Server, the process is as simple as logging into the server and opening Computer Management.
To begin, click on the Magnifying Glass in the taskbar and type in “Computer.”
When Computer Management spawns in the list of choices, click on it.

This opens the Computer Management control panel.
Locate Local Users and Groups on the left hand side menu and then expand it to find Users.
Click on the Users icon to see a list of all local user accounts on the computer.
Right click on the empty white space under the list of users and click New User.

In the New User dialog box, create a Username and Password for this new user that meet your organization’s difficulty requirements.
Then, deselect the “User must change password at next logon” and instead select “Password never expires” from the optional checkboxes. This ensures an avoidance of the Password Change requirement that cannot be fulfilled, as well as prevents the account from being subject to any automatic password rotation policies that may be enforced.
Once set, click the Create button.

This account should now be set up with the appropriate Read/Write permissions on the Network Share being used for the DataCove’s backup, then configured on the DataCove’s Remote Host Config page for use.
If this local account is successful whereas a domain account was not, it may imply that the domain account’s credentials or domain prefix were entered incorrectly, or that there is a domain-level policy affecting the account that was being used that prevented it from mounting the share properly.
If the SMB share is having trouble being mounted, switching to an NFS share may be another easy workaround and provides better performance for both backups and restoration without any penalties.
A separate knowledge base article already exists for how to set up an NFS Network Share and covers all aspects of configuration. The article can be found here.
In some situations, the network share itself may have become unusable or may be misbehaving. Creation of a new SMB network share, either on the same server or, preferably, on another server for testing purposes, can help identify whether the issue is the share or server preventing access.
The process to create a new share is the same process as was originally detailed in this article.
Of note, the new share, if created on the same server as the current share, should never be nested inside the existing backup share. It must always have it’s own independent namespace at the same level as the current backup share or higher, but never inside of the existing share.
Once the new share is created, reconfigure DataCove to point to it via the Remote Host Config page and retest the mounting as per normal.
If the new share mounts successfully, this would indicate the mounting problem being either the server the original share is hosted on, or some other issue with the existing share.
Using a new share for the backups going forward is fine, so long as the server hosting it has sufficient capacity, with the DataCove initiating a Full backup on the first run and then incremental backups thereafter. The old backup share should not be deleted until the new backups have been running consistently for at least a few days first, to avoid running the DataCove without the redundancy that the backup affords it.
Failure to Write/Rewrite Files
If the Remote Backup test battery passes on mounting but fails on Write or Rewrite of files to the backup location, this is nearly guaranteed to be a permission issue.
First, ensure that Write permissions are assigned to the account being used; this is done during the initial SMB share setup wherein the Read/Write permissions (and not just Read) are assigned to the account.

If they are set, then proceed with examining the two likely culprits listed below.
Newly created Windows folders will come with a “partial” Read-Only permission shown at the folder level by default; this only applies to the files contained with the folder, not the folder itself. This “partial” setting allows those individual files to possess their own Read and Write permissions independent of what the folder itself says they have. This property is perfectly fine and a non-issue; it can become an issue if the folder itself is being used to override the writable state of the files themselves though.
An example of the square “partial” Read-Only status:

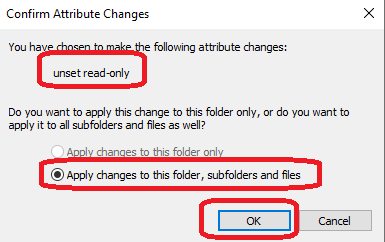
The folder itself can override all permissions for files underneath it by having this same Read-Only box purposefully checked, wherein it will show a full checkmark in that box. An example of this is pictured below.
Folders set with Read-Only with a full checkmark will prevent various files and subfolders within them for being written to. This will cause backups to fail due to an inability to write to those files or folders, which is a critical part of any backup process.

If the Read-Only box on the backup share is fully checked, remove that checkmark and click Apply.
A popup dialog box will then appear asking if the files should be “unset” from the Read-Only mode. Select the radio box to “Apply changes to this folder, subfolders and files” and then click OK.
Once the property change finishes and the dialog box closes, click OK on the Backup share’s property page to close it out, then retry the Remote Backup test sequence.
Note: Depending on the quantity of files contained within the backup share, this process may take time.
If the backup share’s folder property page is checked again after this process finishes, it should resume showing the square “partial” Read-Only status, which is where it should be.
In the situation of a file server with DataCove’s backup share nested within an existing network share, it’s possible that an upstream permission set is rolling down to the DataCove via permission inheritance and causing an inability to write to the location.
To disable this inheritance for the DataCove’s share, right click on the folder that operates as the backup share and select the Security tab.
Select the Username being used with DataCove for read/write access to the share under the Group of User Names section and verify that the Permissions pane shows Full Control Allowed for this account. If it does not have that, select the Edit button and grant Full Control permissions to the account before proceeding.
If the account does have Full Control permissions, select Advanced to spawn the Advanced Security Settings dialog box.

Under Advanced Security Settings, verify that the account being used for DataCove’s access also references having Full Control and no Inherited permissions.
If it does not, use the Edit button to assign the access levels of:
Type: Allow
Applies To: This folder, subfolders and files
Basic Permissions: All
Then click OK.

Once the permissions have been confirmed as good, locate the Inheritance button in the bottom left hand corner of the box. If this is set to Enable Inheritance, the folder is not receiving inherited permissions and this step can be skipped.
If the button shows Disable Inheritance, click the button and then click OK to remove the upstream permissions from rolling down onto this folder.

This will remove Inherited permissions from the folder and allow it independent access.
Once this step is complete, retry the Remote Backup tests to see if they now pass succesfully.
Backup Location Capacity Issues
Is the backup location out of space?
A relatively common issue that can cause backups to fail is the backup location being out of space. This is often the case for many organizations wh0 use a file server or other central storage repository for multiple systems or personnel. All it takes is one system or user to plant enough data in their share to use all the capacity up on the storage volume, thus causing a cascade of other systems or people to be unable to write or save new data to their respective shares.
This is easily verified: bring up This PC on a Windows file server and navigate to either the local disk volume or network location (for SAN/NAS systems) where the backup share is stored and review whether the volume has free space in excess of a few gigabytes. Having some space is necessary for any volume to be successfully used as a backup share repository with the general recommendation that a few hundred gigabytes should be available at all times.
If the backup location is full, expansion of the volume is the best immediate resolution, followed by deleting unnecessary/extraneous data from other network shares on that volume.
If these are not possible, move the DataCove backup to a new storage volume on another system. This is best achieved by creating a new network share on that new volume and running a fresh backup from scratch, rather than attempting to move the tens of millions of small, encrypted files over the network to the new home. Both processes will take time, but the latter process will strain most systems greatly and have a high propensity for interruptions or failure.

File system limitations on the storage volume:
A more complex variant of a “full” storage location is when the file system of that volume can no longer accept additional files or directories made upon it. This can manifest by hitting limitations on file quantity or cluster/inode quantity stored on that volume and include all files on the volume, not just data held in any individual folder or share. The behavior of an inability to write or rewrite to the backup share is the indicator for this, with the variable being that the backup location is not out of space.
This is largely an issue of the past, with almost all systems today using a sufficiently modern file system to handle mind boggling quantities of both files and clusters (generally upwards of 4 billion files and clusters). Some older systems that may be in production or using an older file system for compatibility reasons, or modern systems with very large and overloaded storage volumes can still have this fate befall them however.
To identify whether this is the issue, navigate to the DataCove backup share in Windows and create an empty Notepad file and give it any name.
The first sign of an error may occur at this point, with Windows refusing to let the file be created. If it does, this may be a confirmation of a file system limitation.
If the file does allow creation and naming, open the Notepad file and add in some text of a few hundred characters, then attempt to Save the added content.
If the file system is having a limitation met and fails here, this second test confirms whether it fails on either a simple file creation (which has far lower logical unit consumption at the capacity level) or if it requires more than just a simple file creation to trigger the issue, such as writing content to the file.
If both tests pass, it is unlikely for the file system to be the issue. If the issue is present however, the only safe options are to delete other files from the storage volume to “free up” file system capacity for DataCove’s backups to continue or move the DataCove backup to a new storage location. This latter option is best achieved by creating a new network share on a new volume and running a fresh backup from scratch, rather than attempting to move the tens of millions of small, encrypted files over the network to the new home. Both processes will take time, but the latter process will strain most systems greatly and have a high propensity for interruptions or failure.


Backup (or Database Backup) Not Finishing
Occasionally, a DataCove’s Backup or Database Backup process may not end, even though the backup itself has completed. This is usually due to a short term interruption in communication with the network share, but can also be caused by an internal process to move ahead to the next step in the backup process not triggering for some reason. This issue can be found by finding a Remote Backup process still running long after its normal end time and without any signs of visible progress, especially in terms of network activity or new file writes to the backup location.
In such situations, a couple quick fixes are available to troubleshoot this issue; these are best performed in the below order for minimum impact to production.
Pausing and unpausing the Backup:
With a running Backup (or Database Backup) that appears to be stuck, a very non-intrusive means of stopping and restarting the process can be performed by Pausing the backup process, waiting a few minutes, and then unpausing the backup. This is instructing the DataCove to terminate any ongoing backup processes, including stuck ones, and then ignore all backup process scheduling until instructed to resume.
To begin, navigate to the Backup page via the top header bar, then select Remote Host Config on the left hand side menu.
Locate the "Pause Remote Backup” line and then check the box to the right.
Click Save and Test once done.

With the Backup now paused, navigate to Status in the top header bar and then select System Status on the left hand side menu.
Verify that the Remote Backup and, if applicable, Database Backup jobs are present under Active Jobs or if they are under Inactive Jobs.
If they are under Active Jobs, wait ten minutes and then refresh the page.
In most situations, these jobs will have terminated and now be under Inactive Jobs. If they are, it is safe to proceed with the next step of unpausing the backup.
If they are still under Active Jobs after the initial ten minute wait, give the system another ten minutes and check again. If they have not terminated still, proceed to the next section of Restarting the Supervisor.

With the Backup processes now ended, it is time to resume the backup process.
Select Backup from the top header bar, then click Remote Host Config on the left hand side menu.
Locate the Pause Remote Backup section, uncheck the Pause checkbox, then click Save and Test.

Once resumed, a backup will immediately initiate and resume as a regular Full, Incremental or Differential backup, depending on what the last backup was set to perform.
This backup’s runtime will differ from the norm since it may have a smaller or larger amount of data to push to the backup location depending on what the process was doing at time of pausing, but should run through normally and finish out on its own. Subsequent backups should then return to their normal scheduling.
If these do not occur or the backup gets stuck again, please contact DataCove Support.
Restarting the Supervisor process:
The Supervisor process is a “parent” process to many of the routines that DataCove performs, including processes like maintaining the web interface, fetching new emails and running backups on a schedule. These “child” processes or subprocesses are what the Supervisor manages and restarts in case of any trouble with them. In most situations, this process is entirely automatic and behind the scenes, but if there is a need to give any process a ‘shove’ to get it going, we can manually restart Supervisor, which will subsequently restart all of its subprocesses without having to pick through them manually and terminate each thread.
As the Supervisor runs the web interface, it cannot be restarted from within it. It is instead located in a hidden menu of the system’s console, accessible either from direct attachment of a keyboard and monitor to the DataCove or, preferably, via a remote access tool such as Putty. This step will discuss how the process is conducted via Putty.
To obtain access to the DataCove console menu, use an SSH-capable remote administration tool like Putty or SecureCRT to initiate an SSH connection to the DataCove over TCP 22.
Type in the DataCove’s Fully Qualified Domain Name (FQDN) or IP address and assign it to the SSH service.

Once the communication handshake has completed, the DataCove will respond with a login screen similar to the below image.

The default login for the console system configuration menu is as follows, but if this password has been changed, be sure to use the new password:
Username: cliadmin
Password: ChangeMe
Once authenticated, the system will present its configuration and diagnostic menu, as displayed below.

Type “advanced” at this main menu screen, then hit Enter. This will now provide access to the Advanced Menu.
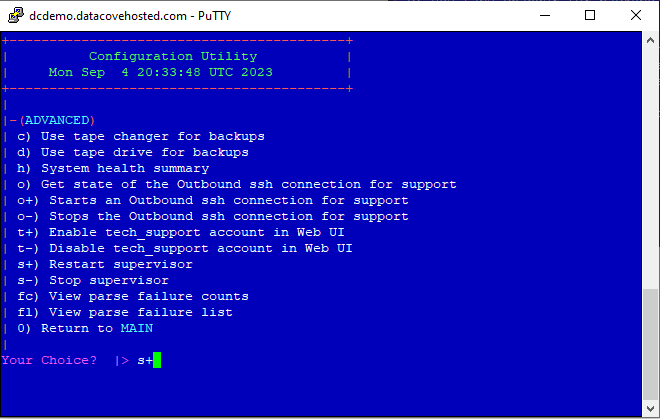
The Advanced Menu provides some additional diagnostic options as well as features that can be toggled on or off. This is also where the Restart Supervisor option lives.
Type s+ at the menu and then hit Enter to begin the restart process of the Supervisor and other child processes.

The Supervisor process shutdown takes approximately one minute on most systems, but can take as long as five minutes on particularly busy systems or if certain processes are slow to respond.
Once the process finishes knocking down all of the processes, it will bring them back online within another two minutes, at which point the Putty interface will indicate that it is now safe to press Enter to return to the main menu. The Putty program can be safely closed at this time.
Log back into the DataCove web interface and check on whether the Remote Backup process is running.
If the process is running, check the "Start Time” of the process to see if it restarted within the last few minutes, indicating a new run.
If the Start Time is showing a date or time that correlates with when the backup originally started and got stuck, this troubleshooting step did not work. Please contact DataCove Support for further troubleshooting steps.
If the Start Time is showing an initiation time within the last few minutes, let this backup run and treat the Supervisor restart as successful.
Now restarted, a backup will immediately initiate and resume as a regular Full, Incremental or Differential backup, depending on what the last backup was doing at the time.
This backup’s runtime will differ from the norm since it may have a smaller or larger amount of data to push to the backup location depending on what the process was doing at time of restart, but should run through normally and finish out on its own. Subsequent backups should then return to their normal scheduling.
If this do not occur or the backup gets stuck again, please contact DataCove Support.
Restoring from a Backup
Restoring a DataCove from a backup is a relatively straightforward affair, but as noted above, the fact that a fresh and unused DataCove must be used for restoration means that DataCove Support will be involved at some point for provisioning of a new system or for modifications to a DataCove’s Maintenance Key. DataCove Support should be looped in as soon as possible in a major service event to best assess whether a Backup Restoration is needed and if so, the most expedient ways to execute one for a given environment.
Once Backup Restoration has been determined as the way to proceed, prepare the new DataCove on the network by assigning a new and independent IP address from the old DataCove to avoid any IP conflicts if troubleshooting is ongoing. Only reuse the old DataCove’s IP address if that system is fully offline and won’t be turned back on.
On the new DataCove:
Begin by navigating to Backup in the top header bar, then selecting Remote Host Config on the left hand side menu.
Populate the details of the old system’s backup here, including the encryption key and path to the backup location. This is providing the location of the backup to be restored onto the new system.
Save and Test when complete.
A dialog line near the top of the page should reflect back in green text specifying that the backup location has been saved. If there is any red text denoting an inability to mount the backup location, check the permissions of the account used for access to the network share or, in the event of an NFS share, that the new DataCove’s IP address has been authorized for access.

Next, navigate to Restore Previous Backup on the left hand side menu.
Input the Maintenance Key of the old DataCove (this can be retrieved from any of DataCove’s nightly email notifications or via DataCove Support) in the Product Key field.
Then, check the Bypass Disk Size Requirements box. This is simply a best practice; a Backup that is being restored should always be onto a same size model DataCove or larger system; never smaller. A smaller DataCove cannot necessarily restore all of the data held by a larger system’s backup, which is logical, but even same size machines can have minute differences in disk sizes between models that can interfere with the restoration if this box is left unchecked.
Once these boxes fields are set, click the Begin Restoration button.

The Restoration process will initiate with green success text at the top of the page, followed by automatically changing the page over to the newly started process so that progress can be observed in real time.

After a few moments, the progress page will drop away and provide the minimalist “DownServer” web interface, which is a subsite of the main DataCove web interface that runs if the main interface is offline for service or is yet to start after a reboot.
This DownServer interface allows for the same functionality as DataCove’s System Status page, showing Active Processes that are running and idle Inactive Processes alike.
Active Processes are designated by the small blue circle icon next to the process name. In this context, only Remote Backup should have the active icon next to it.
Click on the Magnifying Glass of the Remote Backup process to begin seeing the details.
Note: The Remote Backup process’s name is a bit deceptive in this scenario, since it’s really a Remote Restoration using the Remote Backup’s functionality in reverse. The processes are merely coupled together for brevity within the system.

On the Details view of the Remote Backup process, the Activity line will reference that the system is actively conducting a restoration, with the white pane of text below showing exactly what the process is working on at that time.

Most of the Restoration process is relatively fast, with the Configurations, Settings and Database restoring within a few hours on average.

Once the Restoration reaches the Emails phase, the restoration will begin taking a significant amount of time as the data is copied back into their appropriate locations in the Database.

The more emails that are present, the longer this process takes, with larger sized systems taking up to several days to bring all of the data back in.

Progress of the restoration can also be observed in terms of “Gigabytes repopulated” by comparing the backup size from the backup share to the “/Vault” partition on the DataCove, visible from the console menu under Option 4 for System Diagnostic Tools and Option D for Disk Utilization.
Guidance on reaching the DataCove console menu can be found in the first few steps of this Knowledge Base article: https://datacove.net/knowledge-base/opening-a-ssh-reverse-tunnel-for-support
Data restored over time can be tracked by rerunning the Disk Utilization command every hour or so to gauge the rate of restoration in terms of storage capacity by watching the /Vault partition’s consumed space increase, as shown below.


Once the Restoration completes, the DataCove web interface will return to normal functionality and the system is almost ready for full use, pending a couple of final confirmations.
The RemoteBackup process, found by selecting Status from the top header bar and then System Status on the left hand side menu, should now be in the Inactive Jobs section.
Select the Magnifying Glass icon for the process to observe its final status.

If the process ended at Restoring Configuration Files and with a success confirmation at the end and without and warnings, proceed with the Email Search Verification step listed further below.
If the Remote Backup Process log ends with a warning notification, DataCove Support should be contacted to further assess the Restoration’s completeness.
Warnings can mean a lot of different things, ranging from minor issues like process parallelization wasn’t able to be performed and the Restoration took longer as a result, but without any impact to the final data recovered and potentially up to some segments of the emails or indices weren’t restored and are needing to be “replayed” by the system from the transaction logs in order to rebuild them, meaning the Restoration isn’t “fully” complete yet.

A somewhat-common warning can appear if an index or multiple indices failed to restore properly, in which case the DataCove will “replay” or reindex any emails it has restored that lack matching indices.
Reindexing of emails can be a long process depending on the quantity of emails needing this treatment, coupled with any other loads the system may need to resume taking on after it is live again.
Progress of the reindexing can be found under a process called Full Integrity Scan, which will launch after the Restoration finishes if there is any work that needs to be performed post-Restoration. This process can be found under the same Status and System Status pages.

Selecting the Magnifying Glass for the Full Integrity Scan will provide an indication of how far along the process is in its workload, along with a description of what exactly it is doing. Total quantities of emails pending work and percentages of progress are visible on this page.
The below example indicates that some indices need to be resynchronized with the database, which is another way of describing the reindexing process that makes emails searchable.

Identifying the workload of the reindexing process can also be found under the Summary Counts page, which can be found by selecting Status in the top header bar, then clicking Summary Counts on the left hand side menu.
A large backlog in the “Documents Being Indexed” queue can help quantify the emails that the system is working on at that moment, which are normally inserted for work in chunks of 10,000, until a natural “safe” limit of 50,000 is reached.
In this example, out of 142.5 million emails, approximately 25 million of them are pending indexing. Those 25 million emails are being inserted into the DataCove’s indexing queue in chunks of 10,000 until the queue reaches 50,000, at which point they are paused on further insertion until that queue works down to at least 40,000 emails, at which point another 10,000 are added until the 25 million emails have been fully reindexed and are searchable once more.
Searching for emails will be incomplete until all emails are indexed on the system and can lead to missing results. It is best to wait for full reindexing to finish before attempting any investigations or eDiscovery operations.

Email Search Verification
The tried-and-true means of verifying that a Restoration has completed successfully is to run a search for all of the emails on the system.
The count of total emails can be found under the Summary Counts page, which can be found by selecting Status in the top header bar, then clicking Summary Counts on the left hand side menu.
The number at the top of the page, under the Totals section, is Emails. This number is the total number of emails on the system and what we can expect to find a close approximation to if we were to run a search for all emails on the DataCove, known as a Comparative Search in this context.
Note: Approximation is the keyword; there are some housekeeping processes that are always running on DataCove to deduplicate or otherwise tidy up messages or message fragments into cohesive emails; it is not a problem to find a few more or a few less emails than this count indicates when performing the next test, but it is not expected to rise to more than a 0.5% differential.

To begin this comparative search, select Email Viewing in the top header bar, which will default over to the Search page.
In the Sent Date field, use the dropdown menu to select “Before” and then populate the present date in the search term box.
Click Search.
Note: This search may take a minute or two to return full results, as this search is attempting to bring up every email on the DataCove. Larger and more populous machines may take longer.

When the Search completes, green text will appear at the top of the screen reporting the successful completion.
The number of the results brought up by this Search will be in black text and should be close to the total number of emails reported under Summary Counts.
If the number of results is in red text, the search is not yet complete. Please wait for it to finish.
If the counts are more than 0.5% off of the total number of emails as observed from Summary Counts, contact DataCove Support for further investigation, as this could imply some data has not been restored fully.
If the counts come back as being exact or close to the total number of emails from the Summary Counts page, the Restoration was a success and all emails should be ready for investigatory and archival purposes once more.

This concludes the Remote Backup and Restoration article for DataCove.