VMWare Setup Guide
VMWare ESXi versions supported: 5.5, 6.0, 6.7, 7.0 and newer
Qualifying hardware resources for your virtual DataCove
The DataCove Archiver requires different resource allocations depending on the model, which can greatly impact its performance in both email volume processed daily as well as how fast search results are returned to the requester. The recommended resource amounts are provided in the table below.
A detailed breakdown of the different resources and which aspects of the DataCove they affect is further below.
Allocation of lesser resources will greatly reduce the system’s performance and will not provide a satisfactory user or administrator experience. If the adequate resources are not available, our recommendation is to obtain a physical appliance DataCove or Hosted DataCove, both of which will always meet or exceed the resource tables provided below.
Processing Cores
The number and speed of processing cores assigned to DataCove dictate how many different processing and indexing queues can be spawned on the system for parallel workloads. Increasing the quantity of cores assigned to the VM will allow DataCove to "process" more emails per day and allow for additional email fetching in high volume environments.
Email processing includes how quickly DataCove can pull data in from a remote location (email server or network share for data upload), its deduplication and compression of data, as well as preparation of the emails into broken down data sets for the Indexing process to work on.
Processing cores also greatly determine the speed of encryption for processes like Remote Backup, as well as the very complex DeIndexing and DataAging processes of the automated Retention Policies.
Note: Running the DataCove VM on a virtualization host that does not possess a sufficient number of unused or unsaturated processing cores will result in poor performance, caused by the system having to “wait” for all of its assigned cores to be free before it can get a chance to run a cycle.
Memory
An important “all rounder” resource on DataCove, the amount of the memory available to DataCove determines the following:
How many indices can be cached in high speed memory for quick search performance.
How quickly the indexing process can read and catalog all data within an email.
How many simultaneous search and export operations can be conducted.
In both high-volume environment or heavy-use environments (i.e. with end user access or frequent searches by HR/Legal), granting additional memory to the DataCove can be the single most beneficial action taken in dealing with vast or high-frequency searches, primarily stemming from the additional elbow room it provides for large index caches to improve search performance for systems with many tens of millions of emails on them.
Note: Memory on DataCove should always be a static memory assignment, and not dynamically allocated, as DataCove will consume all the memory it sees.
Storage
DataCove's storage needs can be defined in two senses: the sheer amount of space required and the IOPS (Input / Output Operations Per Second) needed for efficient operation.
First and foremost, DataCove is an archival device, and its primary consumption of resources is tilted towards disk space. This space is used to provide 'actual nameplate value' storage in the sense that a DataCove 500 model provides exactly 500GB of usable space, and any additional space is used for Operating System functions that would otherwise utilize perfectly good archival space instead. Space provided or 'extended' beyond what the virtual machine itself comes with is not used by the system (usable space is determined by the model purchased).
The second, and far more important factor, is the IOPS required per system. Traditionally, any DataCove will provide a sufficient level of performance with about 200,000 IOPS (about two dedicated SATA SSDs worth of performance) , but providing higher tiered storage (especially high RPM disks, SSD Cached or even pure SSD volumes) can dynamize the system into an extremely high volume and delightfully more responsive system. It is highly recommended to place DataCove on Tier 0/1 storage whenever possible. All search, exports, email processing, indexing and even system level functions such as automated retention policy purges are heavily reliant on disk speed for their own performance limits.
The volume on which DataCove is placed can have a significant impact on it as well. Parity based RAID volumes like RAID 5 and RAID 6 (as well RAID 50 and 60) have a write performance penalty that are at odds with DataCove's 96% write/4% read profile, and can lead to decreased performance in terms of email volume handled. RAID 10 volumes are the recommended storage type whenever possible.
For reference, all DataCove physical appliances use pure SSD storage arrays as well as RAID 1 or RAID 10 volumes to avoid parity overhead and provide the fastest performance possible. It is recommended to match or exceed these configurations for the best experience.
Disk space allocated to DataCove from the base virtual machine is by default Dynamically Expanding. While this does have a minor performance penalty, it traditionally is not a bottleneck to the system's performance even in high volume environments.
Note: Similar to the Processing Cores, DataCove’s disks must be situated on an unused or unsaturated storage volume, as contention with other virtual machines will impact DataCove’s performance.
Networking
Networking on DataCove is generally kept to a single Gigabit network adapter, as the system is rarely in a situation where it needs more capacity than that. An individual paravirtualized interface comes with the virtual machine as is, and should be assigned to a ‘server’ designated network segment.
This server network should be able to access the following locations:
Internet - Access to the open Internet is necessary for the DataCove to reach the KeyServer to validate its subscription and download new updates, as well as to access hosted email providers to fetch/receive email.
Internal mail server - Access to the internal email server, such as an on-premises Microsoft Exchange system, for email fetching.
Internal storage server - Access to an internal backup or file server so the DataCove can make backups of its system state and data.
Desktop network - Access to the desktop network is valuable for providing end user access and ease of use by administrators.
Note: DHCP is desirable to have for initial system installation, but is not required.
Note: Adding additional network adapters will not provide teaming, link aggregation, or any other benefits to DataCove and can cause unsupported behaviors.
Note: Using a 10Gigabit ethernet adapter can increase download speeds from the DataCove for very large scale exports, but is generally rare enough a situation to where it is not warranted.
Downloading the DataCove Virtual Machine Image
The DataCove virtual machines are pre-created VM's which exist in a ready-to-import configuration, with all hardware already allocated in a baseline configuration (usually 4-8 cores and 8GB-16GB of RAM). The prior explanation of how resources are used on the system can help guide a system administrator into tailoring what is needed for their model.
The DataCove virtual machine images for VMWare can be found by using an FTP client and visiting “DCFTP.DataCoveHosted.Com” and not specifying a username or password. A folder containing the DataCove virtual base images resides inside, and selecting the VMWare folder will bring you to the correct files for VMWare.
Note: Some FTP clients refer to a login attempt without a username and password as an “anonymous” login.
Note: Most browsers no longer support direct FTP downloads and will fail to display a page. The above URL should be used with a dedicated FTP client such as FileZilla, BitVise or WinSCP in order to properly view the contents.
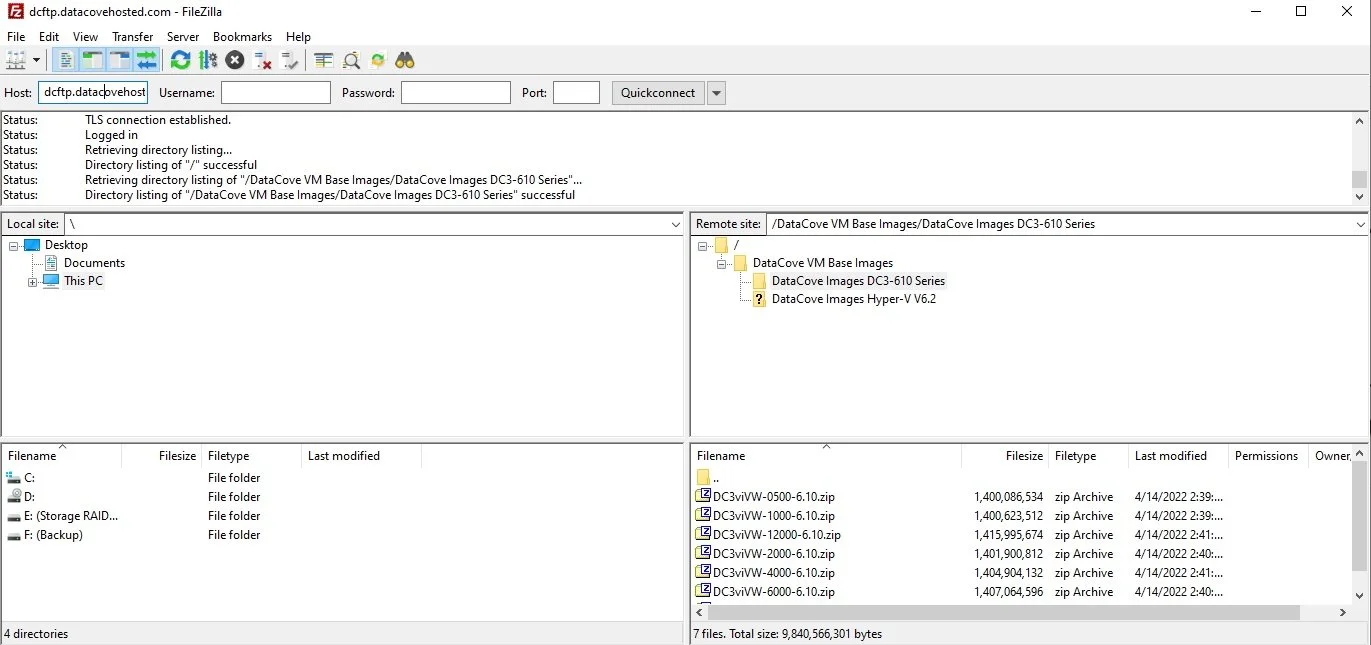
In that folder, you will find .ZIP files of each model of DataCove listed by its prefix. DC3vivw-1000 equates to a the DataCove 1000 model and the DC3vivw-6000 to a DataCove 6000 model, as an example.
Our naming convention determines the model, hypervisor type it is designed for, and OS version for quick review. Once you have located the DataCove model you have purchased, begin downloading. Once the download has completed, decompress the .ZIP file to find the folders containing the actual virtual machine template. The newly decompressed folder will contain two files, an .OVF and a .VMDK. The OVF file is the template file and will define system settings. The .VMDK file is the virtual disk that the template will call for during import.
We are now ready to begin importation of the virtual machine into VMWare!
Importing the Virtual Machine
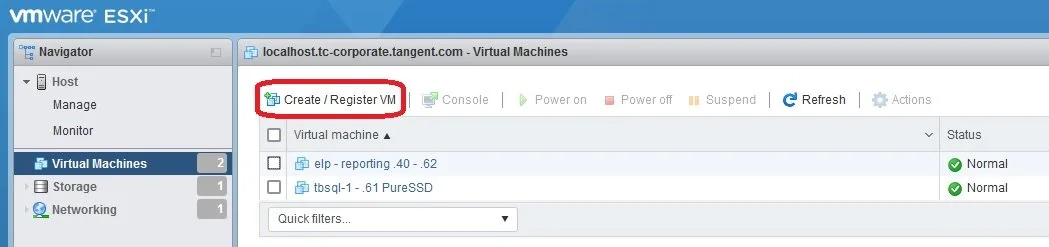
Navigate to your VMWare ESXi or vCenter host via web browser and log in.
Select Create/Register VM.
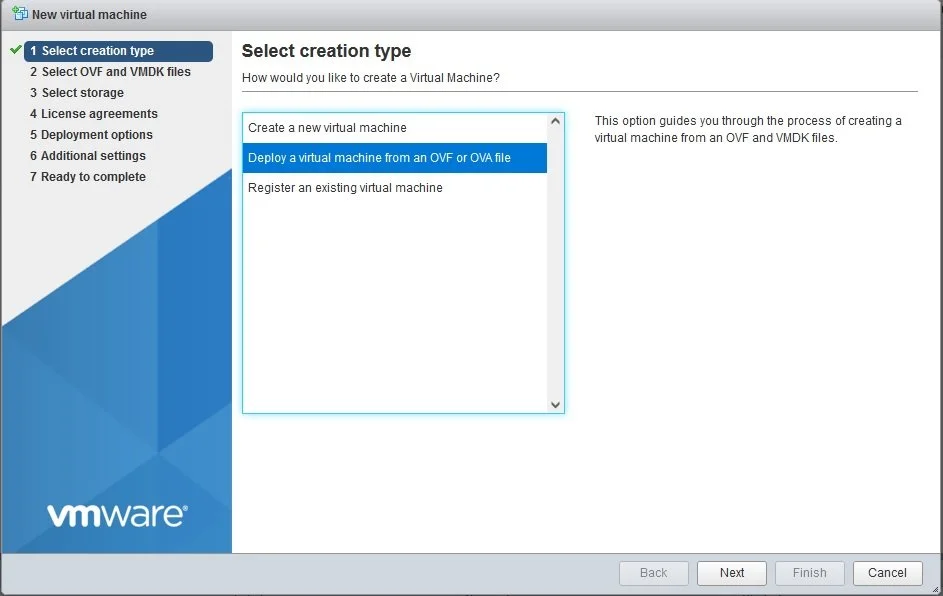
Select the “Deploy a virtual machine from an OVF or OVA file” and click Next.
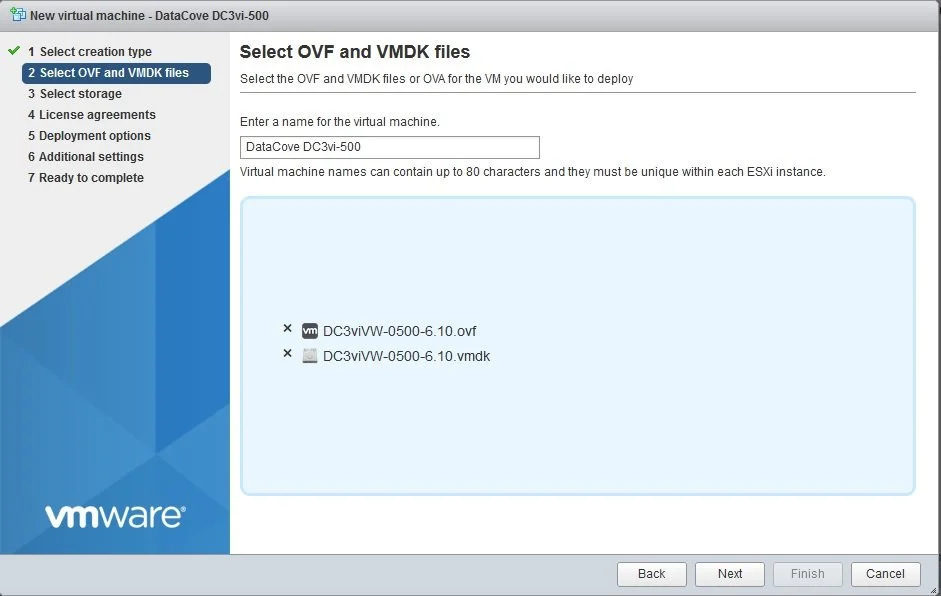
Name the virtual machine something descriptive which will be instantly recognizable by you and your team, and then browse to the recently decompressed .OVF and .VMDK files to select them for import.
Select Next once finished.
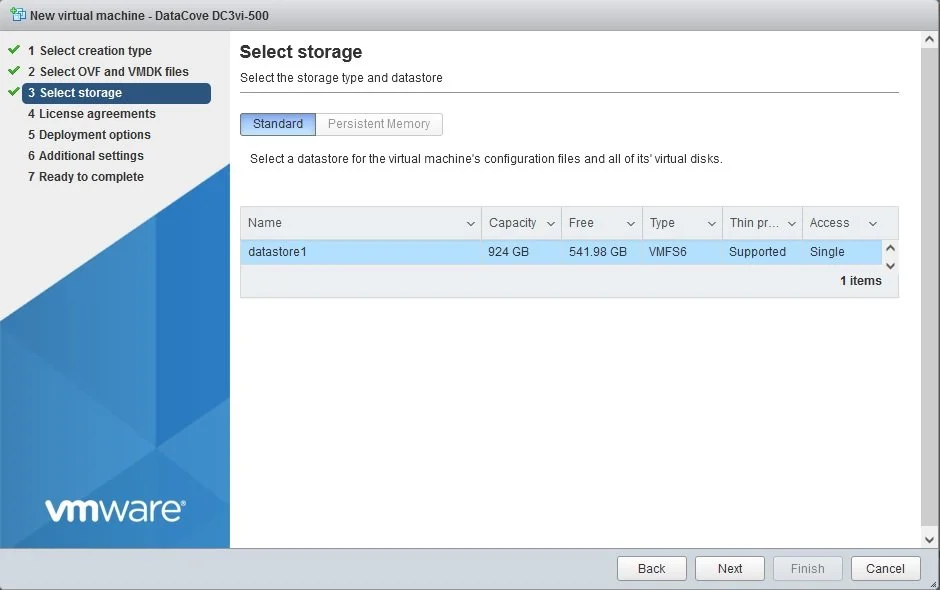
Select the Storage Location for the new DataCove virtual machine. Once defined, click Next.
Note: It is recommended that this be very high speed storage for the best performance.
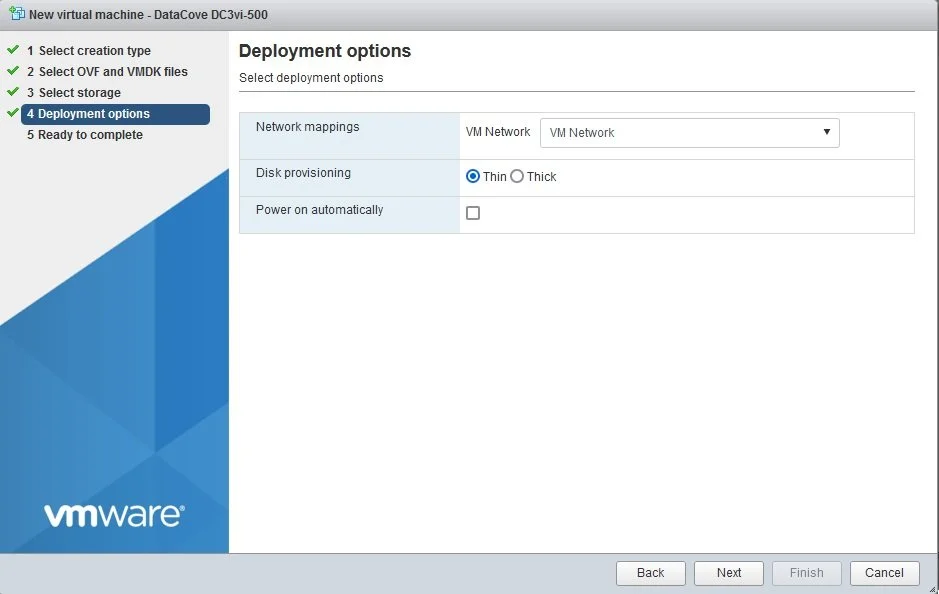
Choose the network to attach the DataCove to, and define whether you’d like to use Thin or Thick Provisioning for the disk.
Be sure to uncheck “Power On Automatically,” as resource adjustments to the virtual machine will be made after import.
Select Next once done.
Note: Thin Provisioning is normally fine for the DataCove since they tend to grow slowly over time. This method only consumes space as the system grows, at the cost of making “commit” commands as it does, which have slower performance due to hypervisor and storage location overhead. If you’d like higher performance, selecting Thick Provisioning will consume all of the space needed by the system at its maximum consumption level now, but will enhance system performance.
Review the parameters defined thus far and make any corrections or changes desired, then select Finish to begin the importation process.
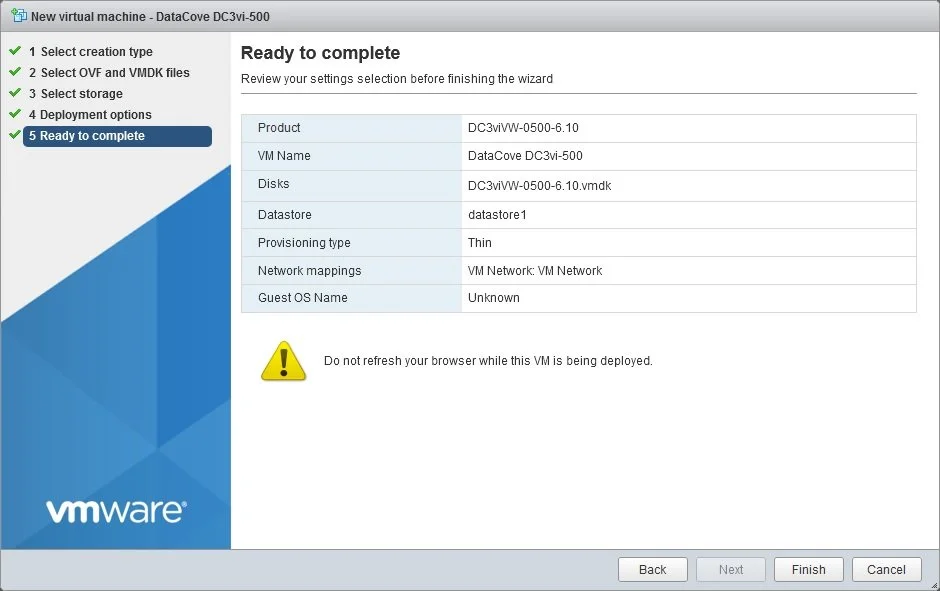
The import process will run at the bottom of the screen and is largely controlled by network and disk speeds from the local workstation and virtualization host.

Once the virtual machine has imported, certain resources like processor counts and memory quantities will need to be adjusted to fit your specific DataCove model.
To do this, select the DataCove VM and then click Actions, followed by Edit Settings.

Be sure to adjust the memory and processor assignments to the virtual machine as per the recommendations above for your model size of DataCove.
It is highly recommended to visit the Advanced Settings of the Network Adapter (reached by clicking on the rightward facing arrow next to it) and bind a unique MAC address to the machine as well, as moving the VM between hosts can cause the MAC address to dynamically reassign itself and prevent the DataCove from authenticating its key later.
This can be made simpler by booting the machine once and testing network connectivity with it’s DHCP or Statically assigned IP address (covered below). If the inbound and outbound communication is solvent, shutting down the virtual machine and then statically assigning whichever MAC address VMWare gave the machine will work just fine.
Note: Some versions of VMWare may not let you choose a MAC address within VMWare’s manufacturer-identity pool of MAC addresses (the first six octets). If so, change a character in one of these octets and then save the setting as a static MAC address.


Once the model-specific resources have been assigned, the system is ready to be powered on for its basic configuration.
Initial System Setup
The initial system setup is fairly simple: we simply need to set up networking for the DataCove so it can reach the mail server (or mail service) and for administrator workstations to be able to reach the system for configuration. If end users will be granted access to the DataCove, it should also be emplaced on a network that they can reach.
Network Configuration of DataCove:
Once the virtual machine has been started, you will see several Linux operating system drivers loading and verifying themselves. Shortly before allowing log into the system, the DataCove will attempt to obtain an IP address via DHCP.
If DHCP is present on the network, it will accept an IP from the DHCP server. If one is not present, the system will wait for approximately one minute before letting the DHCP request time out and continuing to boot without network assignment. Once boot is complete, the following login screen will appear, as shown below:

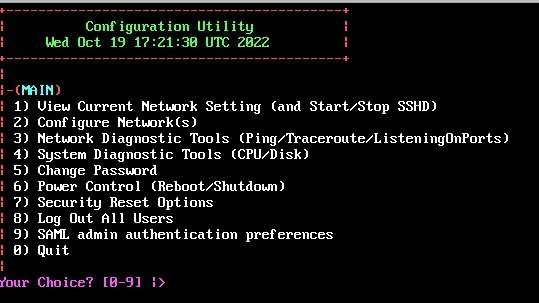
The login for the console system configuration menu is as follows:
Username: cliadmin
Password: ChangeMe
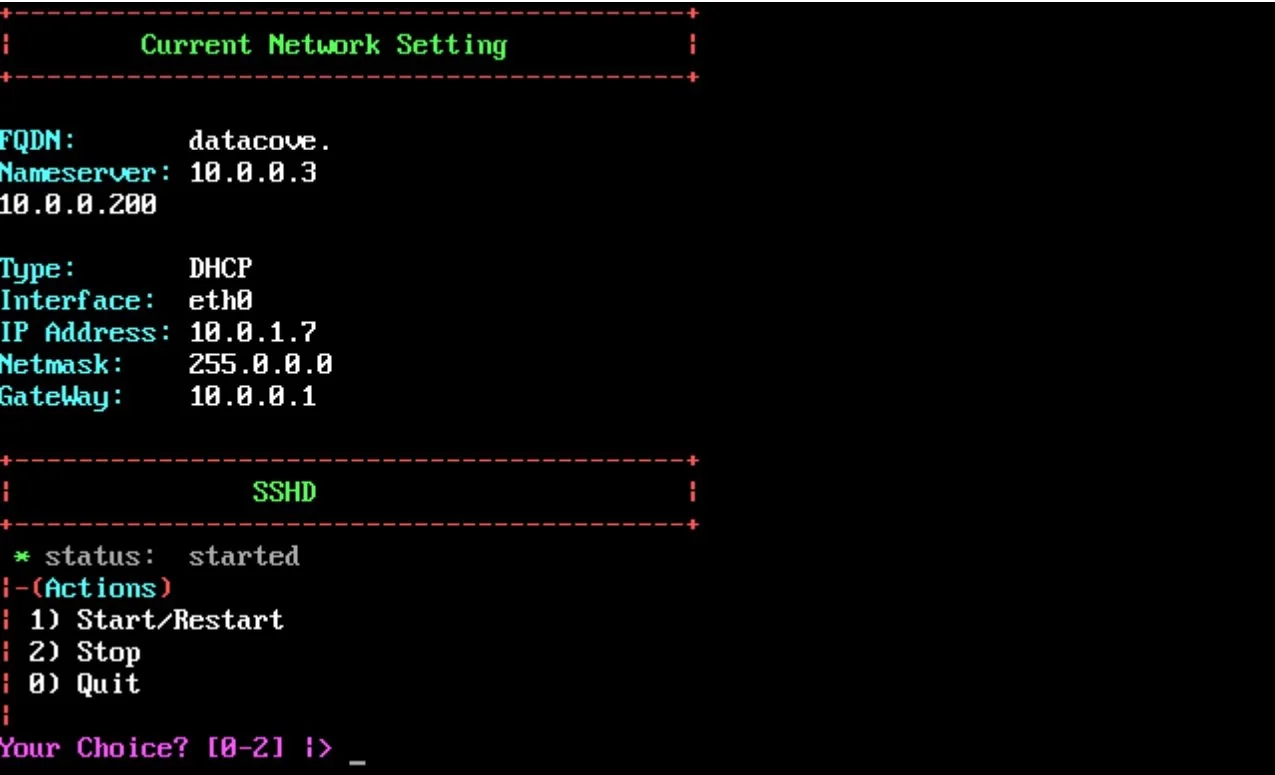
Once authenticated, the system will present its configuration and diagnostic menu, as displayed below. Enter the number 1 and then press Enter to select Option 1, View Current Network Setting.
This will display the network configuration of the DataCove. This includes screen displays of all fields that will need to be populated when assigning a static IP address.
For quick reference, the following addresses are needed (simple Class A network example below):
• IP address of DataCove: 10.0.1.1
• Subnet mask: 255.0.0.0
• Gateway: 10.0.0.1
• Fully Qualified Domain Name: DataCove.domainname.com
• DNS Servers: 10.0.0.3 10.0.0.200 (add a space between DNS server IP's when adding multiple)
It is best to select which IP the system will be bound to prior to beginning the static IP setup, as once the static IP address wizard has started, it only waits for a certain period of time per field before automatically moving on.
Once an IP has been selected and all other network details have been properly configured, you will need to return to the main menu to begin the static IP setup. Enter the number 0 and press Enter to return to the main menu.
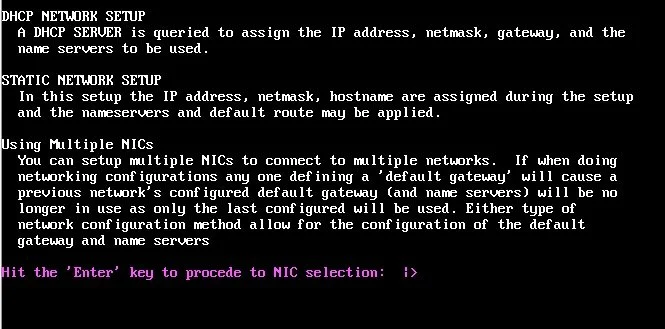
Now, it is time to begin the static IP setup. Enter the number 2 and then press Enter to choose Option 2, Configure Networks.
A small definition screen will appear detailing the differences between the DHCP and Static IP setup options, as well as using multiple NICs on the system.
Select Enter after you have finished reading to proceed.
Note: While multiple NICs can be configured on a DataCove, it is not recommended to use them unless very specific use case requirements are needed for multi-homing, dedicated storage networking for backups or other niche situations. Please consult with DataCove Support before attempting to configure this.
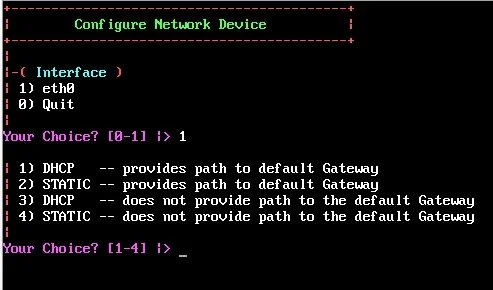
After moving on to NIC selection, select ETH0 as the connection to configure.
Note: If additional ethernet adapters are detected, they will appear here also, but for the purposes of this initial system setup, only choose ETH0.

After selecting ETH0, the wizard will then ask how the connection should be configured.
There are four choices here:
DHCP with Path to Gateway will engage a DHCP seek and lease an IP address from the DHCP server, as well as use that for outbound networking to the internet.
Static with Path to Gateway will start the static IP address configuration wizard and will ask for a gateway to be specified for use with outbound networking to the internet.
DHCP without Path to Gateway will engage a DHCP seek and lease an IP address from the DHCP server, but will not use any gateway server specified to it, remaining an “internal” connection within the subnet only.
Static without Path to Gateway will start the static IP address configuration wizard and will ask for all network parameters sans a gateway, remanding the connection to being “internal” within the subnet only.
Unless using a DHCP reservation to make a permanent home for the DataCove, it’s highly recommended to choose Option #2 to bind a static IP address to the system. Select 2 and then hit Enter.
The system will now be at the point where a static IP address and other information can be bound.
Populate each field with the relevant information as it appears, selecting Enter after each field is finished.
IP address will be the permanent network location that the DataCove will reside at and be accessible from.
Subnet mask determines which network segment the system will be on. This should include other servers like the mail server (if applicable) and be accessible to system administrator workstations.
Default gateway operates as the route to the internet that DataCove uses for subscription validation, software updates and to reach external mail services.
Nameservers (or DNS) handle URL and FQDN resolution for the DataCove to translate various network resources into IP addresses.
Fully Qualified Domain Name should be populated with the name of the system that you expect to use as a DNS A Record for users to interact with the system with, specifically for the purposes of HTTPS/SSL connectivity.
Note: For the Nameserver(s) field, use a space to separate multiple DNS entries.
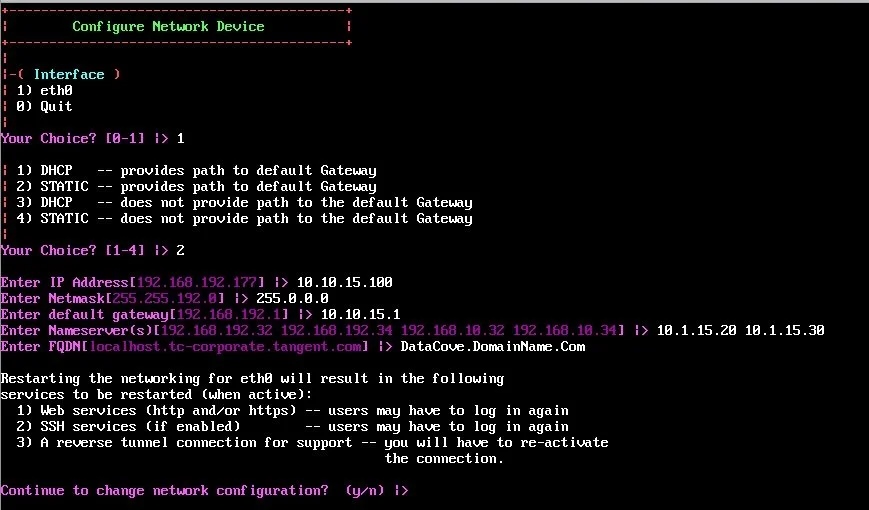
After entering in all of the IP address information, the system will ask to reload network services for the changes to take effect. Select Y and hit Enter for this to occur.
The system will reload the services and then switch back to the Network Configuration screen. Select 0 to get back to the main menu.
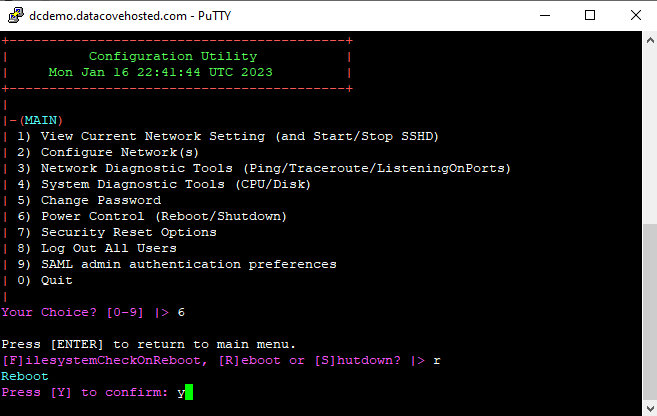
It is highly recommended to reboot the DataCove once the network changes are complete to fully build out an entirely new routing table that removes all traces of the old networking. This can be performed once back at the main menu by selecting Option 6, then Option R to reboot and then Y and Enter to confirm.
This concludes the basic setup of the DataCove virtual machine.
All other steps regarding setup and configuration will largely be handled within the DataCove web interface and should be performed only with a DataCove technician on hand to tailor the system to your specific organization’s needs.
Please contact Tangent using the options provided on our Contact Us page to book an appointment for configuration and final deployment.