Configuring DataCove for SMTP Direct mail delivery
Table of Contents
What is SMTP Direct Journaling?
DataCove SMTP endpoint server configuration
Firewall adjustments for Network Address Translation (NAT) to DataCove
Domain acquisition and preparation
Journaling rule configuration - Office 365
Journaling rule configuration - Google G-Suite
Troubleshooting SMTP Delivery
Outbound Spam Filtering - Why am I not receiving my outbound emails in Datacove?
Inbound Spam Filtering - Why am I receiving too many inbound emails in DataCove?
Journaled emails not arriving - Using Message Trace to verify journaled email delivery
What is SMTP Direct Journaling and how does it work?
SMTP Direct is a fetching methodology that allows DataCove to receive journaled emails over the SMTP protocol, rather than the usual POP3 and IMAP4 methods it uses for standard mail retrieval.
POP3 and IMAP4 fetchers reach out from the DataCove and log into a specified journaling mailbox on the mail server, pull a copy of the messages contained therein onto DataCove and then delete the original journaled message from the journaling mailbox afterwards. This method works fine for most organizations with an internal mail server, but some high volume organizations that receive journaled messages of over 100,000 per day or organizations using Office 365 or G-Suite will often find faster results by leveraging the SMTP protocol, wherein the messages will flow directly into the DataCove over SMTP without the overheads involved from the POP3 or IMAP4 protocols.
These methods of journaled message capture do also avoid the need of hosting a journaling mailbox, which some mail systems, like Office 365, do not allow.
SMTP Direct works by leveraging three major precepts of network communication: MX records, A records and Network Address Translation.
Many mail and network administrators are familiar with the basics of how emails flows from your organization’s mail server flow outside to another organization’s mail server, but it’s not a common item that gets configured or changed, so that ‘corporate memory’ tends to get easily lost to time.
For a quick and simplified example, when Hawkeye@4077MASH.mil sends an email to RadarOReilly@Stateside.com, the mail server at 4077MASH.mil performs a type of DNS record check called a Mail Exchange (MX) record lookup on the Stateside.com domain. The MX record lookup results in the return of a fully qualified domain name (FQDN) known as an A record (another type of DNS record) of Emails.Stateside.com, which is the mail server of Stateside.com.
Now that 4077MASH.mil has an fully qualified domain name, it conducts another DNS lookup on that FQDN whose A record then translates over to the IP address of the mail server, which points to 127.0.150.30. This IP address is a public IP address, reachable from anywhere on the internet and usually will only have a few ports exposed that mail servers need to communicate, like port TCP 25 for the SMTP protocol. All other unused ports are generally blocked off from external access since those would be an unnecessary access or security threat.
With this IP address now in hand, the 4077MASH.mil mail server sends the message over the SMTP protocol to 127.0.150.30. The Emails.Stateside.com server at 127.0.150.30 then receives the message and delivers it to RadarOReilly@Stateside.com, and the email transaction is complete.
With that refresher course on how mail transit works, many of you will already have cottoned on to how SMTP Direct works for DataCove:
The DataCove receives a Network Address Translation (NAT) to a public IP address for port TCP 25. This is configured at the firewall/router level of the organization.
This NAT allows the DataCove to receive SMTP traffic from the internet.
DataCove possesses its own Access Control List for SMTP traffic, so this can be locked down to only allow the desired senders, like Office 365.
A new domain or a subdomain is registered by the organization (or provided by Tangent).
This new domain/subdomain has an A record configured on it to point to the public IP of the DataCove established during the NAT creation.
Once the A record is created, an MX record can be created that points to the A record.
With the MX/A/NAT flow created, all that remains is configuration of a journaling rule on the mail server/service that sends messages to a non-existent email address at the new domain/subdomain. Since DataCove itself doesn’t use an email address for receiving emails, any name can be assigned to the journal account username portion. The only part that matters is the domain portion of the email address used.
For one last example of the workflow, once all of the above items are configured:
A journaling rule is configured on the 4077MASH.mil server/tenant.
This journaling rule sends all messages to Journal@domain.com.
4077MASH.mil mail looks up where to send messages at Domain.com.
Domain.com responds with an MX record of Emails.domain.com.
4077MASH.mil looks up the FQDN of Emails.domain.com for A record resolution.
Emails.domain.com responds with the public IP address assigned to the DataCove during the NAT creation process.
4077MASH.mil then sends the message to the DataCove, which resides at that public IP address.
DataCove receives the message and archives it away dutifully.
A simplified visualization of this flow is below.

The process looks like it has quite a few steps when broken out like this, but really, it’s no different than any other mail-server-to-mail-server transaction. The below guide will cover the specific details of how to configure the relevant components of this methodology.
DataCove SMTP endpoint server configuration
The first step with configuring DataCove to receive SMTP traffic begins in the web interface. We’ll be configuring DataCove’s endpoint SMTP server to receive emails from a list of authorized hosts.
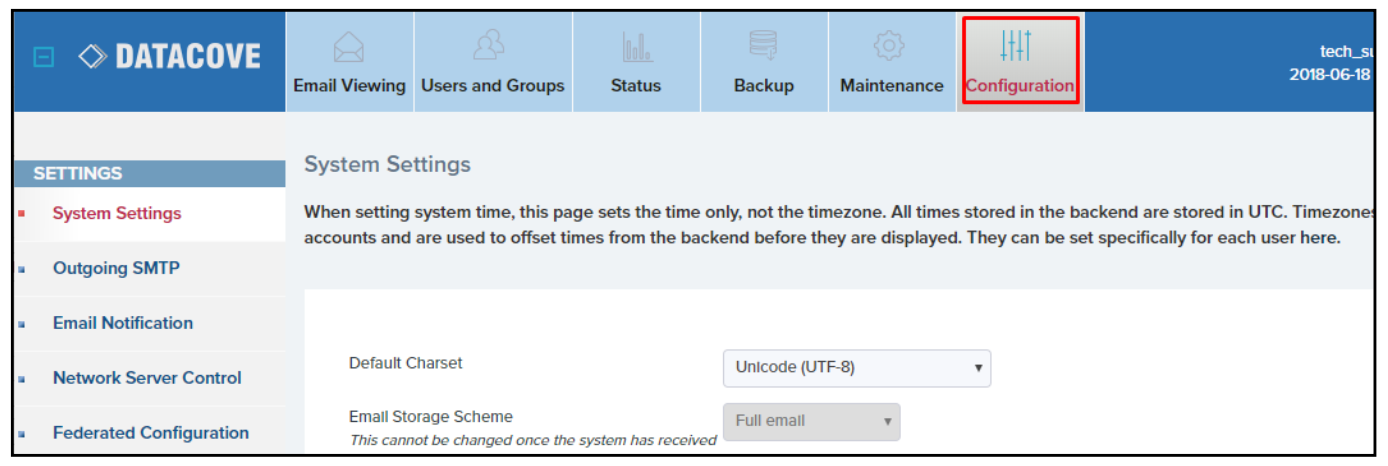
Log into the DataCove web interface by navigating to its internal hostname or IP address.

Click on Configuration in the Top Header Bar.
Then select SMTP Server on the Left Hand context menu to access the SMTP Server Configuration page.

Before activating the SMTP server, we will want to populate the Authorized Hosts List at the bottom of the page with the IP addresses or ranges the SMTP traffic will be coming from. This prevents any random sender, namely spammers, from simply blasting the DataCove with spam and adding undesired emails into the archive.
SMTP traffic from any host not on this list will be rejected by the DataCove’s SMTP server and the message will be lost. Always check on your local mail server or vendors’ IP address tables for their latest IP ranges and add them in. It is better to accidentally have too many IPs whitelisted than too few.
Outbound spam filtering or encryption software, while not in common use as of the writing of this article, are becoming more common every day. Be sure to look up your vendors’ IP address tables for which IP addresses they send emails outbound from and add them onto this whitelist. Not doing so can prevent the DataCove from receiving outbound emails, causing a very unpleasant compliance gap.
Office 365 IP addresses can be found at the following link (or a downloadable copy found here from early 2023). The IPs that reference ports 25, 465 and 587 are the desired ones: https://learn.microsoft.com/en-us/microsoft-365/enterprise/urls-and-ip-address-ranges?view=o365-worldwide
Google G-Suite IP addresses can be found here (or a downloadable copy found here from early 2022) : https://support.google.com/a/answer/60764?hl=en
Tangent maintains fairly up to date versions of both Google and Microsoft IP ranges on pre-generated text files; please inquire with support for a ready made copy of the text file you can upload without having to make a text file yourself.
Note: If DataCove’s IP Access Control list is configured in whitelist mode, which allows traffic from only certain IP addresses, it will be critical to add the SMTP Authorized host IPs to that whitelist as well. DataCove’s IP ACL takes precedence over the SMTP server’s ACL, so if the senders to the DataCove are not authorized there, they will also be blocked from the SMTP server.
When adding a single address, say for a single mail server, type the IP address or range in the white text box and then click the Add Server button.

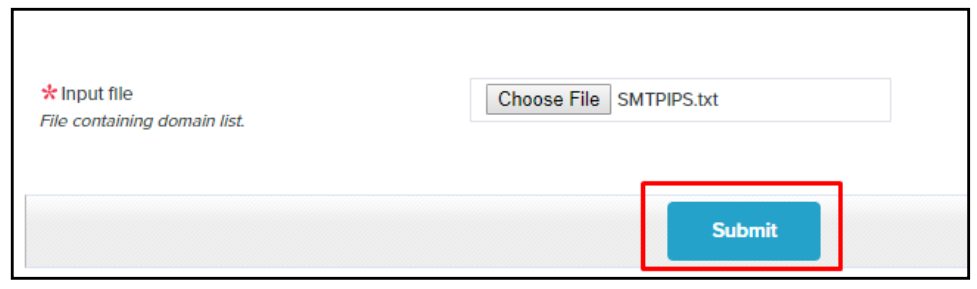
When uploading multiple IP addresses or multiple ranges of IP addresses, it’s best to add these IPs onto a simple text file and upload them with the Add Server List button.
When creating a text file for upload, the text (.txt) file should have a list of IP addresses, ranges or hostnames spaced with one entry per line and no additional text or characters included.


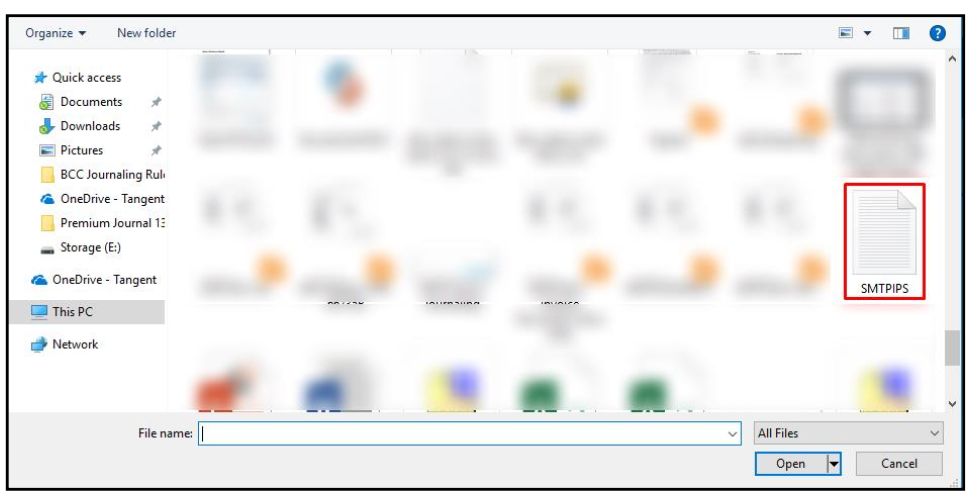
Click on the Choose File button on the following page to browse to the file containing your list of IP addresses to authorize.
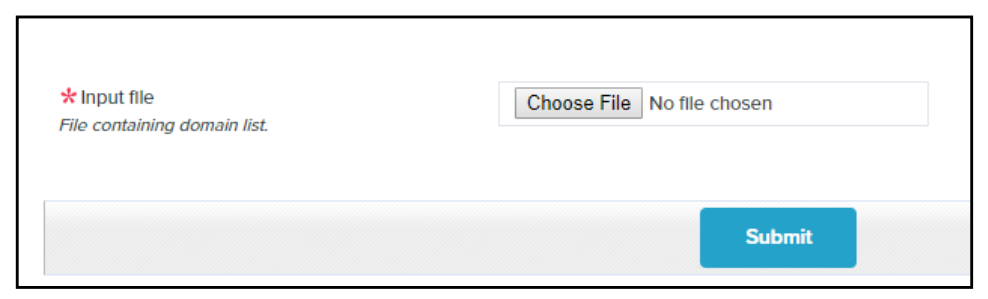
Select the text file containing the IP addresses and click Open.
Verify that the proper file was selected, then click Submit.
A message will appear at the top of the screen in green text indicating that the IP addresses to authorize were added successfully. The page will also refresh and show the list of IPs down in the “authorized SMTP host” field.
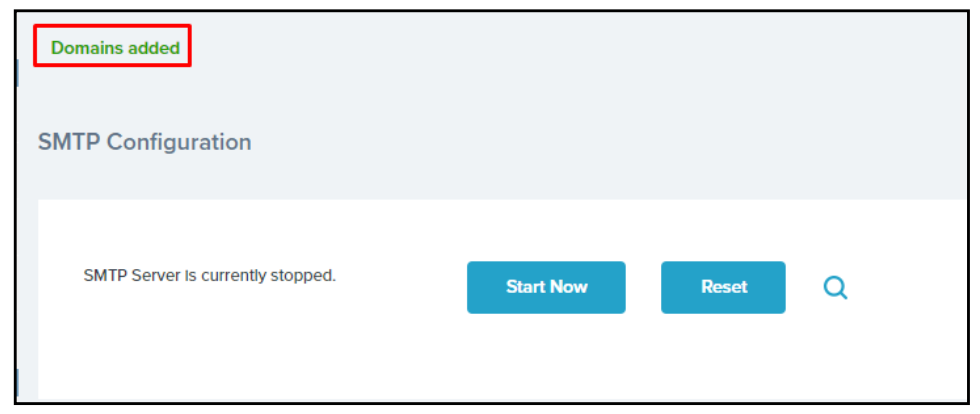
You can now start the SMTP server by clicking the Start Now button.
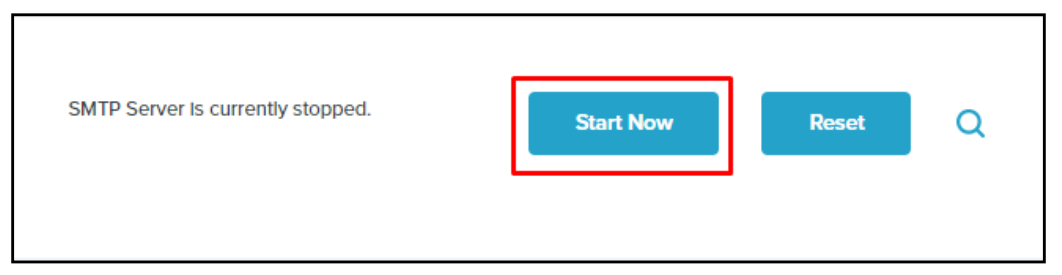
If the pictured Start Now button shows Stop Now, the SMTP server does not need started as it is already started.
This completes the configuration of DataCove’s SMTP server.
Firewall adjustments for Network Address Translation (NAT) to DataCove
This portion of the guide will lay out the requirements of DataCove for SMTP receipt in generic terms. The sheer variety of firewalls out there today and how to configure Network Address Translations on them are beyond the scope of this article. They will require a decent understanding of networking and the organization’s specific firewall; the task is best left to a Network Administrator if one is available.
To create the Network Address Translation (NAT):
An unused public IP address under the organization’s ownership should be chosen to map to the DataCove’s internal IP address, so that any traffic that routes to this public address is transferred inside the firewall and sent to the DataCove’s internal IP address.
This traffic will then need an Access Control List applied to it to only allow SMTP traffic in over TCP 25; all other ports should be blocked. Authorization of TCP 465 and TCP 587 is useful when dealing with certain encrypted communications, but is not usually required.
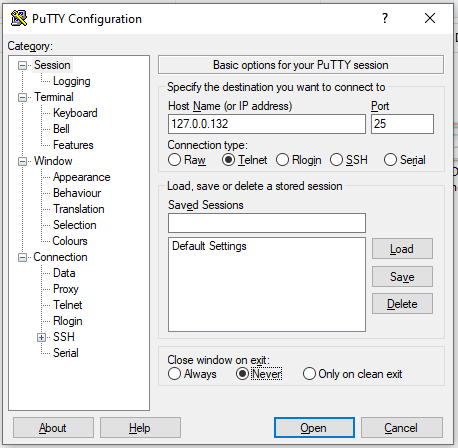
Once configured, this should be tested by using a Telnet session over port 25 to the DataCove’s now public facing IP address from an authorized host (both at the firewall level, and at DataCove’s SMTP server). It’s best to do this from outside the network when possible for best verification (such as a remotely hosted system like a Azure/AWS/GCP hosted virtual machine, or other system not otherwise inside the organization’s network).
Using a remote connection tool like Putty for Telnet purposes is recommended, and an example screenshot of how to configure that connection is below.
Note: In order to test the connection properly, the addition of the gateway being used to reach the DataCove will need to be added to the DataCove’s SMTP ACL, described above. If this is not done, you may receive a refusal or timeout instead of receiving the proper success feedback. This is especially important for remotely hosted systems being used for communication verification.
If the connection is successful, the Telnet session should respond back with a 220 SMTP server ready-reply, a specific DataCove name reference and then an unique alphanumeric key for that system. Pictured below is a sample successful response showing a 221 SMTP server response due to idle connection.
If the connection is fails in any way, shows a series of asterisks or does not show this information, rechecking the firewall configuration and DataCove’s SMTP server status and ACL will be the first steps in troubleshooting.
Note: It is possible to test whether a refused or non-response to a Telnet test from the outside is due to the DataCove’s SMTP configuration or if it’s due to the firewall settings. Verifying the DataCove’s SMTP status can be performed by using the same Telnet connection from an internal computer on the same network as the DataCove to the DataCove’s internal IP address. Testing this way is solely to ensure that the DataCove’s SMTP configuration is correct without bringing the firewall into the equation yet. Make sure to add the workstation that is connecting to the DataCove’s IP address to the SMTP ACL beforehand.

Domain acquisition and preparation
A separate, preferably new, domain is recommended for the safest possible configuration. These domains are to be used specifically for their MX and A record resource to redirect the mail back towards the DataCove.
Note: Tangent, at no cost, can provide a subdomain and MX/A records for use as long as an active DataCove subscription is present. These greatly simplify the DNS record process for most organizations and remove any costs with acquiring a separate domain for this purpose. Some organizations, especially high security ones, do prefer maintaining their own mail flows, and if so, the below instructions still apply.
Under no circumstances should the organization’s existing primary domain be used with low priority MX records for this purpose, as there is the possibility for irrevocable data loss in the event of email provider downtime. While exceedingly rare, Office 365 and G-Suite have experienced this in the past.
Subdomains of the primary domain can be used, but they are not preferred due to risk of confusion or accidents in the future that may wind up sending the mail flow somewhere unintended.
While extant unused domains that are still owned could be used, if there is any likelihood of messages being sent there, especially spam, those messages would be archived by the DataCove wholesale and may risk causing excess capacity utilization or additional and unnecessary line items showing up under e-discovery searches.
To that end, Tangent’s recommendation is to purchase a new domain of an unlikely to be used name and top-level domain name, such as “asdhgkasjdl.xyz” and other variations thereof. Taking advantage of any multiple year discounts on these is always advisable, and registrars offer other uncommon top level domain names at a greatly discounted amount when purchased together.
Any domain registrar is fine for this purpose. Tangent’s nominal recommendation is GoDaddy, for ease of use and low cost.
No SSL certificates or domain accessories need to be purchased for this deployment.
These domains, once acquired, should not be used for any other purpose to avoid drawing undue attention to them that may result in spam being sent their way.
With the domains now in hand, configuration of the MX records and A records on the domain is fairly straightforward. Locate the DNS settings section in your domain registrar’s control panel and add the following two records.
Start by creating an A record that points toward the public IP address of the DataCove created in the previous NAT step.
Time-To-Live (TTL) setting for this record should be set as low as possible.
The record should look similar to the below, but with the Name and Data fields reflecting your specific DataCove and public IP address.

Then create an MX record for the domain that points at the fully qualified domain name of the previously created A record.
Time-To-Live (TTL) setting for this record should be set as low as possible.
The record should look similar to the below, with the Name field remaining “@” but with the Data field reflecting your specific DataCove’s fully qualified domain name (FQDN).

Once the DNS records are populated, the setup of the domain is complete and ready for relaying after their records propagate throughout the world’s DNS servers. This process usually takes a few minutes, but may take up to twenty four hours in extreme cases.
Verification of DNS propagation can be handled via websites like MXToolbox.com and DNSChecker.org. An example of using DNSChecker.org is provided below.
By typing in the fully qualified domain name (FQDN) of your DataCove with the “A” record lookup type chosen, DNSChecker will resolve the FQDN to the public IP address defined:
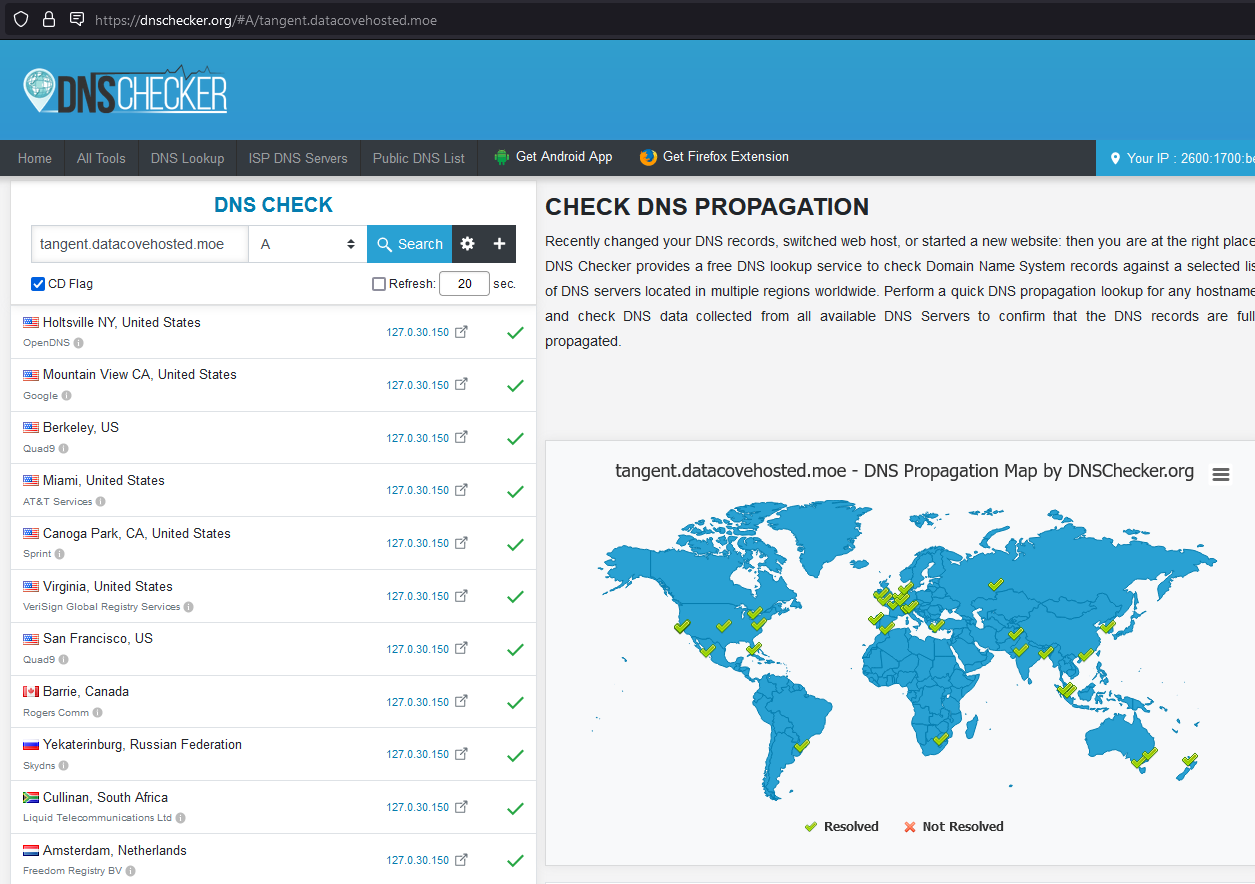
Now, check the MX record of the domain that points to the FQDN by typing in just the domain name and top level domain, and switching the record lookup type to MX:

If the MX record for the domain points at the FQDN defined in the A record and the A record points at the public IP address of the DataCove, the mail flow should be solvent for the next steps.
Journaling Rule Configuration - Office 365
Office 365’s journaling configuration is quite straightforward and only takes a few minutes to implement.
Start by opening a web browser and navigating to Admin.Microsoft.Com.
Log in with administrative credentials to the organization’s Office 365 tenant, then once at the portal homepage, select the Show All button from the left hand side navigation menu.

This will present a full listing of Administration Centers for various components of Office 365’s functionality.
Locate and select the Compliance Center.
Note: If you don’t see Compliance listed, scrolling down the list of Admin Centers or selecting All Admin Centers may be necessary to find it.

Selecting the Compliance Center will launch a new tab to Microsoft Purview.
On the left hand side navigation menu, beneath the Solutions header, expand the Data Lifecycle Management section, and select Exchange (legacy).

Once on the Exchange page, select Journal Rules in the upper middle of the screen.
This will allow you to view any existing journaling rules (if any) and create new ones.
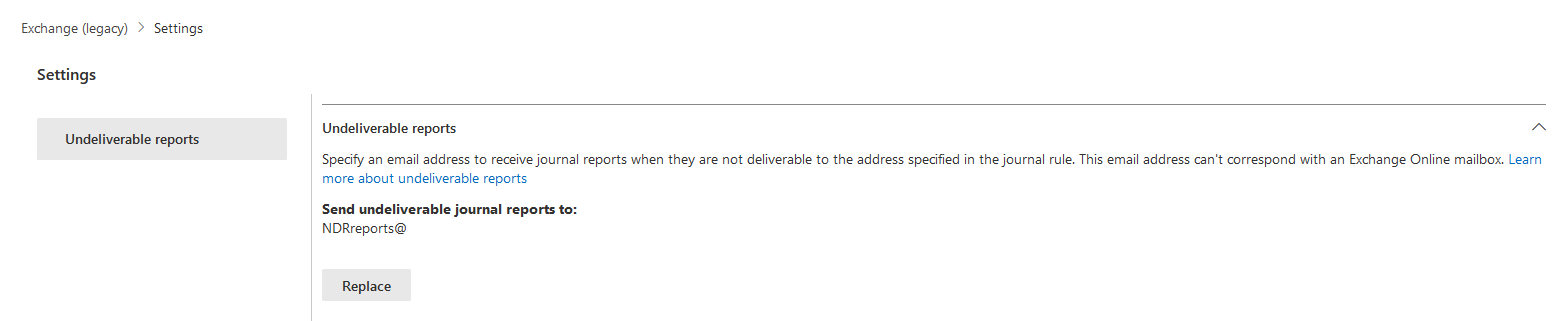
Office 365 tenants require a Non-Deliverable Report (NDR) mailbox to be specified before a journaling rule can be configured. NDR Mailboxes are used as a final destination in the event of a 24 hour or longer unavailability of the DataCove (whether it’s from system downtime, network issues, ISP uplink failure, local or regional disasters, etc) and are meant to be a last ditch notification of the attempt to deliver, along with a copy of the journaled message attached to the NDR as an attachment. This 24 hour period is Office 365’s message retry interval before expunging the journal message and it being lost forever.
Note: This NDR Mailbox was formerly capable of being hosted in Office 365, even though the journaling account itself could not be, but changes from October 2022 have rendered that no longer possible, severely limiting the options of getting even the quasi-redundancy of an NDR Mailbox anymore independently. To compensate for Microsoft’s changes in this arena, Tangent has launched a no-cost supporting service for DataCove clients that provides a mail delivery route where NDR messages can safely go in the event of extended downtime events. Due to the bespoke nature of this service, please contact Tangent Support for address details for your organization.
Configuring an Non-Deliverable Report mailbox can also be done from the Journal Rules page by clicking on the cog icon in the upper right hand corner to reach Settings.

Specify a mailbox under the NDR Mailbox page, then click Submit.
As an example, if the journaling mailbox is DataCove@domainname.com, the NDR mailbox could be simply named as DataCoveNDR@domainname.com.
Attempting to configure the journaling mailbox to an invalid address will yield the below error.

This concludes the NDR Mailbox setup.
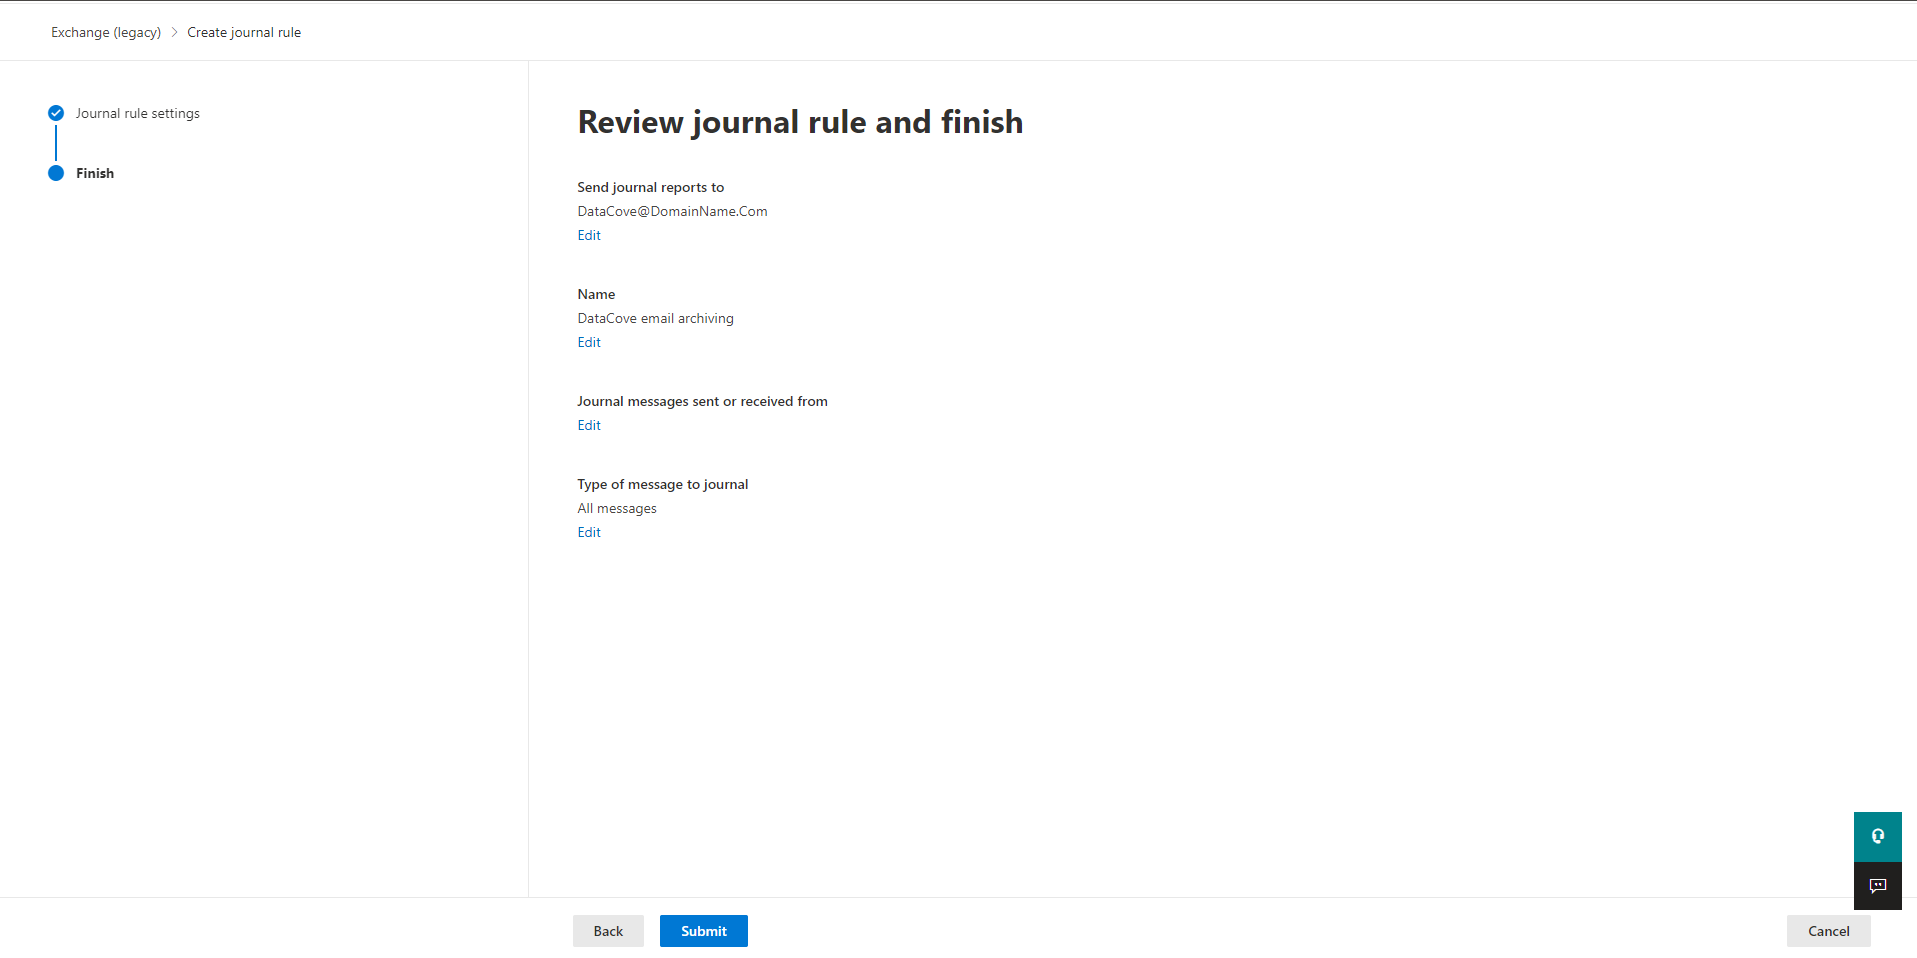
Once back at the main Journal Rules page, select the New Rule button.
The “Define journal rules settings” page will now spawn, allowing the specification of the journal rule, its destination, friendly name and scope.
The address to “Send the journal reports to” can be any ‘username’ at the domain either created or provided by Tangent from the previous section.
Common examples include Archive, Journal or DataCove, but the name can be anything at all.
The domain name portion of the email address is critical and must match the domain exactly, or messages will not route correctly.
The “Journal rule name” can be something memorable so that any future review of this section will be instantly recognizable as to its purpose. The recommended suggestion is “DataCove email archiving.”
“Journal Messages sent or received from” determines the scope of the rule: this should be set to “Everyone,” as any gaps in the message capture would lead to a compliance fault situation and can be harmful for eventual eDiscovery purposes.
“Type of message to journal” should likewise be set to “All Messages,” as either of the other options will limit what data is gathered and likewise cause a compliance fault.

Once the rules are populated, select Next at the bottom of the screen.
On the “Review journal rule and finish” screen, verify that the parameters entered are correct, with especial attention to the spelling of the username and domain being defined as the “journal mailbox.”
Once confirmed as good, click on Submit at the bottom of the screen.
Journal rule submission will take a moment to enter into the organization’s mail flow and, if successful, will report a success screen.
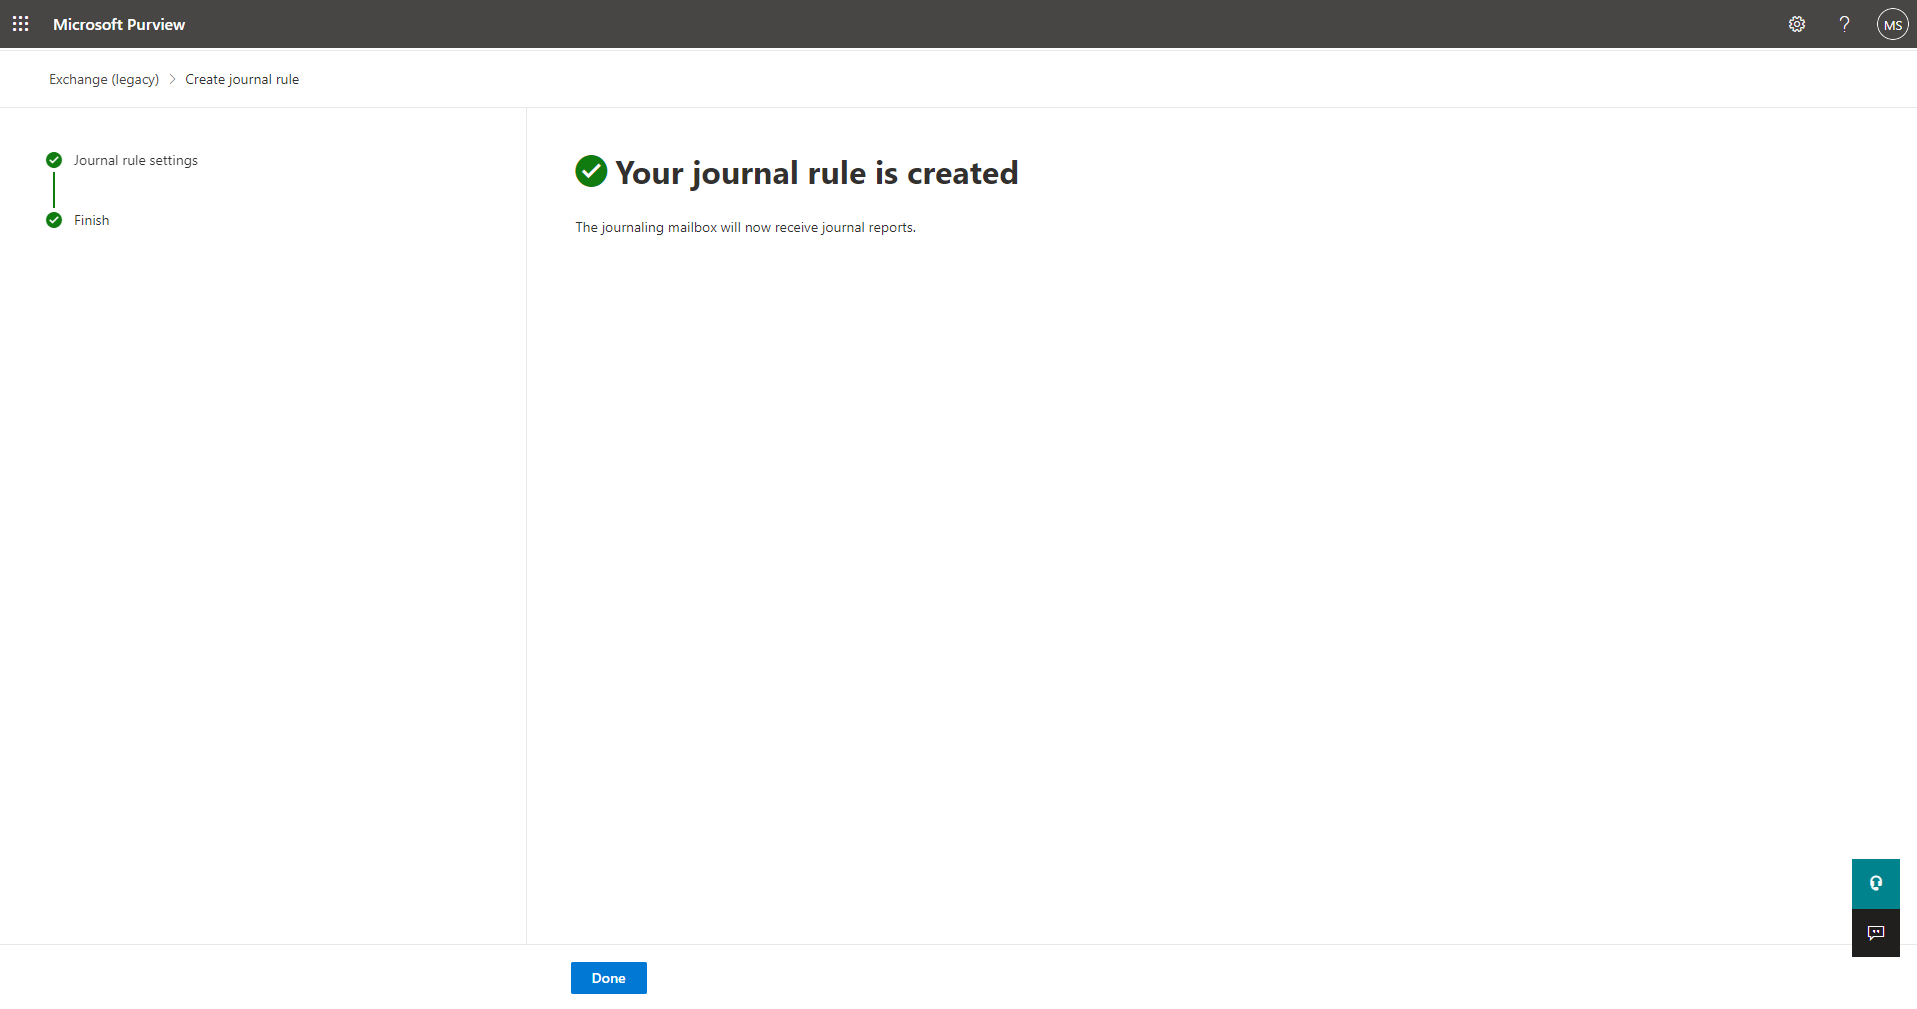
The newly created journaling rule should now show up in the Journal Rules section with a status of “On.”
This concludes the Office 365 setup of journaling.
Within 5-15 minutes, messages should start arriving into the DataCove.
A simple way of verifying this flow would be to send an outbound test message to a coworker, and have them reply back.
It’s also prudent to test mail flow of messages outside of the organization by sending a test email to an owned Gmail, Hotmail or Yahoo mail account, and having that account respond back.
Copies of each of these messages should then arrive in DataCove to validate proper mail flow and message capture.
In the event that messages do not arrive within this time frame, a review of the previous steps would be necessary to troubleshoot. In almost every case, either a forgotten Outbound Spam/Malware filter, improperly configured NAT or IP address ACL on the DataCove will be the cause, and those items should be checked first.
If issues persist, please contact Tangent for additional troubleshooting aid.
Journaling Rule Configuration - Google G-Suite
Journaling in a Google G-Suite environment comes in two different flavors: ‘Licensed Journaling’ via their Third Party Archiving capability, featured in Enterprise and Education Plus editions, and ‘Routing Rules Journaling’ for organizations not on those editions. Officially, Google’s journaling capability is only for those with Enterprise or Education Plus editions, but with some clever routing rule additions, the same effective functionality can be provided to those without it. Both methodologies will be covered below.
Note: When using Google’s Licensed Journaling functionality, all users to be journaled must have an Enterprise or Education Plus license; any lesser licenses assigned to individual users will cause their messages not to be journaled. If there are a mix of user licenses, upgrade the users missing the appropriate licensing to a supported type or, if not possible, use the Routing Rules Journaling method instead.
Google’s official documentation for third party archiver integration is available at this link: https://support.google.com/a/answer/7276605?hl=en
For either Journaling method chosen, it is possible to only enable Journaling for selective Organizational Units (OUs) within the Google Directory structure, so only some users can be Journaled instead of all users within a tenant. Some organizations, such as school districts, would like to use this to only archive their staff and faculty personnel and not archive any students that may be members of their tenant.
Such selective rules can be found by selecting different Organizational Units underneath the root directory and enabling the Journaling rules described below there instead of at the root of the forest.
Note: Journaling rules applied at the root of the forest will automatically inherit down.

Before digging in on a journaling method, review which G-Suite edition your organization is on:
Edition verification can be performed by logging in to Admin.Google.Com and selecting Billing on the left hand side menu.
Subscriptions, the default page under the Billing section, will show which version of G-Suite is in use.
If the edition listed is Enterprise Standard, Enterprise Plus or Education Plus, use the ‘Licensed Journaling’ section below to configure journaling for your organization.
If the edition listed is anything else, such as Education Fundamentals, Education Standard, Enterprise Essentials, Business Starter, Business Standard, Business Plus, Essentials Starter or Essentials, use the ‘Routing Rules Journaling’ method.

Licensed Journaling
Configuring Google’s Third Party Email Archiving is extremely straightforward.
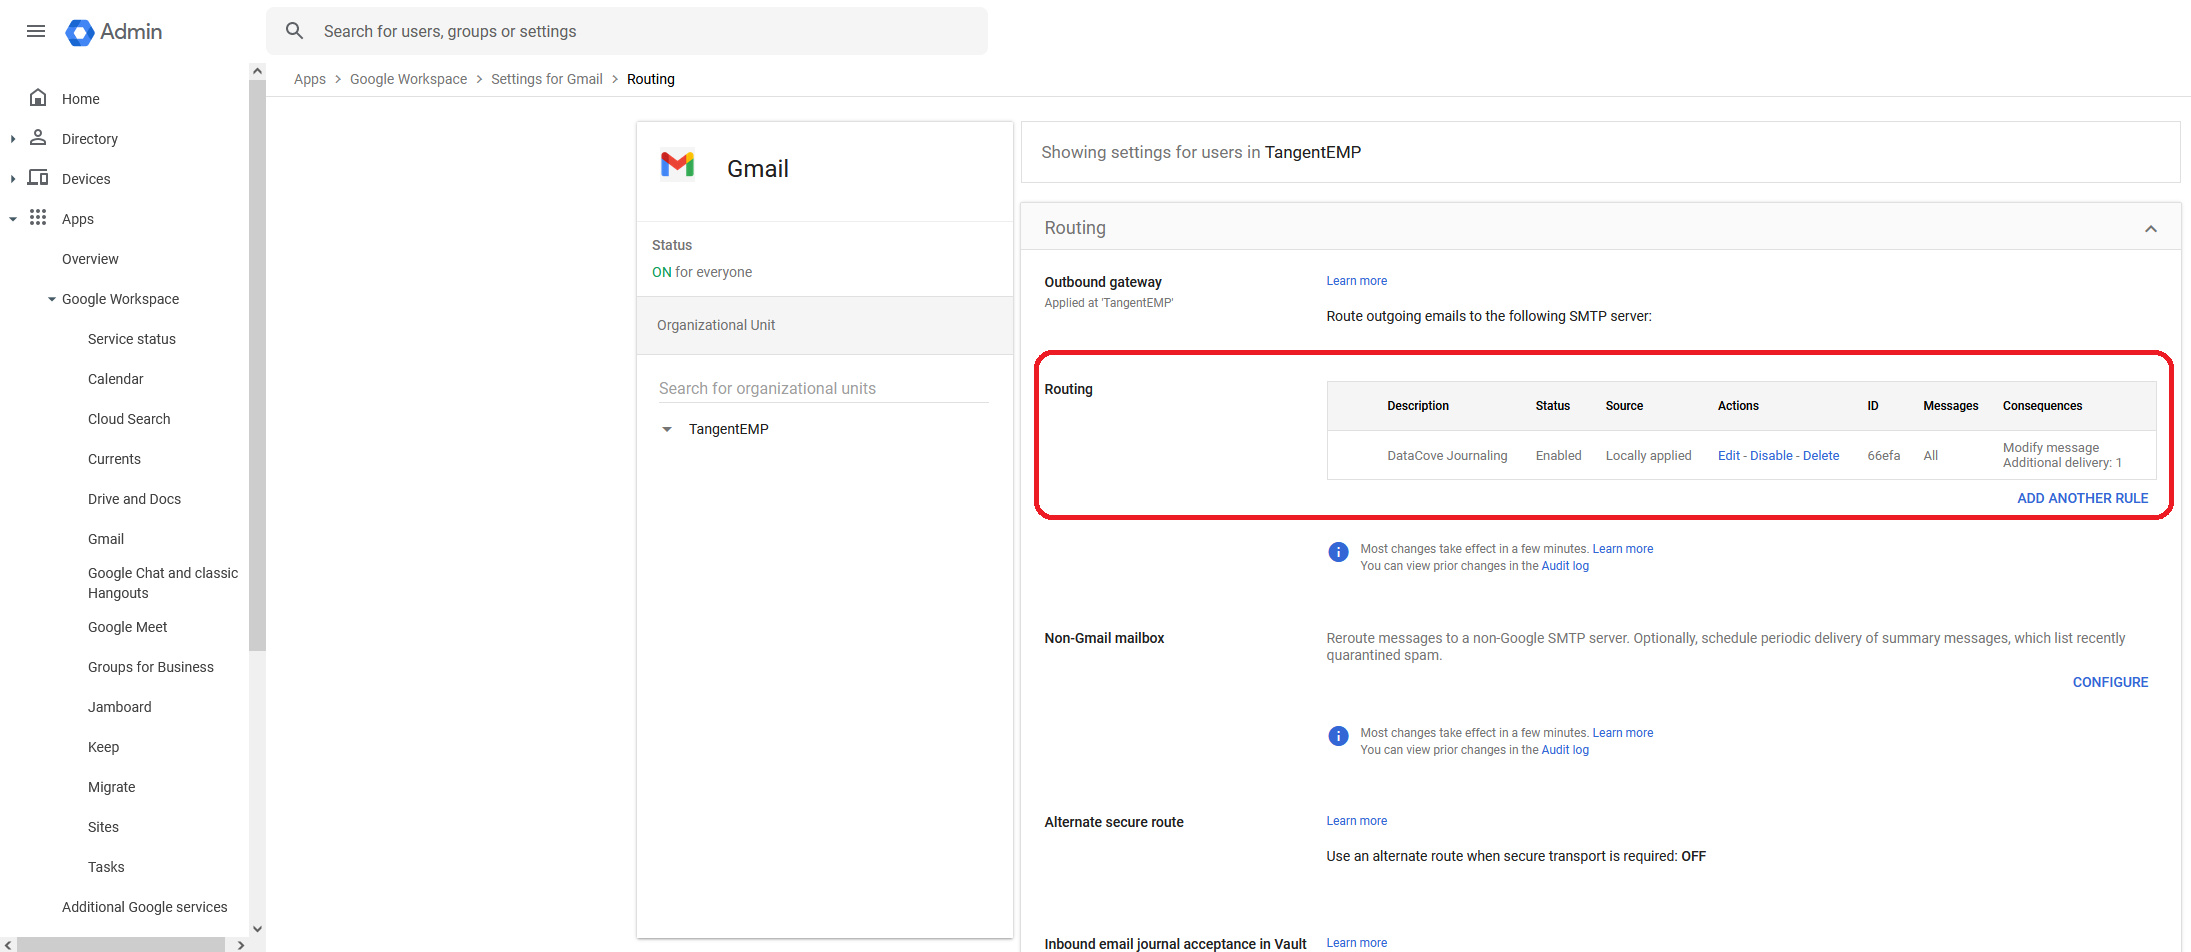
Log into Admin.Google.Com and navigate to Apps > Google Workspace > Gmail > Routing.
Note: The scrollbar may need to be used to find this Routing section, as it’s often at the bottom of the option list. Be sure that Routing is selected; it is unique and different from Default Routing.

Once in the Routing section, locate the Third Party Email Archiving section and click Configure.

A dialog box will appear asking for a description of the journaling address to add, as well as an email address to send emails to.
The “Description” field can be something memorable so that any future review of this section will be instantly recognizable as to its purpose. The recommended suggestion is “DataCove email archiving.”
The email address for journaling can be any ‘username’ at the domain either created or provided by Tangent from the previous Domain Acquisition and Preparation section.
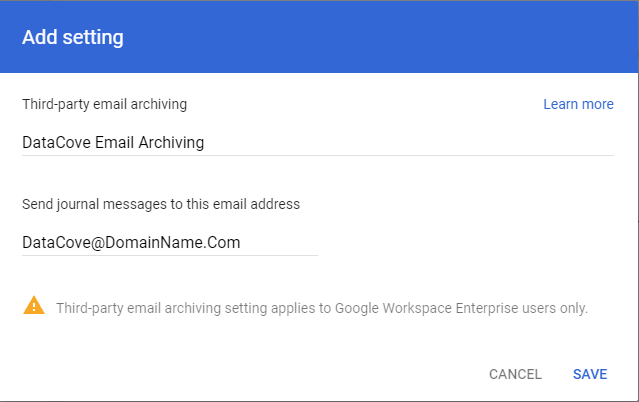
Once fully populated, select Save and the dialog box will disappear.
A new rule should now have loaded under the Third Party Email Archiving section showing the rule in an Enabled status.
If this is present as pictured below, the G-Suite Journaling setup is complete. Please skip ahead to the Conclusion phase of this setup guide for instructions on how to test the mail flow and ensure that journaled messages are coming in.

Routing Rules Journaling
Configuring Google’s Routing Rules Journaling is a little more involved than the Licensed Journaling version, but not by too much.
Log into Admin.Google.Com and navigate to Apps > Google Workspace > Gmail > Routing.
Note: The scrollbar may need to be used to find this Routing section, as it’s often at the bottom of the option list. Be sure that Routing is selected; it is unique and different from Default Routing.

Locate the Routing subsection, usually emplaced right below the Outbound Gateway section, and then select Configure.

A dialog box will appear with a fairly lengthy list of options to select.
The first four options for which messages to affect are very important; all four options should be selected to ensure that all Inbound, Outbound, Internal - Sending and Internal - Receiving messages are captured.
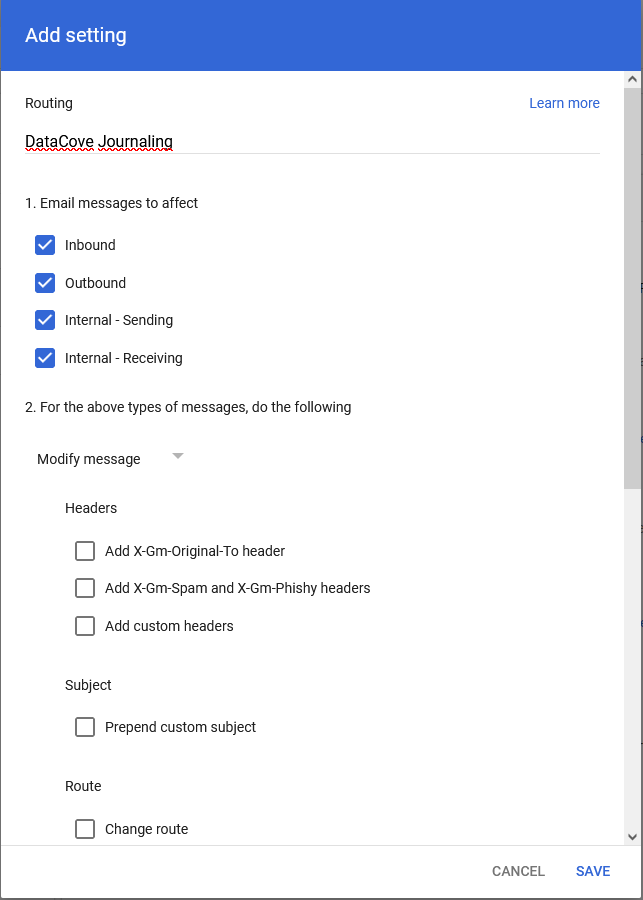
Once those are selected, scroll down until finding the Also Deliver To section.
Check the box for Add More Recipients, and then click Add to spawn a new dialog box.

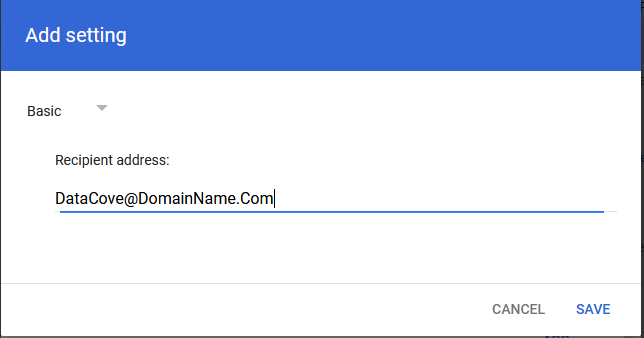
The new dialog box will spawn asking for which additional address to add.
The email address being asked for in the Recipient Address field can be any ‘username’ at the domain either created or provided by Tangent from the previous Domain Acquisition and Preparation section.
At the top of the dialog box, a dropdown menu for Basic options and Advanced options.
Select Advanced.
The Advanced section offers significantly more options and will use the Recipient Address already filled in to populate the Envelope Recipient section’s Replace Recipient field.
This should reflect the address of where you want the emails to route to as part of their relay to the DataCove.
Once configured, scroll down for additional options.
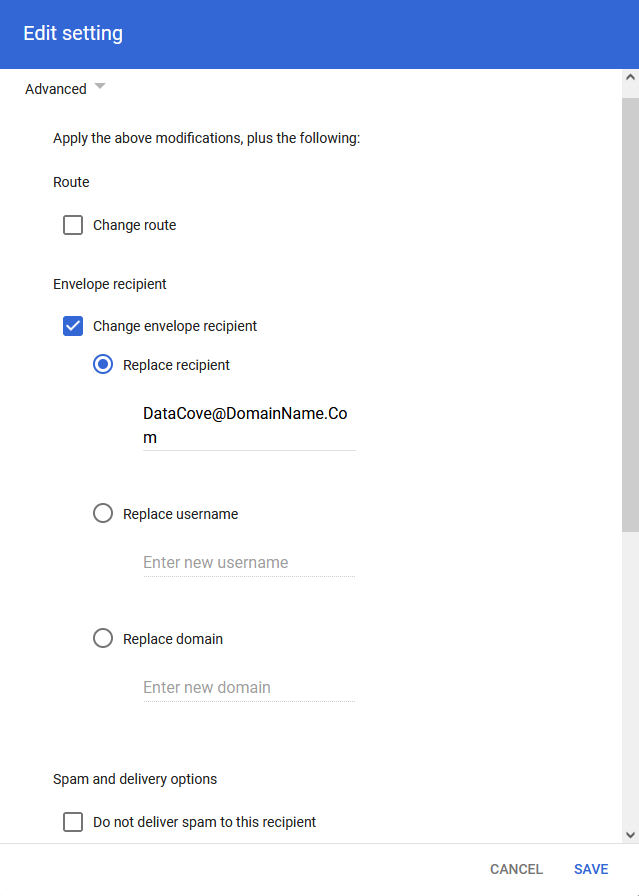
Uncheck the box for “Do not deliver spam to this recipient” as spam, distasteful as it is, should be allowed to this mailbox as compliant communications.
Essentially, the only spam that gets sent to this mailbox is spam that the users are genuinely receiving. If the users are receiving spam, that same spam should always be captured for compliance purposes as filtering any data, well intentioned as it may be, can be risky from a data spoliation perspective.
The “Suppress bounces from this recipient” box should be checked, as in the event of any undeliverable messages not being able to make it into the DataCove, the sender would receive unexpected Non-Deliverable Reports which will wind up confusing them and potentially triggering unnecessary Help Desk inquiries.
Once those options are set, select the Save button in the bottom right hand corner of the dialog box.

With the parameters now set for the routing rules, verify that the configuration shows the expected email address for the SMTP relay, as well as confirmation of the suppression of bounces.
Once verified, select Save in the bottom right hand corner of the dialog box.

A new rule should now have loaded under the Routing Rules section showing the rule in an Enabled status.
If this is present as pictured below with the Additional Delivery field populared, the G-Suite Journaling setup is complete.
Verification of mail delivery is the only step remaining and is covered below.
This concludes the Google G-Suite setup of journaling.
Within 5-15 minutes, messages should start arriving into the DataCove.
A simple way of verifying this flow would be to send an outbound test message to a coworker, and have them reply back.
It’s also prudent to test mail flow of messages outside of the organization by sending a test email to an individually owned Gmail (not the organization G-Suite domain owned account), Hotmail or Yahoo mail account, and having that account respond back.
Copies of each of these messages should then arrive in DataCove to validate proper mail flow and message capture.
In the event that messages do not arrive within this time frame, a review of the previous steps would be necessary to troubleshoot. In almost every case, either a forgotten Outbound Spam/Malware filter, improperly configured NAT or IP address ACL on the DataCove will be the cause, and those items should be checked first.
If issues persist, please contact Tangent for additional troubleshooting aid.
Troubleshooting SMTP Delivery
On occasion, configurations outside of the scope of the above instructions will come into play and require addditional adjustments to make SMTP Direct Journaling flow properly. The below items are some of the more common elements DataCove Support has run into and provide some additional guidance on troubleshooting these situations.
Outbound Spam filtering is in use by some organizations to mitigate the effects of a compromised user account sending out spam or malware-laden emails to potential customers, vendors or other internal employees. Business Email Compromise (BEC) is an extremely common and extraordinarily dangerous tactic used by attackers worldwide and the frequency of successful breaches are only rising. Outbound Spam Filters can protect against this somewhat by scanning the outbound messages the same way an inbound spam filter works and preventing delivery in the event of a positive match for suspicious content.
While the majority of organizations rely on Microsoft’s Exchange Online or Google’s G-Suite platforms to handle outbound spam filtering for them (when turned on), some organizations opt for third party filters, often due to incumbency as their extant inbound spam filter or other benefits. The SMTP IP addresses that are described above for Exchange Online and G-Suite will allow for their respective outbound filters to work, but not for third party filters. As a result, when third party filters are in play, any outbound messages from the organization’s last hop is those filters, and not Exchange Online or G-Suite, and DataCove will refuse acceptance of those messages since their IPs are not on the whitelist of authorized senders.
For organizations using Outbound Spam Filtering by third party providers, it is essential to identify which filter and which IP addresses that filter uses to send from and then add those to the DataCove SMTP Whitelist in the same fashion as the Exchange Online and G-Suite IP addresses.
Common third party providers are listed below for ease of use, but this is not a comprehensive list nor may it be specific to organizations who either have a system in-house or dedicated IPs provided for them. Adding their pertinent IP addresses to your DataCove’s whitelist will allow for messages they relay to be delivered to DataCove.
Barracuda: https://campus.barracuda.com/product/emailgatewaydefense/doc/96023036/email-gateway-defense-ip-ranges/
Proofpoint: https://help.proofpoint.com/Proofpoint_Essentials/Email_Security/Administrator_Topics/000_gettingstarted/020_connectiondetails
Mimecast: https://community.mimecast.com/s/article/Maintaining-Authorized-Outbound-Addresses
All organizations possess an inbound spam filter; this has been the nature of the internet since the early 2000’s. However, not all spam filters have a feature known as Recipient Verification activated.
Recipient Verification allows the inbound spam filter to verify that an email address exists on the mail server (or tenant) before delivering the message, usually via LDAP or SMTP RCPT TO probing. This greatly cuts down on the amount of “blind” spam being sent to a domain to invalid or non-existent email addresses and then relying on the mail server to bounce the message back with an Non-Deliverable Report (NDR), further reducing loads on both the mail server and spam filter.
In Office 365 and G-Suite tenants, mail that is received triggers Journaling first before verifying that the mailbox exists, leading to a copy of that message being sent to the DataCove even when it would normally be rejected due to lack of a mailbox to properly receive it on the tenant’s side. This is a function of the priority that Journaling receives in the inbound mail stack and cannot be changed, however, Invalid Address Blocking can also be enabled at the mail server (or tenant) levels to help them work with spam filters to avoid triggering Journaling in the first place.
These options are almost always requirements to be activated before Recipient Verification can be activated on the spam filter. Information on how to configure it for Office 365 and G-Suite can be found below.
Recipient Verification configuration on the spam filter is best looked into via the vendor’s technical support knowledge base or support contacts due to the variety of mechanisms and terms used.
Microsoft’s Exchange Online Directory-Based Edge Blocking for Office 365: https://learn.microsoft.com/en-us/exchange/mail-flow-best-practices/use-directory-based-edge-blocking
Google’s G-Suite “If the envelope recipient matches the above, do the following:” https://support.google.com/a/answer/2368153?hl=en
As Google’s information is relatively arcane, a quick guide on how to perform their version of Invalid Address Blocking is below:
Under the Admin.Google.Com > Apps > G-Suite > Gmail section, select Default Routing and click Add Setting.
From the “Specify Envelope Recipients to Match,” select All Recipients.
Scroll down to “If the envelope recipient matches the above, d the following” and select Reject.
Under Options, be sure to leave this on the default value of “Perform this action only on non-recognized addresses.”
Note: If there is already a rule in the Default Routing tab that is accepting mail for invalid recipients with a higher priority, remove or adjust that rule first.
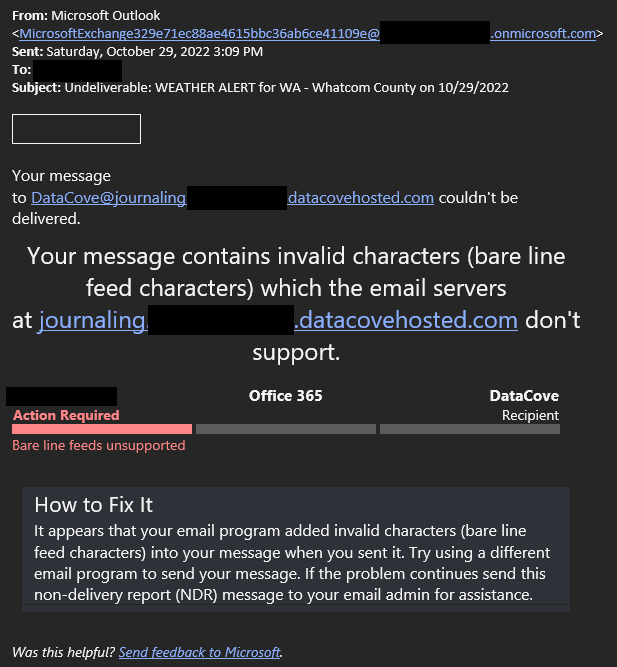
Bare Line Feeds are an old style of message element that could be used in email messages that are largely considered as ‘illegal’ formatting today, as defined by Request for Comments (RFC) 2822. They were very common back in the 1990s and early 2000s for mass notification systems, industrial alerts, police dispatching, real time location systems and other email-based alerts that were time sensitive, and some of those systems are still in use today and were never updated to compensate for RFC 2822. No known modern systems are aberrant to this standard, so this is always some very old system that generates these.
The specific issue that Bare Line Feeds cause is that they are missing the expected CR-LF combination at the end of the message, or it is otherwise incorrect.
DataCove’s with a version prior to 6.13.1 strictly adhere to the RFC standards for SMTP mail delivery, so messages with a Bare Line Feed will be rejected by the system with an error code like “550 5.6.11 SMTPSEND.BareLinefeedsAreIllegal; message contains bare linefeeds, which cannot be sent via DATA and receiving system does not support BDAT.”
Bare Line Feeds have had support added as of version 6.13.1. If these are being encountered on your DataCove, please update to at least version 6.13.1.

Once the update is complete, navigate to Configuration in the top header bar, then select SMTP Server on the left hand side menu.
From here, locate the “Enable BDAT Command” option, check the box, then click Save.

Examples of the error message resulting from an inability to deliver emails with Bare Line Feeds are provided below.

Sometimes, journaled messages won’t leave the Office 365 environment for delivery to the specified domain, or they will leave, but the messages won’t arrive on DataCove.
The most common reason why journaled messages won’t depart Office 365 is an incorrectly specified domain name in the Journaling Email Address, as if an MX record does not exist for a domain, when Office 365 attempts to look up where to send the messages, dispatch will fail since the invalid domain won’t have an MX record associated with it.
This assumes that the incorrectly spelled domain does not exist and isn’t actually someone else’s domain. In this situation, it’s unlikely that the mailbox name specified exists at that domain and Non-Deliverable Reply bouncebacks will result.
An incorrectly spelled mailbox name will not cause an issue, as the DataCove is merely accepting mail to any address specified at that domain; it does not discriminate. Only a misspelled domain name will.
Carefully examining the spelling of the domain name being used for relay, including top level domain extension, is critical to ensuring proper delivery. If this domain name appears to be correct, the messages may be leaving but not in the intended order; continue the below troubleshooting steps to determine where the hold up may be.
If the messages do leave the environment but do not arrive on DataCove, this is most often the result of an outbound spam filter or other relaying service that the Office 365 tenant has a Mail Connector to for final handoff of the messages. Identifying exactly where this is happening can be performed using Office 365’s Message Trace function, which can track messages being sent or received and where they are in the delivery process.
To use Message Trace, begin by opening a web browser and navigating to Admin.Microsoft.Com. Log in with administrative credentials.
Once in, select the Show All link on the left hand side of the screen.

With the Admin Centers now visible, select Exchange.

The Exchange Admin Center will launch on a new tab and possesses many functions. For tracing a message, select Mail Flow on the left hand side menu, then Message Trace underneath.
This will adjust the larger action pane to the Message Trace page.
Select Custom Queries from the top menu, then Start a Trace below it.

The New Message Trace pane will pop-in from the right hand side of the screen.
Populate the domain name that the journaled emails are being sent to in the Recipients box with a preceding asterisk to find all emails being sent to any mailbox at that domain, or enter in the fully qualified name of the journaling address here.
Adjust the Time Range to just the last 6 hours or thereabouts; any longer and the query will take longer than it needs to for such a small data lookup.
Leave the Report Type on Summary Report, as more detail is not necessary for this.
Select Search once all fields are set appropriately.

The Trace will take a moment to run and then bring up the results.
For an example of properly delivered results, the Status field should indicate Delivered.
This means those messages were indeed sent to the final destination and successfully handed off.
In the event of an unknown outbound spam filter or other mail relay service, these may still be referred to as Delivered, but the spam filter or relay service may not be authorized, configured or otherwise capable of sending the messages onwards to the final DataCove destination.
In these situations, the most expedient options are to identify the IP address (or addresses) of the filtering/relay service to then authorize on DataCove’s SMTP Allow List, as if the DataCove does not allow connection from those IPs, the messages will logically fail to be delivered.
If the IP addresses have been whitelisted but delivery continues to fail, check the spam filters/relay service’s authorized domain list or other means of specifying which email addresses or domains it is allowed to send messages to. Many spam filters or relay services will be limited to which domains they can serve so as not to be used as an open SMTP relay, and specifically whitelisting delivery to the chosen relay domain for the DataCove may be necessary.
If these steps do not work or are not feasible, it will be required to configure a dedicated Send Connector from Office 365 to the DataCove’s domain to provide a specific path for journaled emails to take that entirely avoids any other services that could interfere. Configuring a dedicated Send Connector in Office 365 is covered in the next section.

In the event of a failed message delivery, referencing a status other than Delivered like Failed or Deferred, selecting a message will provide significant contextual information and an Error Code that can help identify the problem. Note that clicking through the Message Events section toward the bottom of these failed messages may be necessary in order to obtain information on where the stoppage is occurring.
While the possibilities of error codes are many, the specific text being hunted for will always start with “Reason.” With that information in hand, review the Error Code information carefully for hints as to why the delivery is failing and then analyze the appropriate system or address section to resolve the error.
If additional assistance is needed with troubleshooting, contact DataCove Support with the Error Code information.

In some very complex mail delivery situations, it may be necessary or preferable to configure Office 365 to directly send messages to the DataCove for journaled emails instead of letting them route out through the organization’s normal methods. This is often done to bypass outbound spam filters that are challenging to configure in the desired method or when trying to get outside of the normal mail routing rules that may be interfering with journaled message delivery. For these scenarios, a specialized set of instructions, known as a Send Connector, can be configured that tells Office 365 to send messages bound for a particular destination domain out a different, higher priority delivery pipe than would otherwise be used, and this new pipe can be routed directly to the DataCove.
To begin the Send Connector setup, begin by opening a web browser and navigating to Admin.Microsoft.Com. Log in with administrative credentials.
Once in, select the Show All link on the left hand side of the screen.

With the Admin Centers now visible, select Exchange.

A new tab will spawn for the Exchange Admin center, with a slew of options on the left hand side.
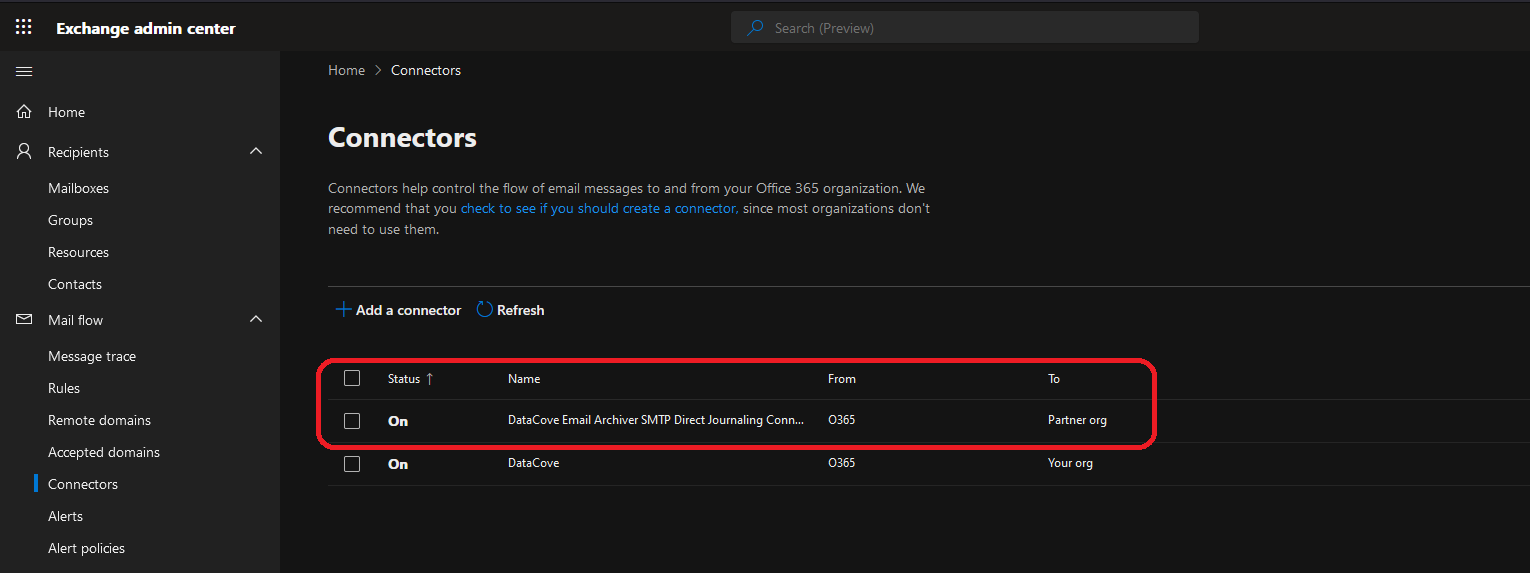
Expand the section for Mail Flow, then select Connectors underneath. This will provide a list of Send and Receive Connectors for your organization.
Click the Add a Connector button to begin the setup of a new dedicated Send Connector for the journaled email traffic.

The New Connector dialog box will now spawn.
For Connection From, select Office 365, as Office 365 will be the origination point for the journaled emails.
In the Connection To field, select Partner Organization, as the journaled emails will be dispatched externally from Office 365 and from any other mail servers your organization may possess.
Select Next once those fields are set.

On the Connector Name section, create a descriptive name for this Connector that clearly describes its core purpose in the organization.
It is suggested to create a detailed description of the function of this Connector and the DataCove’s role within the organization so that other Office 365 tenant administrators will understand the purpose of the rule.
Select Turn It On, which upon completion of this wizard will immediately activate the Connector. If you do not select Turn It On at this time, this Connector will need to be enabled manually after creation.
Click Next once all fields are populated.

The Use of Connector dialog box will now spawn and request specification of when this Connector should be triggered.
Select “Only when email are messages sent to these domains,” then populate the domain field with the relay domain chosen (or provided by DataCove Support) for relaying messages to the DataCove, starting with the format of an asterisk and a period. An example of this will appear as: *.NameOfTheDomainToRelayTo.TLD
Once the domain field is populated, click the + sign to add this domain. This instructs the Office 365 tenant that any message sent to any address or subdomain of the specified domain should route through this Send Connector.

Once the + Sign is clicked, the domain will appear underneath as pictured below.
Click Next.

On the Routing dialog box, leave the default selection of “Use the MX record associated with the partner’s domain” selected, as a properly configured relay domain will have the appropriate MX and A records necessary to point to the DataCove already in play.
Note: Using the Smart Host method and an public IP address (such as the DataCove’s NAT) can also be used to send mail directly to the DataCove while using a fictitious relay domain, but can reduce certain redundant features that come with Tangent’s SMTP Direct methodology when applied to Hosted DataCoves. On-Premises DataCoves can use this method at will.
Click Next.

The Security Restrictions dialog box specifies whether TLS encryption should be used, and if it should, whether the SSL Certificate being presented from DataCove is required to be Certificate Authority (CA) Signed or can be a Self Signed Certificate.
TLS Encryption is always recommended for use with DataCove and there is little to no reason not to use it. TLS will protect the contents of messages while in transit, and is the standard of all email delivery worldwide and has been for many years. The “Always use Transport Layer Security (TLS) to secure the connection” box should remain checked.
Selecting “Any Digital Certificate, including self-signed certificates” is recommended, as the DataCove always has it’s own self-signed certificate. Installing a CA-signed certificate is prudent, but an accidental expiration or the like will cause email to be rejected and unarchived until resolved. The safe choice is the “any” option as a result.
Note: Guidance on installing a CA signed Certificate to DataCove can be found here: https://datacove.net/knowledge-base/uploading-an-ssl-certificate-to-datacove
Click Next to continue.

Before Office 365 will allow a Connector to be built, it wants to verify it can successfully communicate with the destination by sending a test message to it, known as the Validation Email.
This Validation Email page will request an email address at the destination domain for this process; given that the DataCove does not proffer any particular email address to be used, it will instead accept any email sent to it. Any address will work as a result.
The recommended format for this address is to be something clearly identifiable, such as DataCove@RelayDomainNameHere.TLD.
Once the address is entered in, click the blue + Sign to save it.

Once the address has been saved, a Validate button will appear.
Click on the Validate button to instruct Office 365 to send a test message to the DataCove and ensure proper SMTP responsiveness.

The Validation process will take a moment to run with a pulsing progress indicator.

Once Validation succeeds, click Next to continue.
If Validation fails for any reason, review the test results for guidance on what has gone wrong. Most commonly, this will be a NAT that isn’t allowing Office 365’s IP addresses inbound over TCP 25, or the DataCove’s SMTP whitelist not having those same Office 365 IP’s authorized.

The Review Connector page offers a summary of the data entered for this configuration.
Click Create Connector to finish the wizard and spawn the new Connector.

Once the Connector finishes the creation process, a confirmation page will appear.
Click Done to close the wizard.

Back on the Connectors page, the newly created Connector will now appear.
The Status should read back as On; if this was not set to On during the setup process, activate this Connector now.
After activating the Connector, using an email account that is hosted on the Office 365 tenant, send a test message to another user account (on-tenant or off-tenant). This message should get journaled and delivered to the DataCove successfully if the Connector is working as intended. This message transit should be visible from the Dashboard page’s Email Fetch report or by searching for the present day’s emails without any address restriction.
If the message does not appear on the DataCove, use the Mail Trace steps from the previous troubleshooting section to determine where these messages are going.
Note: It may take several minutes from the time the test message is sent for it to become visible on DataCove and searchable due to the myriad of internet latency factors and DataCove’s processing and indexing processes. If the message has not appeared after three minutes, the Mail Trace verification that it left the tenant is recommended.