Configuring Microsoft Exchange Journaling (Exchange 2013, 2016, 2019 and newer)
Understanding the Microsoft Exchange Journaling Process and how DataCove Interacts with it
Creating the Journaling Mailbox
Identifying Exchange’s Licensing for Journaling
Activating Database Journaling
Validating Successful Receipt of Journaled Emails
Initiating Exchange IMAP Services
Creating the DataCove Fetcher
Testing the DataCove Fetcher
Activating the DataCove Fetcher
Troubleshooting the Fetcher at Test Level 1: Inability to reach Mail Server
Verifying Network Communication with the Mail Server
Hostname Resolution of Mail Server
Troubleshooting the Fetcher at Test Level 2: Cannot Reach POP or IMAP Port
Restarting the IMAP Services on Exchange
Restarting the IMAPProxy service
SSL Certificate Service Thumbprinting
Troubleshooting the Fetcher at Test Level 3: Login Issues
Testing with Standard POP3 and IMAP4 Protocols
Troubleshooting the Fetcher at Test Level 4: Folder Legibility
Troubleshooting the Fetcher at Test Level 5: Obtaining a Quantity of Messages in Mailbox
Understanding the Microsoft Exchange Journaling Process and how DataCove Interacts with it
Microsoft’s Exchange Email Server is the most common on-premises mail server there is, bar none. It has been popular since the late 1990’s and has only skyrocketed in capability and renown since then, with the groundbreaking Exchange 2003 setting the tone for decades to come. Introduced in a predecessor version to Exchange 2003, known as Exchange 5.5 Service Pack 4, a little known process known as Message Journaling was released in response to customer demand for better discoverability of emails by system administrators.
Message Journaling was effectively a new transport layer inserted at the database level which would make a copy of any messages that touched any mailbox contained within that database. Inbound, outbound and internal messages all would have copies made of them, with that copy funneled over to a separate mailbox, known as a Journaling Account. The originally intended recipients of the message would still receive their version and be none the wiser, while the journaled copy would reside in the Journaling Account indefinitely.
By creating the copy of the message at this transport layer, sysadmins no longer had to grant themselves permissions to a user’s account to look through their data (with the potential exposure and liability pitfalls that could introduce) or make copies of PST files and attach them to their mailboxes. Instead, the administrator could merely log into the Journaling Account and begin sifting through the data contained therein for responsive data to the investigation.
Of course, having an entire organization’s data copied and flowing into a single mailbox introduced inherent problems of its own, namely in the size of the mailbox. As many email administrators are all too aware of, mail clients and mail servers alike tend not to like having tens or hundreds of gigabytes of data in any single mailbox, with a slew of performance and stability impacts that make themselves apparent soon after. Exporting these Journaling Accounts’ contents to PST files became the norm of the day, with date-range bound PST exports of a week or a month at a time becoming extremely common.
Enter DataCove.
Rather than having to export the contents of a Journaling Account on a regular basis, DataCove would simply attach to the account using the POP3 or IMAP4 client protocols (and their secure variants, SPOP3 and SIMAP4), behaving as if it were just another user (albeit a user who reads and deletes emails extremely rapidly). By pulling the messages out of the Journaling Account almost as soon as they come in, DataCove solved the administrative overhead issues of storing and organizing dozens or hundreds of PST files by importing the email into its own searchable database. Perhaps just as importantly, DataCove sits outside of the mail flow, meaning that it would never be a bottleneck to mail delivery and regular Exchange functionality the way many software or network based mail capture solutions (‘mail filters’, also known as “milters”) often were.
This decoupled mail copy methodology removed the incredible storage pains on the Exchange server from holding duplicates of all emails within its own database, with only an approximate 2%-5% system overhead for the journaling process itself.
As of Exchange 2007, an enhanced version of Message Journaling, known as Envelope Journaling, became the default Journaling method. Envelope Journaling not only captures the message and attachment contents as before, but also the very envelope that the email was sent in. The Envelope contains additional information, such as all of the intended recipients of the message, which can offer insights into Blind Carbon Copy (BCC) recipients that were formerly invisible, as well as expand a distribution list, meaning that all of the email addresses that were on that distribution list at the time of delivery will be shown, rather than just the name of the distribution list that Message Journaling would show. Gone were the days of having to guess who would’ve been on any given distribution list at the time a message was sent, since now they’d be there plain as day and without any opaqueness of potential human error of not having added someone to a distribution list by accident.
Exchange 2007 also introduced the advent of Global Journaling, which would make copies of all messages from all users across all databases, rather than Message Journaling only being available on a per-database level before. With so many organizations subdividing their users into different databases, this made a minor reduction in administrative overhead and greatly reduced the chance of human error of forgetting to turn on journaling for a newly created database. This article will discuss both Global Journaling and Database Journaling further in a later section, including licensing constraints between the two.
Below is a simplified network diagram showing how the mail flow operates in an Exchange environment with Journaling active. In a nutshell, all mail that touches the Exchange Server (or Database Availability Group [DAG] cluster) will have a copy made of it and placed into a separate mailbox on Exchange. End users still talk to Exchange via MAPI (Messaging Application Programming Interface) or EWS (Exchange Web Services) from their Outlook clients to transfer emails, with DataCove using (S)IMAP4 or (S)POP3 to talk to Exchange to “fetch” the journaled emails and delete them after successful download. Note DataCove’s presence is entirely outside of the mail flow of the organization and end users; this is by design so that DataCove never becomes a failure point in the event of downtime on the archiver.
With this baseline understanding of how Exchange’s Journaling function and DataCove operate together, we can now dive into the configuration steps required to enable Journaling and bind DataCove to fetch those journaled copies.

Creating the Journaling Mailbox
The Journaling mailbox is the mailbox used by Exchange as the destination for all of the copied messages, thus it is expected to receive a large amount of traffic per day and will need to be accommodating of that expectation. Creation of the Journaling mailbox is not dissimilar from the creation of any regular user mailbox; the setup is the exact same, but with a few modifications that make it behave more like a “service account” than a true user’s mailbox.
Specifically, the Journaling mailbox should have the following special properties assigned to it after creation:
The mailbox should be hidden from the Exchange Address Lists and Global Address Book.
This limits how many people will accidentally put it onto an “all” distribution list and blast it with additional traffic over what it will already be receiving, as well as limit any questions for curious Address Book checkers about “what is this journaling mailbox and what does it do?”
2. The mailbox should have any default or policy-level size limitations rescinded so that it is unlimited in capacity, or at least very large in maximum capacity (100GB to 250GB is sufficient for most organizations).
While the daily throughput of storage in the mailbox is never expected to rise above 10GB, in the event of a problem with fetching (password expiration, DataCove downtime, network issues preventing DataCove from reaching the mailbox, etc), having a large mailbox ensures that journaled emails simply build up and await fetching once the issue is resolved, meaning no data is ever lost. If the Journaling mailbox ever gets full, not only will this condition prevent new journaled emails from reaching it, it is very likely to cause mail queue backlogs on Exchange proper, with subsequent ‘back pressure’ throttling to regular user’s traffic and the unpleasantness that ensues there.
3. The mailbox should not have a password that expires or requires changing upon login.
A common policy for many organizations is to have a requirement of changing user passwords every 90 or 180 days. In the event such a policy is applied to the Journaling account, DataCove will be unable to log in and fetch email until the password is reset on both the account and on DataCove. This often takes time to be identified unless the system administrator is reading DataCove’s alerts or Exchange’s disk capacity growth regularly, meaning that data can be lost and compliance at risk by having this set. Note that the aforementioned unlimited storage capacity for the Journaling mailbox can buy time on this, but it is best to avoid it in the first place when possible.
4. A very complex password should be assigned to this account.
No user will be logging into this mailbox; only DataCove itself and, if needed, the mail administrator for troubleshooting purposes. A very strong password of at least 20 characters should be configured for this account. The usual special characters, lowercase and uppercase characters and numbers should be used to make this password (or better yet, passphrase) as complex as possible. Any breach of this account is essentially providing access to the entire organization’s mail, hence the prudence in significant security measures.
To begin setting up the user mailbox, use an Incognito/InPrivate tab or other non-cookie saving mode of a web browser (or other web browser entirely) and navigate to your Exchange Server’s Admin Center web interface, normally found at the “HTTPS://IP.Address.Goes.Here/ECP” URL. Using the Hostname of the server is also common, with an “HTTPS://ExchangeServerName.DomainName.Com/ECP” also being perfectly fine to reach it.
Once at the login screen, log in with administrative credentials.

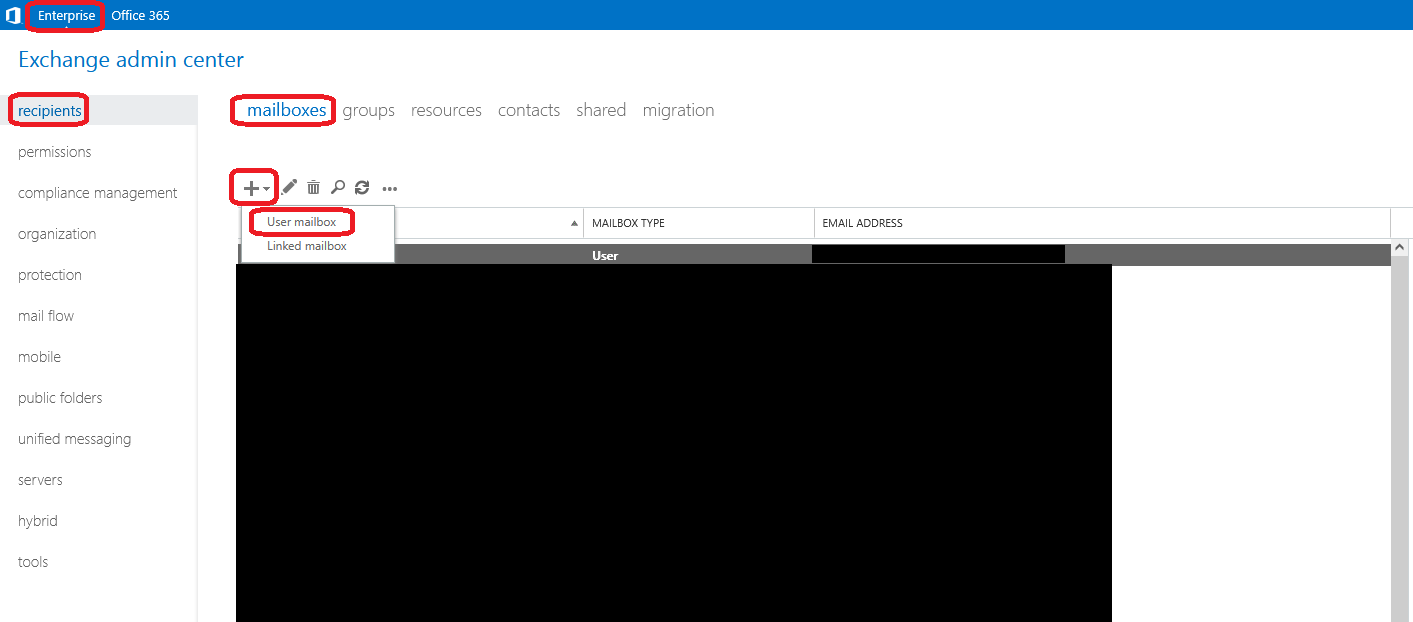
Once into the Exchange Admin Center, verify that all work is being conducted in the Enterprise panel, not the Office 365 panel (for hybrid scenarios) by checking that the small white arrow on the blue banner at the top of the screen is pointing towards “Enterprise.” This ensures that the mailbox is being created on the local Exchange server and not Office 365.
Select Recipients on the left hand side navigation menu, then Mailboxes on the top contextual menu.
Click on the gray plus sign (+) and select User Mailbox.
On the New User Mailbox dialog box, configure all of the usual details that would be set up for a new user account.
It is often best to name this account something that has its purpose clearly stated in the name itself, so that it is obvious that it is not a normal user and has technical importance to the organization.
If a separate Organizational Unit and Mailbox Database exist for Service Accounts, place this Journaling mailbox there. This helps keep it separate from the regular users and easier to find when needed.
Once all the parameters are configured, click Save.

With the mailbox now created, select the newly created mailbox from the list and click on the gray pencil icon at the top of the screen to Edit the properties.

The properties of this mailbox is where the aforementioned specialty settings will be applied.
Under the General tab, check the box to “Hide from address lists.”

Next, select the Mailbox Usage tab on the left hand side.
A warning popup may appear at this time, reporting that Exchange has no size utilization information due to the account not having been logged into yet. This is fine to ignore since the mailbox was just made.
Click on the More Options link below the usage count.


With the expanded options now available, select “Customize the quota settings for this mailbox” and set all three options to 0GB. This is “unlimited” as far as Exchange is concerned and will allow this mailbox to grow to a size only limited by the database size limits (if present) or disk size limits and offers the safest amount of space for the journaled email in case of a fetching problem.
Note: Large limits, such as 100GB or 250GB are also possible to set for these fields in situations where an unlimited capacity is not desirable, such as a constrained database or storage disks on the server itself, but it is always recommended that these settings be very high to allow for the largest safety window to detect and resolve an issue if one occurs.
Next, set the “Customize the retention settings for this mailbox” to 1 Day. There is a relatively unknown feature of Exchange known as the Recoverable Items Folder (formerly known as the Exchange Dumpster) which serves a role similar to that of the Recycle Bin in Windows. Items that a user has accidentally deleted but may want to restore are kept in this hidden folder and can be restored to a mailbox via PowerShell. Unfortunately, this Recoverable Items Folder has a size limit of its own and if it gets filled, it will prevent the deletion of emails from the Deleted Items folder in the mailbox itself. This has very adverse effects with a snowballing of data over time which will fill the Journaling mailbox, especially in high mail volume organizations. By setting this to 1 day, Exchange won’t hold emails in that Recoverable Items Folder longer than 24 hours and will avoid that issue entirely.
Note: Setting the retention settings to “0 Days” has had varying effects on Exchange in the past, from treating it as “delete immediately” to “hold forever,” meaning that Microsoft has changed their policy on this setting in Exchange in some update. It is best to use the “1 day” setting to avoid this situation since the exact update and version criterion for it are unknown.
Once the settings are bound, click Save to apply these parameters to the mailbox.

The last step with this account will be to set the password to never expire.
For organizations that do not have an domain policy that requires a user to reset their password after a set number of days, this step can be skipped.
For organizations that do have a password expiration and rotation policy, log into an Active Directory Domain Controller or and launch Active Directory Users and Computers (commonly known as ADUC).

Select Action from the ADUC’s file menu, then select Find.

Under the Find menu, type in the name of the Journaling account that was just made, then press Find Now.
This will locate the account wherever it was placed in the Active Directory forest and allow for direct access to its parameters.

Right click on the Journaling account and select Properties.

Select the Account tab in the menu options at the top, then check the box for “Password never expires” under the Account Options section.
This will prevent any Group Policy requiring a regular password rotation from affecting this account.
Click Save once set.

All of the steps necessary for creation of the Journaling mailbox are now complete.
Note: While in the ADUC, it is prudent to place the DataCove journaling into a Service Accounts Organizational Unit (OU) if one exists, helping to keep it separate from the regular users.
Identifying Exchange's Licensing for Journaling
Microsoft Exchange’s Journaling feature comes in two different flavors, whose options are dependent upon which server license and Client Access Licenses (CALs) are installed.
Premium Journaling is available with the Enterprise Edition of Exchange and respective Enterprise CALs. Premium Journaling offers the ability to define a single global journaling rule which applies to all of the databases on the Exchange server, as well as granular journaling options for distribution groups or individual users. For the purposes of this article, Premium Journaling will be referred to as Global Journaling, since it will always be used in a global context of the Exchange environment to journal all user accounts.
Standard Journaling is available with the Standard Edition of Exchange and the standard CALs. Standard Journaling is configured at the mailbox database level for all users on that database; no granularity or customizability is offered. Journaling must be activated individually for each mailbox database that may exist; if one is missed, it won’t be journaled and this can lead to a compliance gap. For the purposes of this article, Standard Journaling will be referred to as Database Journaling, since it will always be configured at the individual mailbox database level.
Insofar as DataCove’s email archiving goes, either option is perfectly fine for use and no upgrade or changes to an Exchange environment’s CALs or versioning are required. Both options provide the same journaled data to DataCove without any practical difference. Premium Journaling simply offers automation and ease of configuration over that of Standard Journaling, since only a single rule needs to be configured for all users and mailbox databases.
Standard Journaling only has a moderate risk factor involved if an email administrator creates a new mailbox database and forgets to activate Database Journaling upon it. Mailbox databases are not everyday creations for any organizations, so it’s easy to forget to configure features like Database Journaling upon them, but likewise, since they are not commonly created or changed, the chances of this occurring are relatively small in the first place.
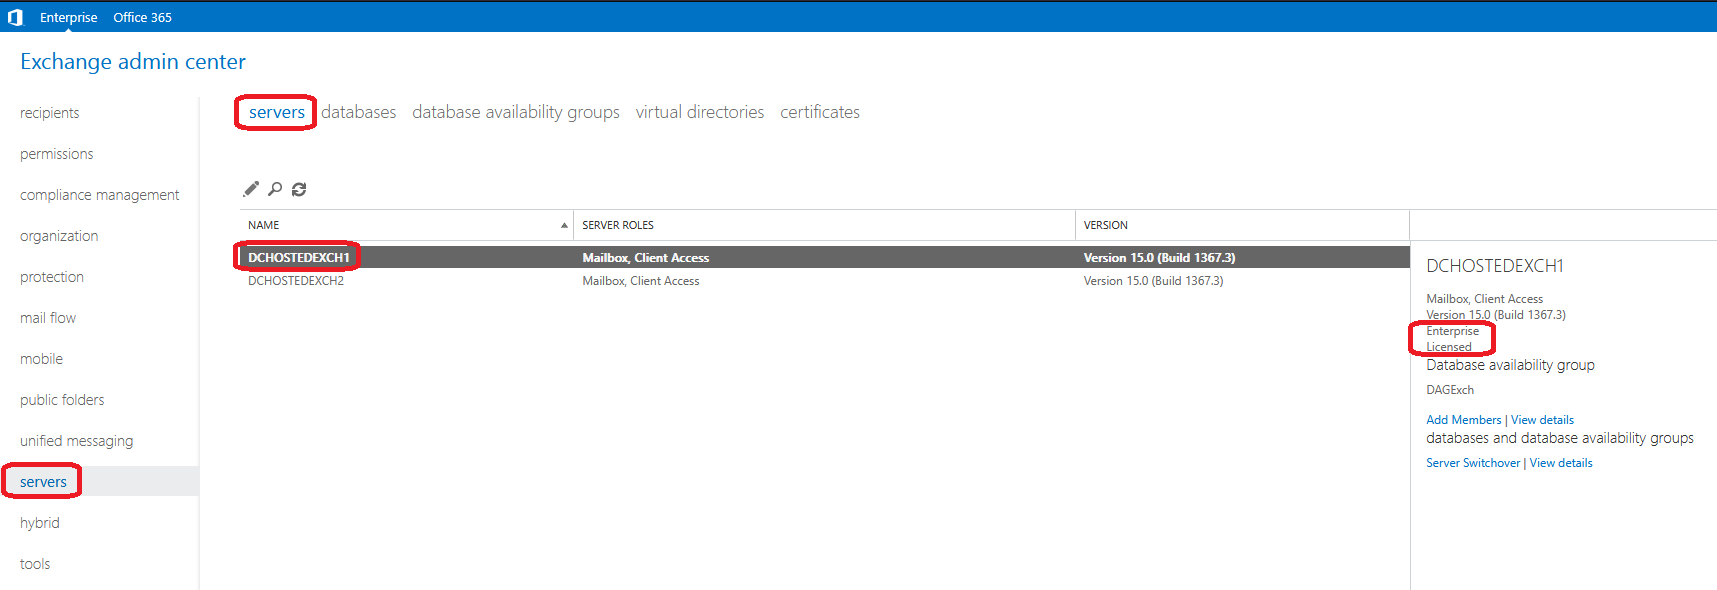
To identify which version of Exchange licensing is in use, open a web browser and navigate to the Exchange Server’s Admin Center interface. Select Servers on the left hand side navigation menu, then Servers in the top context menu. Select a server from the list presented and check the information pane on the right hand side of the screen. This will specify if it is Enterprise Licensed or Standard Licensed.
Based on the licensing level detected, follow the appropriate process below:
Organizations with Enterprise licensing should follow the Global Journaling process.
Organizations with Standard licensing should follow the Database Journaling process.
Activating Global Journaling
Configuring Global Journaling on Exchange consists of three steps, which should be performed in sequence for best results.
Creating a Non-Deliverable Report (NDR) mailbox.
Binding the NDR mailbox to the Journaling configuration.
Binding the Journaling mailbox to a Journal Rule.
Creating the Non-Deliverable Report (NDR) Mailbox:
The Non-Deliverable Report (NDR) mailbox is a specialty mailbox that NDRs are delivered to in the event of an inability to deliver the journaled emails to the newly created Journaling mailbox. This can occur in cases of the Journaling mailbox being full, being unreachable (say, from a dismounted database) or any other delivery blockade or prevention. NDR Mailboxes are used as a final destination in the event of an inability to deliver the message to the Journaling mailbox within the retry period set on the Exchange server and are meant to be a last ditch notification of the attempt to deliver, along with a copy of the journaled message attached to the NDR as an attachment.
NDRs in the context of journaled messages are not all that different from the standard NDR that are ubiquitous in the email world. If you’ve ever sent an email to a mistyped or incorrect email address, you’ve received an NDR saying that the address does not exist or that the message could not be delivered. This is effectively the same NDR that Exchange will generate if it is unable to deliver the journaled message to the Journaling mailbox.
These NDRs are not suitable for direct import into DataCove, but with some conversion work that can be performed by the DataCove Support team, they can be rebuilt into the original journaled emails and then imported into the DataCove without any loss of fidelity. In the event of NDRs being detected, contact DataCove Support immediately for resolution steps on the root cause as well as conversion work of the NDRs.
Note: The mailbox used for this should absolutely be a dedicated mailbox and treated as a service account. No user account whatsoever should be used for this, as the NDR mailbox receives especial routing rules from Microsoft Exchange that automatically override any and all mail routes and filters in order to ensure delivery of these critical notices.
With that preface into the purpose of the NDR mailbox, the same steps that were used to create the Journaling mailbox can now be used to create the NDR mailbox. It’s recommended to give it an obvious name like DataCoveNDR@Domainname.com so it’s purpose can be easily and immediately discerned at a glance.
Note: For redundancy, it is recommended to place the NDR mailbox on a different datastore (when available) than the Journaling mailbox itself.
Binding the NDR Mailbox to the Journaling configuration:
With the NDR Mailbox now built, it is time to bind it to Exchange’s Journal Rule framework. Messages that are undeliverable to any Journal Rules specified in this area will have their NDR bounced over to the NDR Mailbox address for later recovery.
In the Exchange Admin Center, navigate to Compliance Management on the left hand side menu, then select Journal Rules in the top header bar.
Note the small text of the “Send undeliverable journal reports to” text and click on the Select Address hyperlink.

A small dialog box will appear asking for the address to be used for the NDR reports.
Click Browse and then search for the NDR mailbox that was just built.
Once located, click on the mailbox to highlight it and then click OK.
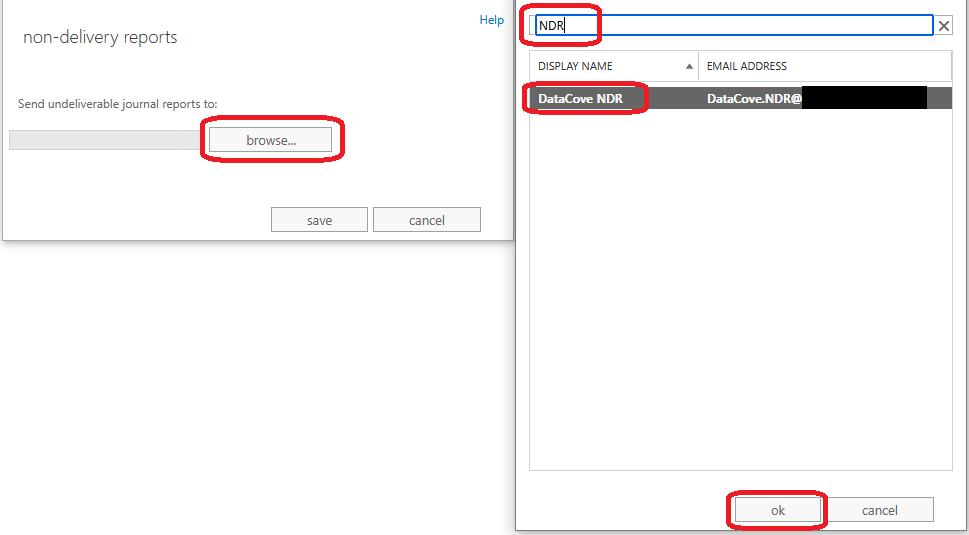
The original dialog box will now have the newly selected NDR mailbox email address in it.
Verify that the address is the proper mailbox and then click Save.

Once complete, the Journal Rules page should now specify the NDR mailbox as being the destination of any undeliverable journal reports.
The binding of the NDR mailbox is now complete and the Global Journaling rule can now be bound.

Binding the Journaling mailbox to a Global Journaling Rule:
On the same Journal Rules page as where the NDR mailbox was bound, click the Plus (+) Sign to add a new Journal Rule.

A dialog box will appear with several critical fields for information.
Begin by typing in the Journaling mailbox’s email address. It is absolutely critical to type the address in perfectly, as even one incorrect character will result in journaled emails going elsewhere or failing to deliver and winding up in the just-created NDR mailbox.
Next, give the Journal Rule a descriptive name that makes it immediately identifiable as to its purpose. The general recommendation is “DataCove Email Archiving.”
The next two fields offer the granularity options of Premium Journaling. For the purposes of compliant email archiving, both should be set to Apply to All Messages.
Note: Using anything less than All Messages, such as specific distribution groups, subsets of users or trying to avoid any service accounts from being archived can risk being penalized for non-compliance and/or incomplete archiving in a legal proceeding and is a very risky undertaking with extremely minimal benefits. Most data that is normally deemed non-relevant (such as backup status notifications from internal servers), while not intrinsically valuable from an archiving standpoint, can be important to possess from an eDiscovery standpoint as purposefully avoiding archival of any data can raise questions about how complete the rest of the archives may be, if there are any audit trails on who was in which archived containers or groups and at what times and other questions about potential invalidity of data. For the very small amount of space that such notifications take up on DataCove, the penalties of being discovered as trying to avoid archiving some data make it decidedly futile to pursue outside of extraordinary circumstances.
Once the Journal Rule fields are configured, click Save.

A warning popup may appear asking if this rule should be applied to all future messages.
Selecting “Yes” here will activate the Journal Rule immediately.
Selecting “No” will create the rule, but leave it inactive. It will need to be manually activated later if so.
In most scenarios, the intent is to activate Journaling immediately. Select Yes.

The Global Journaling Rule is now saved and live. Journaled emails will start arriving in the specified Journaling mailbox within the next five to fifteen minutes.
This concludes the Global Journaling Rule setup. It is safe to move ahead to the Initiating IMAP4 Services section from here and skip the Database Journaling section.
Note: In the event of a need to deactivate this Journal Rule without deleting it, uncheck the box under the On column. There are generally very few circumstances when this should ever be disabled; it is best to contact DataCove Support to discuss why it may need to be paused before taking any action that may stop this rule, since it can risk compliance gaps even being off for a minute or two.

Activating Database Journaling
The process of binding the newly created Journaling mailbox to each Database is a fairly straightforward process involving only a couple of fields to be filled out.
Note: There is some additional flexibility in that Database Journaling allows each database to have its own independent Journaling mailbox assigned, rather than just one mailbox for all of the databases the way Global Journaling normally does. This is only occasionally used by high volume email organizations (defined as having upwards of 100,000 emails journaled per day) where having all mail funneling into one account can prove strenuous to it. If there is a desire to have multiple independent journaling accounts on a per-database basis, create additional Journaling mailboxes from the previous step and bind them uniquely to each database.
Begin by logging into the Exchange Admin Center via a web browser and select Servers on the left hand side navigation menu. Select Databases at the top context menu, then select the database to be journaled. Click on the Gray Pencil icon near the top of the page to Edit it.

A dialog box will now appear with the Properties of the selected Database.
Select Maintenance from the left hand side navigation menu, then locate the Journal Recipient field near the top of the screen.
Click Browse to open a search and selection dialog box to find the desired mailbox to journal to.

Use the Search bar at the top of the dialog box to drill down by the name of the newly created Journaling mailbox.
Once located, select the Journaling mailbox and then click OK.

The search and selection dialog box will now close and return to the Maintenance tab of the Database Properties page.
Verify that the declared Journal Recipient is the intended Journaling mailbox, then click Save.

After Saving, the Database Journaling service will go live and within approximately approximately five to fifteen minutes, the Journaling mailbox should begin receiving emails.
If there are multiple databases containing user or service accounts, repeat this process for those databases and have them all point towards the Journaling mailbox.
Validating Successful Receipt of Journaled Emails
A small, but important, step of configuring Journaling is to validate that traffic is coming into the Journaling account successfully. This is as simple as logging into the newly created Journaling mailbox via Outlook Web Access to ensure that emails are arriving from and to users who do not have the Journaling mailbox’s address in either the To, CC or BCC fields. For a brand spanking new account that isn’t on any address lists, this is effectively guaranteed to be the case for any emails arriving into it.
Using an Incognito/InPrivate tab or other non-cookie saving mode of a web browser (or other web browser entirely), navigate to your Exchange Server’s Outlook Web Access portal, normally found at the “HTTPS://IP.Address.Goes.Here/OWA” URL. Using the Hostname of the server is also common, with an “HTTPS://ExchangeServerName.DomainName.Com/OWA” also being perfectly fine to reach it.
Log in with the Journaling mailbox’s credentials.
Once inside the account, review two or three of the emails that have arrived by now and ensure that the Journaling account’s email address is not on the To, CC or BCC fields of any emails received. If emails are present and they are user-to-user emails that do not directly intend to communicate with the journaling account, the Journal Rule is now live and functioning properly.
If there are no emails in the account, wait ten minutes and then recheck the mailbox. Some very busy Exchange Servers can take some time to “insert” the Journaling Rule into their transport layers and it could take a little longer for journaled emails to begin arriving.
If no emails are present in the Journaling mailbox after fifteen minutes, verify that the Journal Rules are active and pointed to the email address that is being logged into, with careful attention being paid to the spelling of the email address and domain associated with it.
If all of the parameters are correct and journaled emails are still not arriving, contact DataCove Support for assistance.
Initiating Exchange IMAP Services
With Journaling now live, Exchange must be tuned to allow communications from DataCove to the server to allow for “fetching” of those messages over to the DataCove. DataCove’s fetching process entails logging into the Journaling mailbox(es) via the Internet Message Access Protocol Version 4 (abbreviated as IMAP4), downloading the messages to itself and finally deleting the messages either immediately or after they have been saved to a backup location external to the DataCove’s datavault itself (more on that later).
The IMAP4 services are not enabled by default on Exchange and must be manually activated on the Exchange Server(s) that DataCove will be fetching from.
Note: For larger organizations, Exchange servers may be broken out into dedicated front-end and back-end servers, known as Client Access Services (CAS) servers and Mailbox Transport Services (MTS, usually known as Mailbox) servers. CAS Servers are most often used for managing the various connections from email clients and Outlook Web Access and will broker connections between end users and their mailboxes, which are stored on the Mailbox Servers. While CAS servers can handle the role of brokering IMAP and POP connections to the Mailbox servers, they are often suboptimal for this task due to the sheer volume of data that a Journaling mailbox receives (i.e. a copy of all email at the organization, rather than a single user’s sent and received email). They can wind up being a constraint or having intermittent connectivity issues, sometimes manifesting as an inability to connect or respond, for this reason. For the purposes of configuring and making the IMAP connection described in this article, it is best to enable the service directly upon the Mailbox Server(s) and point DataCove at them for the extraction of the Journaled emails.
To do so, either directly log into or remote into the Exchange servers themselves, as activation of these services is not available from the Exchange Admin Center.
Once logged in, select Start or use the Windows Search to look for “Services.MSC” and select Services when the icon appears. This is the same Services that many Windows components and third party programs use to launch their subservices when Windows starts or when triggered.

Once the Services window spawns, scroll down until the Microsoft Exchange IMAP4 services are found. There will be two services listed: the IMAP4 Service itself (known as the front-end service) and the IMAP4 Backend Service. In their default out-of-the-box state, both services will be inactive and left in a Manual activation status.
Both services must not only be activated for the IMAP4 protocol to function successfully right now, but also set to Automatic Start so that any future reboots of the Exchange Server will have this service restart and ready for communications afterwards.

To configure the IMAP4 Frontend Service, right click on it and select Properties.

From the Startup Type dropdown menu, select Automatic, then click OK to save the setting.

Conduct the same step on the IMAP4 Backend Service.
From the Startup Type dropdown menu, select Automatic, then click OK to save the setting.

Once both IMAP4 Services are set to Automatic, it’s time to start them.
Right click on the IMAP4 Backend Service first, then click Start.

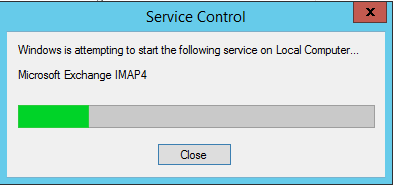
A small dialog box will appear with the progress of the service startup.

Once the process finishes and the dialog box closes automatically, conduct the same Service Start step on the IMAP4 Frontend Service.
Another dialog box will appear with the progress of this service initiating. The Frontend Service usually takes a few seconds longer than the Backend Service; this is expected behavior.

Once both services are started, they will list themselves as having a Running status under the Services list.
With the IMAP4 services now started, Exchange is prepared for communication and has messages ready to be fetched.
The next steps of Configuring a Fetcher will take place on the DataCove itself.
Note: While it is unlikely to be needed in most situations, it is recommended to keep the logged-in session to the Exchange server and the Exchange Admin Center access live in case of a need of troubleshooting (covered further below).

Creating the DataCove Fetcher
With the Exchange side of the house now prepared, DataCove’s Fetcher can be configured to pull messages from the Journaling account. Before creating the Fetcher, a brief definition on what it is and how it works is below.
A “Fetcher” is the name of DataCove’s mail client-like process that behaves similarly to any email client software, such as Microsoft Outlook or Mozilla Thunderbird, to log into a mailbox hosted on the Exchange server to read and delete messages. These Fetchers support a couple of fairly universal email protocols just like Outlook would, such as POP3 and IMAP4 (as well as their Transport Layer Security (TLS) secured variants, SPOP3 and SIMAP4) allowing them to connect to not only Microsoft Exchange, but nearly any mail server type in existence.
Fetchers work in a relatively simple manner:
The Fetcher logs into the mailbox they are pointed to using the credentials supplied to them upon creation.
The Fetcher will then begin enumerating the total quantity of messages contained within the Journaling mailbox. This process is extremely rapid for mailboxes under 100,000 items (a few seconds), but can take several minutes for mailboxes that may be larger than that.
After enumeration finishes, the Fetcher will begin reading the messages contained within the mailbox, oldest to newest, while downloading a copy of that message to DataCove.
Depending on the Deletion setting configured when creating the Fetcher, it will then either delete the messages as soon as it finishes downloading them from the Journaling mailbox, or it will wait until the DataCove commits a backup containing those same emails before deleting them from the Journaling mailbox.
The options available when creating the Fetcher will be discussed in-depth below, along with recommendations that are prudent for most environments.
To begin creating a Fetcher, log into the DataCove web interface and select Configuration in the top header menu. Select POP or IMAP Fetchers on the left hand side menu.
On the right hand side of the screen is a blank white field and the Add Fetcher button.
Populate a name for the Fetcher in the blank field (something that designates which Journaling mailbox it is for and which mail server that account is hosted on is prudent, especially if there will be multiple Fetchers for multiple Journaling mailboxes), then click Add Fetcher.

The Add Fetcher button will spawn a new screen that allows for specification of the parameters the Fetcher will use. As some of these fields can be complex in their implications, they’ll be approached line by line below.
Configuration Name is the name that was created in the previous step as a name for the Fetcher. It has no technical purpose and is only meant to be referential to a system administrator in knowing where this Fetcher goes at a glance. Having it named after a Journaling mailbox and email server name (especially if there are multiple servers in a cluster) is a solid place to start. The Configuration Name cannot be changed after the Fetcher is created; if this is preferred to be changed now, press the browser’s Back button and repeat the previous step of naming the Fetcher and then adding the new Fetcher.
Server Address should be set for the Fully Qualified Domain Name (FQDN) of the email server or the IP address of it. In general, it is recommended to use the mail server’s IP address to remove Domain Name Service (DNS) Server changes in the future from impacting DataCove’s ability to reach and fetch from the email server. It is unfortunately common that DNS updates to some non-Line-Of-Business (LOB) servers, including DataCove, are often forgotten when new DNS Servers are deployed and it can mean Journaling mailboxes do not get fetched from until the mail server begins complaining about a lack of capacity or someone goes looking for newer emails that are not being found on the DataCove. Using an IP address eliminates this problem entirely.
Server Description is another non-technical field that allows for a description of the Email Server Type, Version, Update Level, Physical Location and other such administrative details to be specified for quick reference. This is especially valuable at organizations with multiple email servers (such as a Data Availability Group [DAG] in Exchange), warm sites with redundant email servers and mixed environments email servers of different generations or update levels.
Username is used to identify the Journaling mailbox and is generally going to be the User Principal Name (UPN), also known as the fully qualified email address of the account. “Username@DomainName.Com” is the best choice for this reason. Some mail servers will also tolerate just the Username without the email address portion.
Password is the password for the Journaling mailbox. MultiFactor Authentication (MFA) should not be enabled for this mailbox, but a highly complex or other application specific password can be used to grant the mailbox higher-than-average security.
Activate Email Server is a little deceptively named, in that it is not activating any email server per se, but activating the Fetcher itself to begin speaking to the Email Server configured in the previous fields. For the time being, do not check this box, as testing the Fetcher before formally activating it will be the next step. Activating the Fetcher now without testing it beforehand risks certain undesirable situations: as an example, if the password was entered incorrectly by accident in the previous field, the Fetcher will repeatedly try to log into the Journaling mailbox with that password multiple times within approximately twenty seconds. For organizations who automatically lock accounts after multiple retries with an incorrect password, this can complicate the Fetcher configuration process and add troubleshooting to the mix of an otherwise straightforward operation.
Server Protocol specifies which mail transfer protocol will be used to communicate with Exchange. Multiple options exist here, such as Standard IMAP4, Standard POP3, Secure POP3 and Secure IMAP4, all of which have different use cases and opportunities for use in different environments; some of these will be discussed in the Troubleshooting sections below. For the purposes of an Exchange 2013+ email server with a brand new Journaling mailbox, this should almost always be set to SIMAP4, as this is the default configuration that modern Exchange will use out of the box.
Port Number is automatically set by the selected Server Protocol, but can be changed to a custom port number if one is in use by the email server. The default port assignments are as follows: POP3 uses TCP 110, SPOP3 uses TCP 995, IMAP4 uses TCP 143 and SIMAP4 uses TCP 993.
Mailbox Name is another deceptively named field, in that this is meant to describe the “folder” inside of what we consider the mailbox itself. Those folders, such as Inbox, Deleted Items, Junk Email, etc are considered “mailboxes” in and of themselves as far as email semantics go, even if the average user or administrator would never consider them as such, and are a relic of the early days of email. Unless building very specific Fetchers to go after individual folders or when used for specialty troubleshooting purposes, this should always be left at the default “Inbox.”
Email Deletion determines when DataCove is instructing the Journaling mailbox to delete messages that have been downloaded to DataCove already. “Delete Emails Once Backed-Up” is a more secure setting in the sense that it requires the journaled emails to exist in two places at any given time, i.e. on the mail server and on DataCove during and after fetching, and then on DataCove and its backup location after the backup is complete and the emails have been deleted from the mail server. This affords excellent redundancy in case of a catastrophic failure of either location, since the other will possess the emails and be able to restore them if needed. “Delete Emails Immediately” simply deletes the emails from the mail server as soon as download to the DataCove is complete and not necessarily before DataCove’s backup sequence has run. While this does carry some minor risk of data loss in the event of a disaster, the more realistic situation is the backup location becoming full or inaccessible (say, network issue or backup location downtime), which prevents DataCove from backing up for an extended period of time. If this is not caught and remediated quickly, journaled emails will build up inside of the journaling account until they start impacting mail server performance or stability. For this reason, and the extremely low likelihood of a problem with the DataCove system, it is recommended to use “Delete Emails Immediately.”
Fetch Timeout sets how long DataCove should wait for a response from the mail server when it is polled for messages to fetch. Nominally, the ten minute time allotted by default is sufficient and it can be left at that default number. However, to pre-resolve any slow responses from a busy mail server or when troubleshooting a large Journaling mailbox down the line (say, a password got changed or it was otherwise unable to be accessed for a long period of time and has hundreds of thousands or millions of emails in it), setting a very high timeout value can take care of these issues in advance of needing any more complex attention automatically. Setting this timeout for “1440” is the recommended policy to gain this subtle automation.
Once all of the Fetcher parameters have been set as desired, click on Save to retain the settings. This will refresh the page back to the original POP or IMAP Fetchers page.

With the Fetcher now configured, locate the Fetcher under the Inactive Fetchers section of the POP or IMAP Fetchers page. Towards the right hand side of the Fetcher, several different functions are available:
Activate will enable the Fetcher and will begin attempting to log into the Journaling mailbox right away.
Test navigates over to a subpage of the Fetcher which allows for a battery of different connectivity tests to be run against the Journaling mailbox to ensure successful communication and is invaluable for troubleshooting.
Edit allows for changes to be made to the Fetcher configuration. This can be used for fixing errors made in the previous step or while troubleshooting for a failed Test sequence.
Delete will delete the Fetcher configuration from the system. Note that Inactive Fetchers, like the one just made, pose no impact to the system or any other resource, and it is safe to leave unused Fetchers in the Inactive state rather than deleting them if they have potential history that can be useful for future reference.
For the next step, select the green circled checkmark to reach the Test subpage.

Testing the DataCove Fetcher
This Test subpage will launch a battery of different tests to validate proper communication with the email server.
Connection is a simple network Ping test, verifying that the DataCove can reach the email server specified by FQDN or IP address. While it will also reference the Port number being used to connect in this section, that is actually being validated as part of the next test. Failure at this level mean the DataCove cannot resolve the FQDN of the mail server (suggesting a DNS issue, such as outdated or incorrect DNS entries on the DataCove’s network configuration or that those servers are not responding to DNS requests) or cannot reach the IP address, perhaps due to being on a disjointed network from the mail server or needing a Level 3 Network Switch-level authorization to send or receive packets from it.
Correct Protocol is affirming that the email server is responding over the Protocol and Port specified in the Fetcher configuration. Errors detected here suggest that the SIMAP4 service may not be running on the mail server, the port may be getting blocked by a firewall on the mail server or other Access Control List at the Network Switch level or that an incorrect Authentication mode may be configured for the SIMAP4 service.
Log In is ensuring that the Fetcher can log into the mailbox itself. Failing this test can mean an incorrect username or password, a locked account, an account that has another user logged into it currently (only an issue for POP3 and SPOP3 connections), SSL handshake problems (with SIMAP4 and SPOP3 connections) and can sometimes also be rendered from the response delay from the mail server on extremely large mailboxes, with upwards of several hundred thousand messages waiting within.
Select Mailbox verifies that the specific folder that the Fetcher was instructed to reach is present. While nearly all fetchers will pursue the “Inbox” folder, errors or mailbox corruption that affect the Inbox folder can cause this test to fail. For Fetchers that are pursuing other specified folders, errors in the spelling of the folder name is the next most common culprit.
Messages in Mailbox is an identification of how many messages currently reside in the Journaling mailbox that need to be fetched. This is normally going to be some low amount of a few dozen to a few hundred emails at any given time, as the IMAP4 protocol runs its commands for listing, reading and deleting messages in batches, rather than individually the way POP3 does. For a low volume organization or when Journaled email is not being delivered to the account, this can show up with a warning notice that no emails were found in the account. For Journaling mailboxes that may not have been able to be logged into or fetched from for some time, this can also take time to render or report a failure if the query command times out. This latter issue of timeouts on large mailboxes does not necessarily mean they are critical failures and repeated retries will eventually yield results.
Select the Run Tests button to begin.

Within a few moments, the test battery will launch and test connectivity to the mailbox and run a count of the mail contained inside.
Click on the “Show All Details” link in the upper left corner to expand out the fields with full information.

If all was set up properly in the previous steps, and barring any outside factors like networking blockades or additional services being needed outside of the norm, the expected behavior is for all five fields to reflect in green success text. Any warnings or errors should have the Fetcher configuration information reviewed for accuracy and then a rerun of the test sequence until all fields return in green.
If the test has successfully completed, proceed to the next step of formally Activating the Fetcher and the verification of new emails being received on the DataCove.
If the test has failed and the Fetcher Configuration details are believed accurate, please proceed with the Fetcher Troubleshooting sections further below, selecting the appropriate troubleshooting duide based on which level the test failed at.
Activating the DataCove Fetcher
With the Fetcher now verified as able to connect, click on the browser’s Back button or select “POP or IMAP Fetchers” from the left hand side menu to return to the main Fetcher configuration screen.
Locate the newly created fetcher under the Inactive Fetchers section and click on the green, upward facing Activate arrow.

This will launch the Fetcher into the Active Fetchers section, instructing it to begin talking to the mail server regularly and pulling emails into the DataCove.
Click on the blue magnifying glass icon to jump to the Fetcher’s current Status.

The Fetcher’s Status can also be found by clicking on Status in the top header bar, selecting System Status on the left hand side menu, locating the “MailRetrievalService” (the internal name for a Fetcher) and clicking on the blue magnifying glass to observe its Details.
Note that the Fetcher will almost always be under the Active Jobs section, but in the brief moment when it takes a moment to “refresh” itself every few minutes with the mail server, it may appear under the Inactive Jobs section of the System Status page and can be found there.

The Fetcher’s Status screen provides a wealth of information about the Fetcher’s current activity and progress.
The most important fields here are:
Fetched This Hour reports on how many messages have been fetched within the current hour. This indicates how fast the DataCove and mail server communicating and generally should match up with how many messages are coming into the account within the same period of time.
Mailbox State shows the current messages inside the mailbox and any Download Failures. Messages inside the mailbox should never exceed more than a few thousand unless the “Delete after Backed-Up” setting was used with the Fetcher configuration, and if so, should never exceed more than 40,000 messages. Anything higher suggests a problem with deleting messages from the Journaling mailbox after fetching them or a backup problem. Download Failures are malformed, damaged, corrupt emails or emails that are not compliant with RFC822 that cannot be read properly by the Fetcher. Such messages are almost always very few and far between since mail servers are designed to recover and/or reject these already, but if any appear, they’ll be incremented on this counter and will reside in the Journaling mailbox indefinitely without any harm.
Activity displays what the Fetcher is doing currently. It could be resetting itself to clear off old counts, making an initial connection or, most commonly, it will be logged in and polling the Journaling mailbox for new messages to come in, downloading them and then deleting them. Any inability to connect or errors will be listed in this field and in the large white box below which contains additional connectivity details.
Fetched Today lists the total amount of messages pulled in by the Fetcher over the course of the entire day. This is largely informational and provides a rapid overview of the Fetcher’s daily workload.
In general, the Fetcher should always looks to have a similar status to what is pictured below, albeit with higher than zero numbers in the Fetched This Hour and Fetched Today fields, with it being logged into the Journaling mailbox and fetching away happily. With the successful receipt of emails now confirmed, successful setup of Journaling on Exchange and the extraction of those messages into DataCove is complete.

Troubleshooting the Fetcher at Test Level 1: Inability to Reach Mail Server
If the Fetcher fails its test at the Connection level, this indicates an inability to reach the mail server outright. Failing to reach the mail server tends to boil down to a few fairly simple issues, but they can take some time to verify the various possibilities. Below are the most commonly observed issues and some troubleshooting steps that can be taken to resolve them.
Simply put: can the DataCove reach the specified mail server over the network? A Ping test can help identify this, but the command must be run from the DataCove since it is the DataCove that is trying to communicate with the mail server.
Testing of DataCove’s ability to communicate with the mail server is best conducted via the DataCove console menu, accessed using an SSH-capable tool like Putty or SecureCRT. Guidance on downloading the Putty SSH-tool can be found in the first section of the Changing Network Settings knowledge base article, found here.
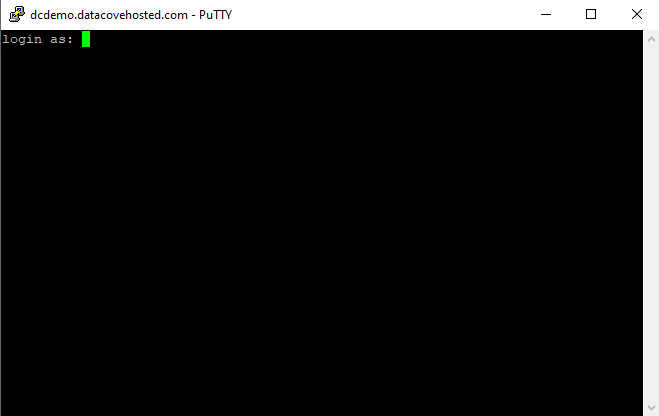
Launch the Putty application. When Putty launches, a window will appear asking for a few parameters to be assigned.
Type in the DataCove’s Fully Qualified Domain Name (FQDN) or IP address and assign the connection type to SSH.
The Port used will automatically change to 22.
Select Open when ready.

Once the communication handshake has completed, the DataCove will respond with a login screen similar to the below image.
The default login for the console system configuration menu is as follows, but if this password has been changed, be sure to use the new password:
Username: cliadmin
Password: ChangeMe
Once authenticated, the system will present its configuration and diagnostic menu, as displayed below.

Type “3” for the Network Diagnostics menu, then hit Enter.

Type “P” for the Ping command, then hit Enter.
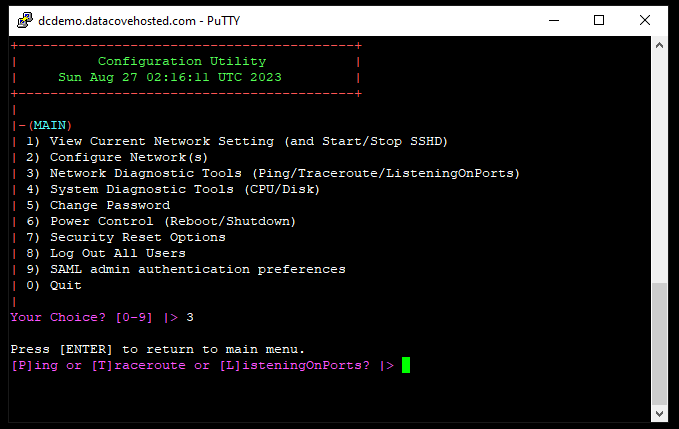
Type in the IP address or Fully Qualified Domain Name of the mail server, then hit Enter.
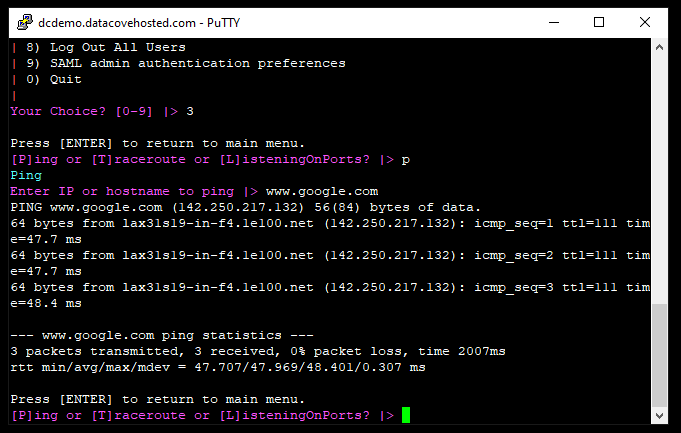
The results that are returned, if the Internet Control Message Protocol (ICMP) is enabled on the network, should show a successful response from the remote server. A successful response means that communication to the server at the most basic level is solvent, but does leave open the possibilities that a local firewall, Managed Switch or other filtering systems may be blocking access over the protocol being used to connect for the fetching itself (POP3 or IMAP4).
Note: It is highly recommended to test both the FQDN and IP address of the selected mail server and conduct independent Ping tests against both. If a failure occurs at the FQDN level but the IP address ping works fine, this indicates a DNS issue on the DataCove that can be fixed in the next step.
As the possibility of specific protocol blockades of this nature are less likely, it is recommended to pursue the other troubleshooting options described below before checking through firewall settings or switch policies.
Note: If ICMP is blocked on the network or not enabled on the remote server, often a reality in high security networks, this test cannot be used.
If the Mail Server’s hostname, as opposed to an IP address, was used for the Server Address under the Fetcher Configuration, are DataCove’s configured Domain Name Servers (DNS) accurate to receive resolution?
DataCove’s current DNS settings can be found by clicking on Status in the top header bar, then selecting Dashboard on the left hand side menu. Scroll down on the page until Network Information is located and verify that the Name Server fields are populated with the correct Name Servers for that network and are up to date.
Many organizations change Domain Name Servers over time and DataCove is an oft forgotten system to receive an update to the latest Name Servers, which can impact services that have hostnames specified to reach them.

Validating whether a DNS issue is the cause is pretty straightforward.
Select Configuration from the top header bar, then select POP or IMAP Fetchers on the left hand side menu.
Locate the Fetcher being used to reach the mail server and select the yellow pencil icon to Edit.

On the Fetcher Configuration, change the Server Address from the Fully Qualified Domain Name (FQDN) that was used into the mail server’s IP address.
Save the changes, then run the Fetcher’s Test battery to see if the the Fetcher can now connect to the mail server.

If this IP address replacement of the FQDN is successful in getting the Fetcher to connect, it could mean that the DataCove’s Name Server bindings are out of date or not responding.
If this is the case, updating the DNS settings of the DataCove can be accomplished from the console menu. To do so, follow the instructions in the Changing Network Settings knowledge base article, found here.
Once the DNS settings are changed, the Fetcher can be edited again and the Server Address field changed back to the FQDN of the mail server and subsequently retested to ensure that the Fetcher can connect under that hostname, or it can be left as the IP address going forward.
Troubleshooting the Fetcher at Test Level 2: Cannot Reach POP or IMAP Port
If the Fetcher fails its test at the Port level, this indicates an inability to communicate properly over the assigned port and protocol. Failing to connect to the appropriate port can occur for a fairly wide variety of issues, including very complex ones. Below are the most commonly observed issues and some troubleshooting steps that can be taken to resolve them. If none of these steps resolve the issue or are a functional workaround, contact DataCove Support for advanced troubleshooting.
Occasionally, the IMAP services on Exchange can encounter issues or misbehaviors which do not allow for regular login and download of messages. While these tend to manifest as more complex Login issues, found under Test Level 3, they can also show up here.
These can be rapidly resolved by logging into the Exchange Server that DataCove’s Fetcher is connecting to, opening the Services control panel and restarting both the Microsoft Exchange IMAP4 Frontend and Microsoft Exchange IMAP4 Backend services, in the exact same fashion as to how they were originally enabled earlier in this guide. Observing extra long stoppage and startup sequences of these processes, beyond the normal three to five second times for each, can indicate stalled out connections that are now being terminated and cleared for reuse.
Note: Very long or failed stop or start processes can indicate greater issues on the Exchange Server, up to and including a need for new updates to be installed, a full reboot of the server and potentially corruption of critical files, necessitating repairs or a change to a different fetching protocol.
After the service restarts have completed, retry the Fetcher tests to see if connectivity has been restored.
There is a relatively unknown subservice for the IMAP4 (and POP3) protocol that proxies IMAP4 based connections between Exchange’s Client Access Service (CAS) and Mailbox Transport Service (MTS) known as the IMAPProxy. On occasion, the IMAPProxy will go into an Inactive state, which will kill IMAP connections and prevent new ones. This particular problem is extremely prevalent on Exchange 2013 and dramatically less so on Exchange 2016 and later versions.
To identify if this condition is affecting an Exchange Server, special health check and health reset commands must be sent from the Exchange Management Shell (also known as Exchange PowerShell). Note that this must be the Exchange Management Shell (EMS), not Windows PowerShell. Traditionally, EMS is only found on the Exchange Server itself and it is best launched from there.
To do so, log into or remote into the Exchange Server that DataCove’s Fetcher connects to.
Search for Exchange Management Shell from the Start Menu and launch the application.

A PowerShell-like window will launch and take a moment to load its specific database of Exchange-specific commands. Note the “Welcome” message at the top of the window specifying that it the Exchange Management Shell.
After the Shell connects itself automatically to the Exchange Server it was launched from, it will wait at a PowerShell command prompt for input.

Run the below command to ask the Exchange Component Health Monitor about the status of all of the services it oversees, replacing “MailServerNameHere” with the Hostname of the Exchange Server that DataCove fetches from, then click Enter to execute the command.
Get-ServerComponentState -Identity MailServerNameHere

Exchange’s Component Health monitor will spawn a list of components and their current status.
The intent is to find out of the IMAPProxy (or if POP3 is being used, the POPProxy service) service is Inactive or Active. Review the list of Components and States to find them.
If the component reports back with an Active status, the IMAPProxy is fine and this troubleshooting step can be skipped. The EMS window can be closed without any impact.
If the component reports back with an Inactive status, proceed with the next command.

If the IMAPProxy service is determined to be Inactive, run the below command to instruct the Component Health Monitor to restart that subservice. As before, replace “MailServerNameHere” with the hostname of the Exchange Server.
Set-ServerComponentState -Identity MailServerNameHere -State Active -Requester HealthAPI -Component IMAPProxy

There should be a small delay as the command is processed, after which EMS will drop the window back to another command prompt without any further feedback on the change.
In order to identify if the service launched properly, rerun the original Get-ComponentState command again.
Get-ServerComponentState -Identity MailServerNameHere

If the IMAPProxy service now lists itself as Active, retry the Fetcher tests again to see if they pass successfully now. No restart of the IMAP4 Front-end and Back-end services should be necessary after this command is run; the subservice is entirely separate and unaffected by the primary services.
If the IMAPProxy service is still Inactive, there is likely a greater underlying problem with the Exchange Server that will necessitate deeper troubleshooting outside the scope of DataCove Support.
A somewhat uncommon error to encounter is losing TLS security when replacing SSL Certificates on the Exchange Server over the years, leaving TLS-enforced connections unable to complete. In DataCove’s fetching context, this issue specifically affects connections made over Secure IMAP4 (SIMAP4) and Secure POP3 (SPOP3) since those are both reliant on a functional SSL Certificate being assigned to them in Exchange. Standard IMAP4 (IMAP4) and Standard POP3 (POP3) will connect and operate fine without an SSL Certificate, with the difference being the encryption used on the Secure variants of the protocols compared to the plaintext of the Standard versions. Exchange 2013 and newer will, by default, attempt to use the Secure versions of these protocols as a requirement, but this setting can be adjusted to use the Standard versions. The methodology and considerations for using those Standard versions is discussed in a Test Level 3 troubleshooting step.
Sometimes, when first deploying or renewing an SSL Certificate on the Exchange Server, some services may not get “thumbprinted” with the SSL Certificate that they will be used with. This is especially common in cases where the IMAP4 or POP3 services are not expected to be used and may have been ignored when installing the Certificate. In such scenarios, assigning (or “thumbprinting” as it is known) the existing SSL Certificate to these additional services can correct an inability to connect over SIMAP4 or SPOP3.
To check on the SSL Certificate’s assigned services, use an Incognito/InPrivate tab or other non-cookie saving mode of a web browser (or other web browser entirely) and navigate to your Exchange Server’s Admin Center web interface, normally found at the “HTTPS://IP.Address.Goes.Here/ECP” URL. Using the Hostname of the server is also common, with an “HTTPS://ExchangeServerName.DomainName.Com/ECP” also being perfectly fine to reach it.
Log into the Admin Center with administrative credentials.

Once inside, select Servers from the left hand side navigation menu, then select Certificates from the top context menu.
From the Select Server dropdown menu, select the Exchange Server that DataCove is connecting to.
Review the Exchange Server’s installed Certificates in the list pane below and locate the Certificate Authority-signed SSL Certificate (normally one named Microsoft Exchange or with some other “randomly generated” name; not the Server Auth or WMSVC certificates).
Click on the Certificate to display information about it on the right hand Details pane.
The intent is to identify which services that SSL Certificate is thumbprinted upon from the “Assigned to Services” field. Almost all Certificates will have “IIS” and “SMTP” defined, as those are core services in Exchange, but optional services like POP and IMAP may not have been selected. If IMAP or POP are missing from the Assigned Services list, click on the Gray Pencil icon below the Select Server dropdown menu for the appropriate Certificate to open its Properties dialog box.

On the SSL Certificate’s dialog box, select Services on the left hand side menu.
This will display a list of services that the SSL Certificate can be used with.
Check the box for IMAP (and if desired, POP), then click Save at the bottom of the screen.
This will thumbprint the SSL Certificate onto those services and allow for TLS-secured connections over the IMAP4 protocol.

Next, with the thumbprinted services now configured, restart the IMAP4 Front-end and Back-end service on the Exchange Server that DataCove is connecting to from the Services control panel.
This is accomplished by logging into (or remoting into) the Exchange Server and launching the Services menu.

Once in the Services menu, locate the Microsoft Exchange IMAP4 Front-end and Microsoft Exchange IMAP4 Back-end services.

Right click on the Back-end service and select Restart from the context menu.

The Back-end service will be halted and then restarted within short order.

Once the Back-end service finishes its restart, perform the same Restart procedure on the Front-end service.
Once both services have completed their restarts, test the DataCove’s Fetcher against the Exchange Server to see if this has resolved the issue.
Troubleshooting the Fetcher at Test Level 3: Login Issues
Failures at Test Level 3 indicate login issues, but not necessarily ones as simplistic as having an incorrect username or password.
“Easy” issues like a password reset, account unlock and MFA disablement (if enforced globally) against the Journaling account are normally all that are needed, along with a careful review that the username and password were typed in properly. These can be validated by attempting to log into the same Journaling mailbox using Outlook Web Access (OWA) to authenticate if the credentials are solvent or not, but there are occasions where an OWA login will succeed but a IMAP or POP login will fail.
When dealing with this kind of error, the more complex procedures of adjusting the security settings of the protocols used can assist with isolating where the problem may be.
The most complex issues with Login failures are often ones that are either related to how the TLS configuration of SIMAP4 is configured, or may point to a problem with the base IMAP4 process that SIMAP4 uses. In such scenarios, switching to Standard IMAP4 can help with verifying if the issue is a TLS issue of some sort (including the aforementioned SSL Certificate issue that can occur at Test Level 2) or may be a problem with the IMAP4 protocol itself, which usually implies a corruption issue on Exchange.
This section of the article will discuss switching to Standard IMAP4 for testing, but note that all steps mentioned throughout the entirety of this article can also be used with the POP3 (and its secure variant, SPOP3) protocol instead, including how it is initiated and troubleshot. In the event the Standard IMAP4 testing does not work, it is suggested to attempt to use POP3 as the next best alternative for testing and analysis.
Note: In the latter scenario, switching to using the POP3 or SPOP3 protocol can validate that DataCove can connect to Exchange (initiation of its services are the exact same as IMAP4’s, but for the POP3 Front-end and Back-end services) and determine if the problem is actually the IMAP4 service itself or not. For the purposes of this article, POP3 terminology will not be used, but it is interchangeable with the steps being used to change Secure IMAP4 to Standard IMAP4. Switching over to using the POP3 or SPOP3 protocol in this manner is fully supported by both Exchange and DataCove. Changing from the default of SPOP3 to POP3 is found under the same Server Properties menu (right above IMAP4) and all settings are adjusted in an interchangeable manner.
Note: Before proceeding with this process, care should be taken to verify that no other systems, users or services utilize the IMAP4 services on Exchange (if the services were enabled and running before implementing DataCove, there is a good chance that some other service uses it, such as Blackberry services). Changes being made as part of this process can be prevent the use or functionality of those other services and are not recommended. Switching to the POP3 method mentioned above is a safer alternative as no other known services use that protocol.
To begin, use an Incognito/InPrivate tab or other non-cookie saving mode of a web browser (or other web browser entirely) and navigate to your Exchange Server’s Admin Center web interface, normally found at the “HTTPS://IP.Address.Goes.Here/ECP” URL. Using the Hostname of the server is also common, with an “HTTPS://ExchangeServerName.DomainName.Com/ECP” also being perfectly fine to reach it.
Log in with administrative credentials.

Once inside, select Servers on the left hand side navigation menu, then click Servers in the top context menu.
Select the Exchange Server that DataCove is connecting to from the list of servers and click on the Gray Pencil icon to Edit the Server.

A dialog box will spawn with the Server’s properties.
Select IMAP4 on the left hand side menu and locate the Logon Method dropdown box.
The default setting for Exchange 2013 and newer is to use a Secure TLS Connection, which automatically uses SIMAP4 as it’s default protocol for all IMAP4-based connections.

Change the Logon Method to Basic Authentication (Plain text), then click Save at the bottom of the screen.
This will allow for Standard IMAP4 connections under TCP 143 to the Exchange server after the IMAP4 services are restarted on the Exchange Server Services.

Next, with the IMAP services now reconfigured, restart the IMAP4 Front-end and Back-end service on the Exchange Server that DataCove is connecting to from the Services control panel.
This is accomplished by logging into (or remoting into) the Exchange Server and launching the Services menu.

Right click on the Back-end service and select Restart from the context menu.

The Back-end service will be halted and then restarted within short order.

Once the Back-end service finishes its restart, perform the same Restart procedure on the Front-end service.

Once both services have completed their restarts, edit the DataCove Fetcher away from using the SIMAP4 protocol to instead use the Standard version of the IMAP4 protocol instead.
Making this change will automatically adjust the port used from TCP 993 to TCP 143, the port used by Standard IMAP4.
Save the changes.

With the Fetcher configuration now adjusted, test the DataCove’s Fetcher against the Exchange Server to see if it can connect successfully.
Note: When using POP3 or SPOP3 protocols, only a single logon to a mailbox is allowed at a time. If the DataCove Fetcher test fails, be sure to Disable the Fetcher so it is not running while testing is being performed, as the two separate processes (Running Fetcher against Testing Fetcher) will interfere with each other and can make it appear as if they are failing, when one is in fact succeeding.
If the Fetcher can connect, it is a viable solution to leave the DataCove and Exchange using Standard IMAP4 long term if the DataCove is on the same internal network as the Exchange server. Such a configuration relies on external security from the firewall, as well as internal physical security on the network, to prevent any risk of packet sniffing that could ascertain the credentials to the Journaling mailbox, as the TLS encryption that comes from using SIMAP4 would no longer be present. Using a Standard IMAP4 Fetcher on a DataCove that connects over the open Internet or any other insecure network is not recommended.
If the Fetcher can connect but leaving the Fetcher in Standard IMAP4 mode cannot be maintained as a permanent solution, there are additional complex Telnet tests that can be performed while Standard IMAP4 mode is enabled. Please contact DataCove Support for further information.
Troubleshooting the Fetcher at Test Level 4: Folder Legibility
A rare but unique issue can occur in a couple of scenarios: DataCove’s fetcher will report that the “Inbox” folder cannot be selected. Either the Inbox folder is missing outright or it has been renamed to all capital “INBOX” which is a technically different folder.
During Test Level 4, a list of folders that the Fetcher can see will be displayed. Scroll through this list to see if the inbox folder is labeled as “INBOX” or of it’s not present entirely.
If the folder does exist as “INBOX,” instead of the usual “inbox,” edit the DataCove fetcher to reflect that in the Mailbox Name field, then click Save.

Test the Fetcher again afterwards to see if this resolves the problem.
If it does not, or if the “inbox” folder does not detect under the folder list at all, this suggests a corrupt mailbox. Corrupted Journaling mailboxes are rare, but are likely to happen if a Journaling mailbox is migrated from one version of Exchange to another. The high priority rules that Exchange imparts on Journaling mailboxes puts them at very high risk when they are migrated and can cause such issues.
In such scenarios, the best procedure is to create a new Journaling mailbox and redirect both the Journaling Rule and DataCove fetcher towards that new Journaling mailbox.
The old Journaling mailbox should be exported from Exchange as a PST file and then uploaded to DataCove to archive any remaining emails within it. Guidance on uploading PST files can be found here.
Troubleshooting the Fetcher at Test Level 5: Obtaining a Quantity of Messages in Mailbox
Occasionally, a Fetcher will throw a failure or warning at Test Level 5, when enumerating the number of messages in the Journaling mailbox. This can happen for a single reason, but that reason could have multiple potential causes.
The cause for the error occurring at this level is invariably that there are a very large number of emails inside of the Journaling mailbox, which can trigger delays or timeouts on the Test process. These timeouts are not inherently problematic and are usually Exchange-server-side in how long the Server is taking to count up the messages and provide that number to the Fetcher. After a few minutes for mailboxes of a few hundred thousand messages, to a few hours for mailboxes in the millions, the Fetcher will be able to log in and pull messages as per normal, albeit at a dramatically slower pace.
IMAP4, as a communications and transfer protocol, excels at handling small to medium quantities of data in a speedy manner. When encountering large mailboxes however, it can slow down dramatically and becoming too slow to be effective, especially if new data is being added to an already oversized Journaling mailbox. Depending on the cause of the email build-up, different approaches are warranted to resolving the situation.
Potential causes:
Fetcher Deletion Policy was set to Delete Once Backed-Up, but Backups failed to run for an extended period of time. This would leave a large amount of messages in the Journaling mailbox, even though the DataCove already has received them.
Exchange Recoverable Items Folder (Exchange Dumpster) for the Journaling mailbox was not configured for a short enough retention duration, leading to large amounts of messages piling up being unable to be deleted by the Fetcher. These are often reported as Expunge errors by the mailbox.
Fetcher was not running for an extended period of time, possibly from a scheduling error, expired DataCove subscription or inability to authenticate DataCove subscription.
DataCove reached its maximum capacity and had no further room for fetching of new data.
Solutions:
Set the Fetcher Deletion Policy to “Delete Immediately” instead of “Delete Once Backed-Up”, if the cause was backup related.
Change the Journaling mailbox’s Deleted Items Recovery duration to 1 day, if the cause was an Expunge command related.
Switch the IMAP4 fetcher into a POP3 fetcher. POP3 excels at dealing with very large mailboxes due to its method of fetching being one message at a time, allowing it to slowly peck at the account until it reaches a more manageable size, after which it can be switched back to IMAP4.
Create a new Journaling mailbox, redirect the Journaling Rule towards it and create a second Fetcher on DataCove to fetch from the new Journaling mailbox while the original Fetcher slowly trims down the old Journaling mailbox. If the old mailbox is operating at too slow a pace for a Fetcher to make an impact, disable the old account’s Fetcher and export the contents of that mailbox to PST, with subsequent upload to DataCove. Guidance on uploading PST files can be found here.
For issues or resolutions not listed above, or if the above steps do not resolve the issue, please contact DataCove Support for additional troubleshooting options, as well as root cause resolution.